Singularity

| |
| Information | |
|---|---|
| Full name | Singularity |
| Event type | Story |
| Released on | CN, TW, KR, EN, JP |
| Available in campaign menu | CN (with Ranking), EN (with Ranking) |
| See Events Music | |
| View page template | |
Event stub
Event run time[edit]
| Title | Period (start/end) | Server | Type | Comment |
|---|---|---|---|---|
| 塌缩点 | 2018-02-08 03:00 - 2018-03-08 02:59 (UTC) |
CN | Story Event | |
| Singularity | 2018-03-30 06:00 - 2018-04-27 05:59 (UTC) |
KR | Story Event | |
| Singularity | 2019-11-19 18:00 - 2019-12-16 17:59 (UTC) |
EN | Story Event | |
| Singularity | 2020-01-17 04:00 - 2020-02-14 03:59 (UTC) |
JP | Story Event |
Ranking
| Title | Period (start/end) | Server | Type | Comment |
|---|---|---|---|---|
| 马蜂窝 | 2020-06-11 03:00 - 2020-06-18 02:59 (UTC) |
CN | Ranking | PLUS rerun |
| Hornet's Nest | 2022-09-27 08:00 - 2022-10-11 07:59 (UTC) |
EN | Ranking | PLUS rerun |
Overview[edit]
Event Maps
Note: A portion of this event walkthrough method and screenshots were written/taken by 菲卡 from NGA.cn, it was shamelessly stolen borrowed with permission from and with respect to the author. Translated by Girls' Frontline Wiki editor(s). Any form of duplication/reposting of this guide not allowed without the authors' permission.
Event Overview
Singularity is the latest event map released on the main land Chinese servers, both BiliBili and DigitalSky. Singularity describes a immediate follow up story after the event in chapter 10, Singularity also feature a the biggest amount of additional background lore, the most battle chapters and possibly a much harder difficulty when compared to Cube+, Arctic Warfare and Deep Dive.
Singularity event started on the 8th of February 2018, event will be open until 8th of March.
Story Route and Backtracking
Differs from previous events, Singularity's story is told by different story routes, though a different route only tells the same story from a different perspective, every chapter have the same ending.
A new event mechanic called "Backtracking" is introduced, upon reaching branching nodes players can choose which route to progress, upon completion of one route the story cannot progress any further, players must backtrack their way to the beginning, progress down the storyline again after backtracking. Chapter 1 have three total routes, chapter 2 have four total routes, chapter 3 is a linear chapter with only one route available.
Routes are named with alphabets, orderly arranged from left to right on the in game map interface, A, B, C and D, explaining the level notations:
- E1-2 would mean the second mission node on chapter 1, before entering any branched out routes.
- E1-A1 would mean the first mission node down route A of chapter 1.
- E2-D3 would mean the third mission node down route D of chapter 2.
Hidden levels
Every chapter has hidden levels, one can only unlock hidden levels after achieving certain criteria.
Loot boxes
Event reward loot boxes are available upon completion of any route of any chapter, however player have to backtrack to renew the loot box rewards eligibility. Players can only renew one chapter's eligibility per reset, if one spent their backtrack loot box eligibility renew on chapter 2, they cannot backtrack and gain loot boxes from chapter 3 in that same day.
Chapter 1 The Great Retreat
Initial stage
E1-1 Starting point
Clear reward: 500x of each resources
Notable drops: None
Victory Condition: Capture enemy HQ
Recommended Team Composition: Any 2x expansion squadron can pass with ease.
How to:
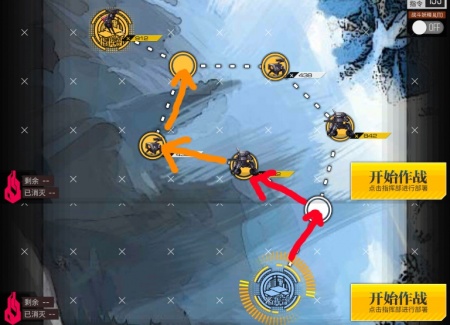
Something like this I guess.
E1-2 Branching node 1
After completion of this level players can select to continue with route A or B/C.
Clear reward: Enhancement capsule x20
Notable drops: Naw
Victory Condition: Rescue hostage x1
Recommended Team Composition: Any 2x expansion squadron can pass with ease.
How to:
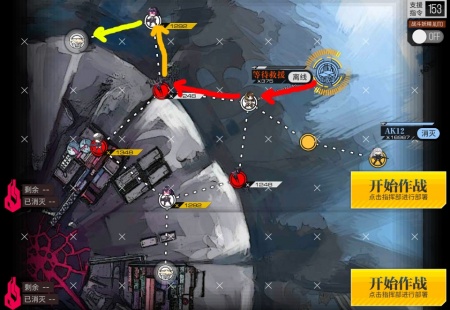
This ->
Route A "Stroke Dead-Center"
E1-A1
Clear reward: Batteries x100
Victory Condition: Capture enemy HQ
Recommended Team Composition: Teams around lv30 3x expansions shouldn't have any problems here... 5x expansion teams can even defeat the black bomber unit.
How to:
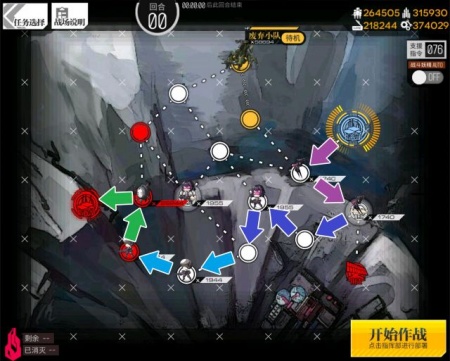
Upon capturing the air field and sequentially surround capturing the radar, the SOCOM unit up top will be converted to a friendly, which the player can make use of to remove the black bomb if they don't have/do not wish to deploy strong units. Note that the SOCOM unit does return to yellow status (aggressive towards both player and Ferri) at the end of every turn, maintain one node distance between the player unit(s) is advised.
This is one possible way of passing the level.
E1-A2
Clear reward: Exp book x50
Notable drops: HG ThunderThunderThunder, RF wz.29wz.29wz.29, HG P226P226P226
Victory Condition: Defeat all enemies.
Recommended Team Composition: Squadrons around lv50 will do.
How to:
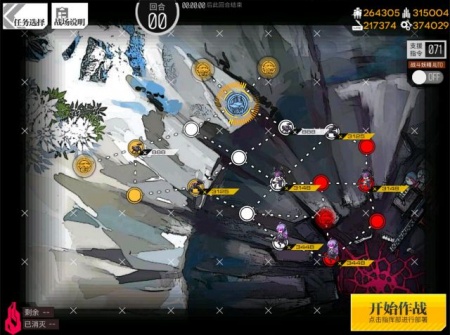
The map looks like this, standard day time elimination mission, no turn limits and nothing much of interest, get some fast firing units against the Dinergates. Players can use this map as a leveling level while farming for Thunder .50.
E1-A3
Clear reward: Memory fragments x100
Notable drops: RF JS05JS05JS05, SMG M12M12M12, AR T65T65T65
Victory Condition: Maintain supply line for two rounds.
Recommended Team Composition: Lv60 teams should handle it with ease, high level teams for fighting Jupiter cannons.
How to:
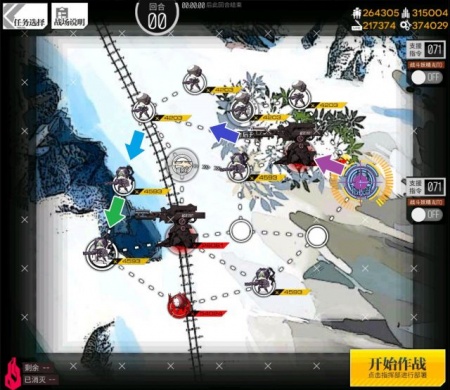
Those who know how to defeat Jupiter cannons can just go straight through them with one team, those who does not/can not, go around it.
E1-A4
Clear reward: Profile portrait "Reunion"
Notable drops: SG M1887M1887M1887, MG HK23HK23HK23, SMG TMPTMPTMP, RF WZ.29WZ.29WZ.29
Victory Condition: Capture enemy HQ
Recommended Team Composition: Lv70-90 RF squadron x1
How to:
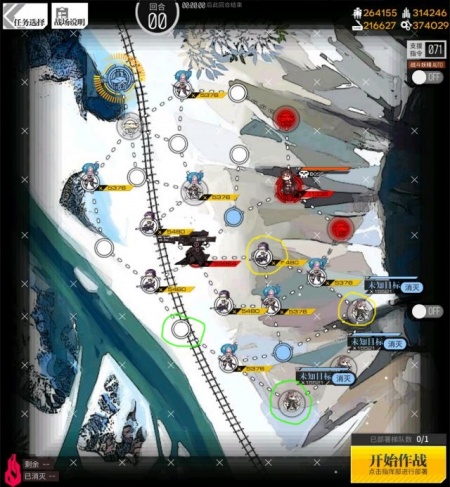
Command the friendly support squadrons to have the other sides of the Jupiter cannon captured, while player unit capture the top side of the cannon and defend the HQ. Air drop fairy can just deliver the squadron right on top of the boss and end the battle with one turn however.
Note, when the support squadrons highlighted by the yellow circle reached their marked locations, put on halt. When the green circled support squadron reached the green mark, put on halt for one turn to divert the third squadron into the correct path, then set on elimination to capture the southwest side of the cannon.
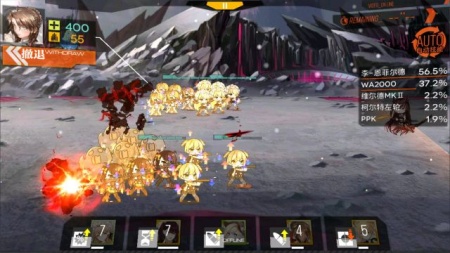
Boss battle looks like this, standing in this formation should avoid all AOE damage.
- Notes on boss fight:
- Executioner will unleash a T shaped attack pattern after reaching certain HP level, the attack will damage the middle row and the rear column, adjust to avoid damage.
- Executioner will also unleash a penetrating attack on the top and bottom row, deals minor damage.
Route B "Compression Processing"
E1-B1
Clear reward: Battery x100
Victory Condition: Maintain supply line for three turns
Recommended Team Composition: Team composition around 4000 - 5000 operation effectiveness is sufficient.
Step by step guide:
This level may appear to be difficult to beat at first, but it have a slight trick to it, capturing the radar station (having squadron on top of it) will convert the SOCOM unit into an ally.
Turn 1: Deploy squadron, switch place with M4A1, move one node down, one node right, capture radar station.
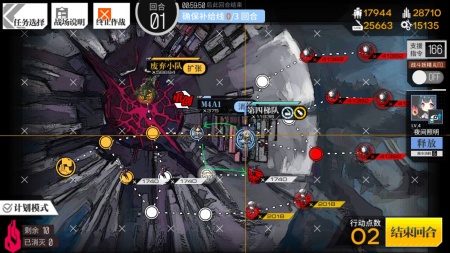
Notice how the SOCOM unit switched sides.
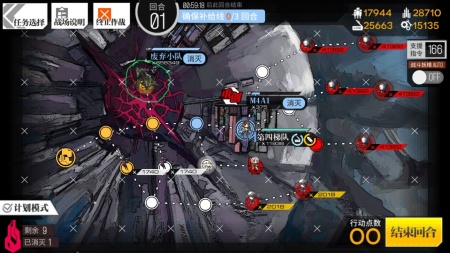
Turn 2: Move squadron one node left, one node up, switch place with friendly SOCOM units, move one node down to fight the Ferri below.
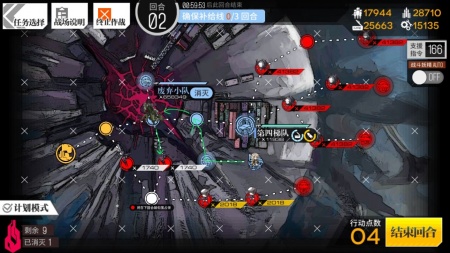
Turn 3: Set SOCOM unit to stationary with the stand by command button (Stand by command button is the middle one, as circled in the provided screenshot picture), capture node in front of the supply point, maintain supply line for 3 turns.
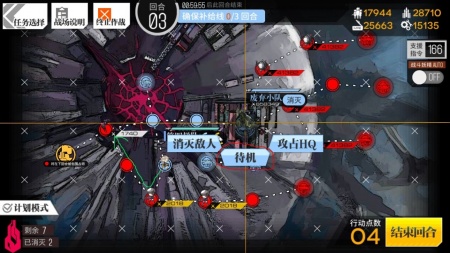
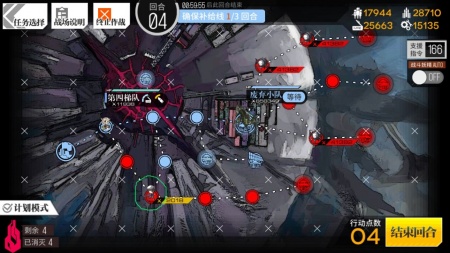
Turn 4: Deal with the circled Ferri unit should it interfere with the supply line, end turn until mission accomplishment.
E1-B2
Clear reward: Calibration Vouchers x100
Notable drops: HG Mk23Mk23Mk23, SMG MP5MP5MP5
Victory Condition: Defeat all enemy units.
Recommended Team Composition: 3x to 4x expansion teams should suffice.
How to:
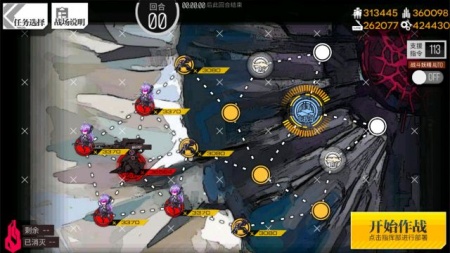
Day time casual combat, no turn limits, no special tricks and nothing of interest. Just remember to surround the Jupiter cannon and capture all the blocks before attacking it. It looks something like this ->
E1-B3 Branching node 2
After completion of this level players can select to continue with route B or going on to route C.
Clear reward: Beginner Training Data x200
Notable drops: HG SPP-1SPP-1SPP-1, SMG TMPTMPTMP, HG P226P226P226
Victory Condition: Maintain supply line for two turns.
Recommended Team Composition: 3x to 4x expansion teams should suffice.
How to:
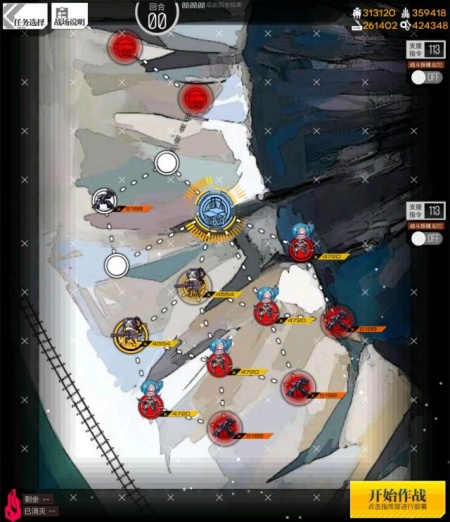
Day time casual combat, no turn limits, no special tricks and nothing of interest. It looks something like this ->
E1-B4
Clear reward: Furniture - Television
Notable drops: RF DSR-50DSR-50DSR-50, SMG M12M12M12, AR T65T65T65, MG HK23HK23HK23
Victory Condition: Capture enemy HQ
Recommended Team Composition: Level 70+ 4x expanded squadrons should be suffice.
How to:
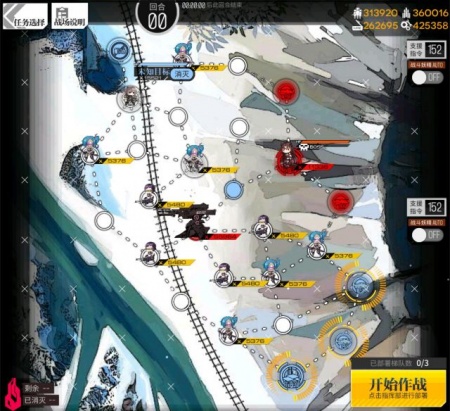
Literally E1-A4 from a different perspective, no time limit on this level, the change this time is to capture the north end of the Jupiter cannon with the ally squadron, while the capturing of the other 3 sides will be relied on your own squadrons. Boss fight is exactly the same, air drop fairy trick is still available, bullet points down below to serve as reminders.
- Notes on boss fight:
- Executioner will unleash a T shaped attack pattern after reaching certain HP level, the attack will damage the middle row and the rear column, adjust to avoid damage.
- Executioner will also unleash a penetrating attack on the top and bottom row, deals minor damage.
- Players with Air drop fairy can drop down at the air field and attack Executioner at round 1.
Route C "Re-ignition"
E1-C1
Clear reward: Exchange Core x10
Notable drops: RF wz.29wz.29wz.29
Victory Condition: Maintain supply line for two turns.
Recommended Team Composition: WIP
E1-C2
Clear reward: Memory Shard x100
Notable drops: HG Five-seveNFive-seveNFive-seveN, SMG M12M12M12, AR T65T65T65
Victory Condition: Go to a certain point (Radar station)
Recommended Team Composition: WIP
E1-C3
Clear reward: Procurement token x50
Notable drops: AR ART556ART556ART556, MG HK23HK23HK23, SMG TMPTMPTMP, RF wz.29wz.29wz.29
Victory Condition: Capture enemy HQ
Recommended Team Composition: WIP
E1-C4
Clear reward: AR CZ2000CZ2000CZ2000
Notable drops: SMG MP7MP7MP7, HG P226P226P226, AR T65T65T65, MG HK23HK23HK23
Victory Condition: Maintain supply line for two turns.
Recommended Team Composition: WIP
Chapter 1 Hidden Map: Messenger
This level is unlocked by defeating Executioner four times in A4.
- There is an achievement for completing this level without fighting any enemy, players can just deploy a fodder HG squad and run through four random points while avoiding other enemies and completing the level without any resources consumption.
- Players can also farm this level for the limited edition T-dolls.
Clear reward: Memory shard x100
Notable drops: SMG TMPTMPTMP, RF wz.29wz.29wz.29
Victory Condition: Capture enemy HQ
Recommended Team Composition: Fodder squad x1, or night optics ARSMG / RFHG teams
Chapter 2 Second Lunar Phase
Initial stage
E2-1 Branching node 1
After completion of this level players can select to continue with route A/B or C/D.
Clear reward: 1000x of each resources
Notable drops: HG Colt RevolverColt RevolverColt Revolver, SMG UMP45UMP45UMP45, AR AS ValAS ValAS Val
Victory Condition: Go to a certain point (Air field)
Recommended Team Composition: Armor piercing, 5x expansion RF/HG team x1 (Or MG/SG team, but higher resources consumption), turn fodder squad x1
Step by step guide:
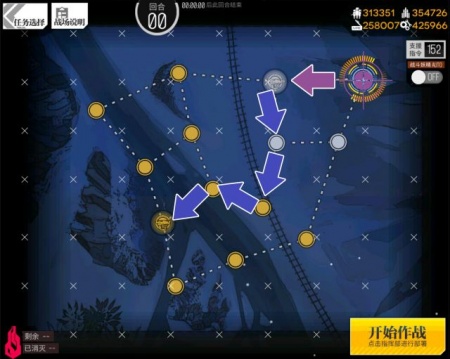
- Two turns:
- Turn 1: Deploy fighting squad, move one slot left, deploy fodder squad.
- Turn 2:
Rush BMake a dash for the air field, sit on it, end turn.
Route A "Queen's Gambit"
E2-A1
Clear reward: Enhancement capsule x30
Notable drops: HG P7P7P7, SMG PP-90PP-90PP-90, AR 9A-919A-919A-91
Victory Condition: Go to a certain point (Enemy HQ)
Recommended Team Composition: Armor piercing, 5x expansion RF/HG team x1 (Or MG/SG team, but higher resources consumption)
Step by step guide:
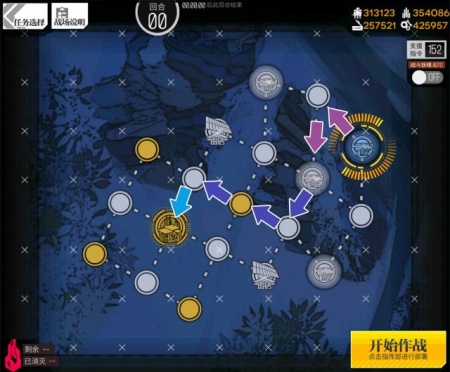
- Only one squad is needed, deploy and follow the arrow shown on the picture to the right.
- Note: Recommend using RF/HG team, there is a "Typhoon" class tank sitting on the enemy HQ, which fires a piercing laser beam straight down the middle row of your squadron. Having fast movers units such as HG in the middle row is recommended as slow mover units may take damage from the laser beam.
E2-A2
Clear reward: Battery x200
Notable drops: SMG MP5MP5MP5, AR Type 56-1Type 56-1Type 56-1, RF SpringfieldSpringfieldSpringfield
Victory Condition: Go to a certain point (Air field)
Recommended Team Composition: Armor piercing, 5x expansion RF/HG team x1 (Or MG/SG team, but higher resources consumption), turn fodder squads x2
Step by step guide:
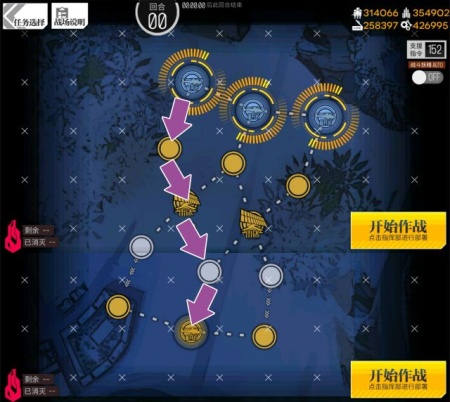
- One turn only, deploy fighting squadron on the far left zone, fill the other two zone with fodder squadrons. Start battle,
Rush Bfollow the direction arrow straight down the middle and end turn on the air field.
E2-A3 Branching node 2
After completion of this level players can select to continue with route A or going on to route B.
Clear reward: Intermediate Training Data x200
Notable drops: MG HK23HK23HK23, HG Mk23Mk23Mk23, SMG UMP9UMP9UMP9, MG MG3MG3MG3
Victory Condition: Maintain supply line for two turns within six turns.
Recommended Team Composition: Armor piercing, 5x expansion RF/HG team x1 (Or MG/SG team, but higher resources consumption)
Step by step guide:
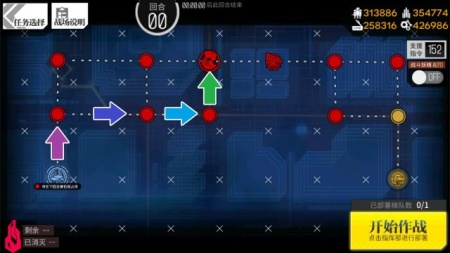
- Only one squad needed, move one step at a time to establish a supply line.
- SG/MG team might be more comfortable with this level due to fast moving Armored Dinergate (yellow doggos) are present. High enough rate of fire buffed RF can deal with the Dinergate units but player may have to retreat the HG units up front to avoid Dinergate bites.
E2-A4
Clear reward: Memory shard x150
Notable drops: HG SPP-1SPP-1SPP-1, HG P226P226P226, SMG M12M12M12
Victory Condition: Maintain supply line for five turns within six turns.
Recommended Team Composition: Armor piercing, 5x expansion RF/HG team x2 (Or MG/SG team, but higher resources consumption)
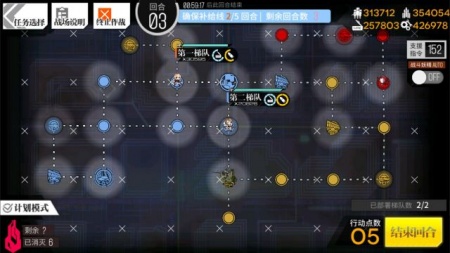
Step by step guide:
Turn 1: Deploy two squadron at available nodes, move as the arrow indicates.
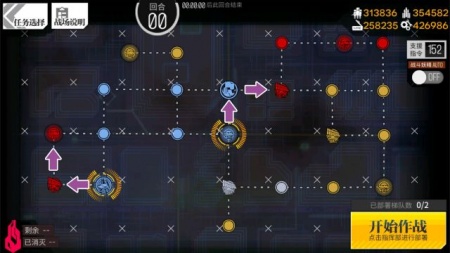
Turn 2: Relocate two squadrons as the arrow indicates
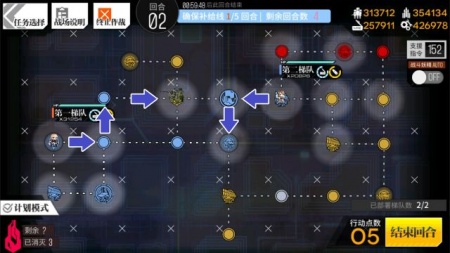
Turn 3-5: Hold both squadron in position at those nodes until battle victory achieved
Route B "Castling"
E2-B1
Clear reward: Exchange core x10
Notable drops: HG P226P226P226
Victory Condition: Go to a certain point (Enemy HQ) within five rounds.
Recommended Team Composition: High level max expansion ARSMG team or grenadier thrower are recommended
How to:
3 turns, follow the indicated arrow, easy does it.
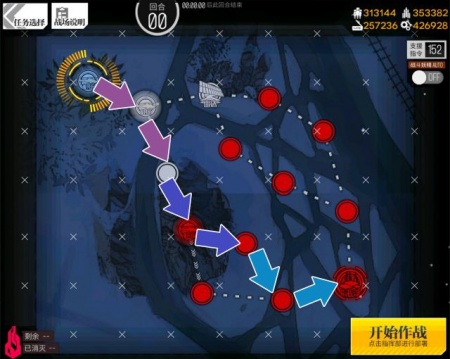
E2-B2
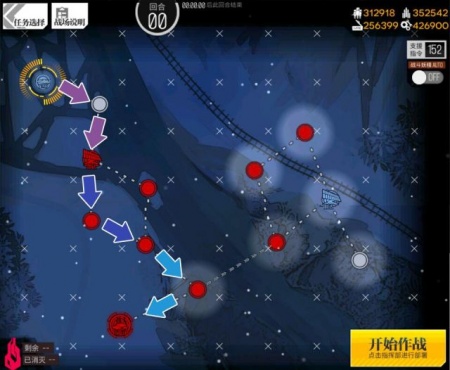
Clear reward: Calibration voucher x200
Victory Condition: Go to a certain point (Enemy HQ) within rounds.
Recommended Team Composition: High level max expansion ARSMG team recommended
How to:
3 turns, follow the indicated arrow again, simple as it looks.
E2-B3
Clear reward: Memory shard x200
Victory Condition: Defeat all enemies within rounds.
Recommended Team Composition: Night combat teams x2, ARSMG team with night optics, or RFHG team recommended
How to:
You know how to do an elimination mission by now, right? Capture points and do stuff.
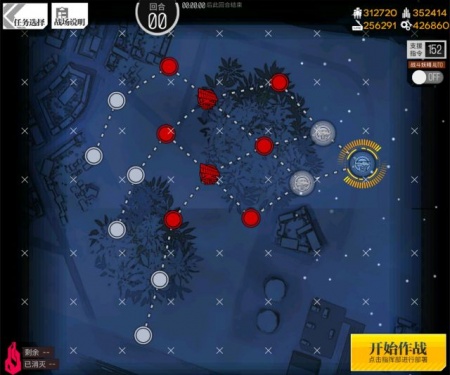
E2-B4
Notable drops: HG ThunderThunderThunder, SMG TMPTMPTMP, RF wz.29wz.29wz.29
Victory Condition: Capture enemy HQ within rounds
Recommended Team Composition: Max expansion, high specification ARSMG team x1, fodder squad x1
Standard tactic:
The Ferri HQ cannot be reached, three red bombs can be found on the map at marked locations. Arriving at the radar station node below Gager will put the top SOCOM unit under our command, prompt Gager to fight your units, the top SOCOM unit cannot fight Gager head on, they serve to capture the Ferri HQ for us.
- Fortunately unlike E2-C4, Taskforce 404 can actually defeat the red bomb for us so we don't have to use a fodder unit to bait the bomb in front of the radar station.
- Assume all random nodes on the map are enemy units (mostly Dragoons) encounters.
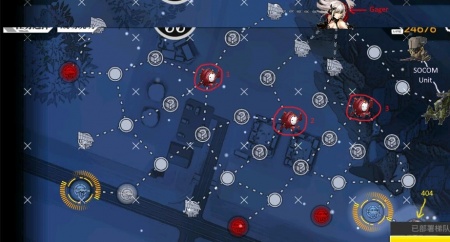
Turn 1: Deploy fodder squadron on the left, deploy combat squadron on the right, move up one space, end turn.
Turn 2: Switch combat squadron's position with 404 and have them attack the red bomb.
Turn 3: Move squadron to the radar point below Gager, toggle the now under player command top SOCOM unit to stand by.
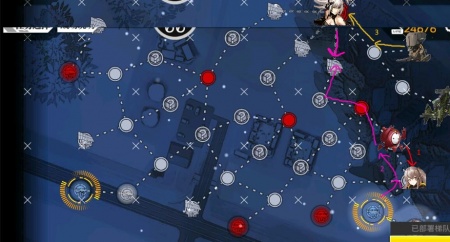
Turn 4: After Gager fight, switch SOCOM unit to capture mode, end turn until enemy base captured.
Notes on Gager fight:
- Gager will be paired with Disruptor, Gager herself frequently launch straight line AOE attacks down one row, player have to drag units out of the way of the attack should they wish to avoid the damage.
- Disruptor however just performs her normal attack and the charge attack like in 4-6 and 4-4E.
- This fight can be easily handled with high damage output units and high evasion SMG units.
Alternative tactic:
Route C "Pawn Promotion"
E2-C1
Clear reward: Batteries x200
Notable drops: Nope
Victory Condition: Eliminate all enemies.
Recommended Team Composition: Armor piercing focused units, high firepower ARSMG squadron or SGMG squadron recommended x2. (RFHG team is also possible, if one have high enough rate of fire to deal with the armored Dinergate enemies.)
How to:
Standard night elimination mission, enemies are all stationary thus this level can be easily done with two deployed squadrons.
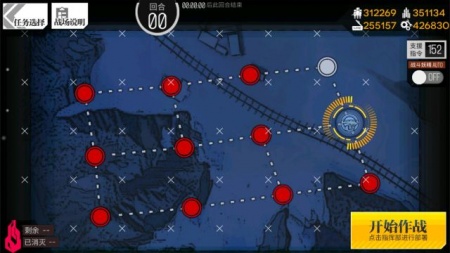
E2-C2
Clear reward: Exchange core x10
Notable drops: Naw
Victory Condition: Go to a certain point (Enemy HQ)
Recommended Team Composition: High firepower night equipped squadrons x2, all compositions acceptable.
How to:
Turn 1: Deploy attacker squad, move according to pink arrow, deploy defender squad
Turn 2: Move attacker squad according to blue arrows, end turn on the enemy HQ
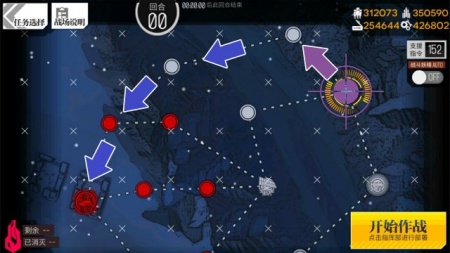
E2-C3 Branching node 3
After completion of this level players can select to continue with route C or going on to route D. Clear reward: Advanced training data x200
Notable drops: Ney
Victory Condition: Rescue three friendly units.
Recommended Team Composition: Fodder squadron x1
How to:
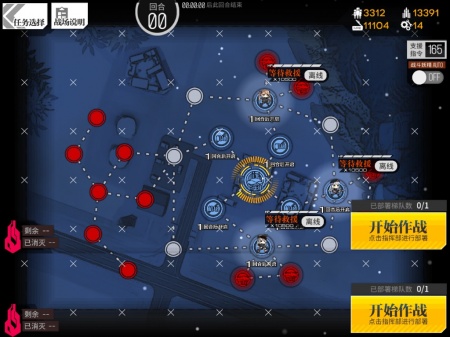
With the high amount of starting air fiends, this level can be easily done with just one unit in one turn, players can pass this without any form of resources consumption (except manpower). Players are meant to rescue the friendly units and extract them at the HQ.
- Player can save one move set point by switching position with the rescue targets, then rescue them while moving towards the HQ.
- The map itself looks like this ->
E2-C4
Clear reward: Furniture - Chessboard (Can interact with)
Notable drops: HK416 Exclusive equipment
Victory Condition: Capture enemy HQ
Recommended Team Composition: Max expansion, high specification ARSMG team x1, fodder squad x2
Standard tactic:
The Ferri HQ cannot be reached, three red bombs can be found on the map at marked locations. Arriving at the radar station node below Gager will put the top SOCOM unit under our command, prompt Gager to fight your units, the top SOCOM unit cannot fight Gager head on, they serve to capture the Ferri HQ for us.
- Unfortunately, no ally units are present to defeat the red bomb like E2-B4, players will have to use a fodder unit to bait the bomb in front of the radar station.
- Assume all random nodes on the map are enemy units (mostly Dragoons) encounters.
Turn 1: Deploy fodder squadron 1 at the left, deploy fighting squadron on the right. Move fighting squadron out according to indicator arrow and surround capture the air field
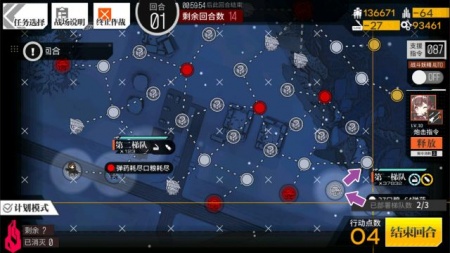
Turn 2: Deploy fodder squad 2 at the right side air field, move fighting squadron to the node indicated to clear the random node

Turn 2 carry on: Move fodder squad behind the fighting squad, switch position with them
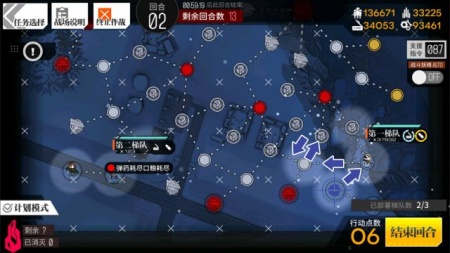
Turn 3: Move fighting squadron to the radar station node as shown on the picture, switch SOCOM unit under stand by command
Turn 4: After Gager fight, switch SOCOM unit to capture mode, end turn until enemy base captured.
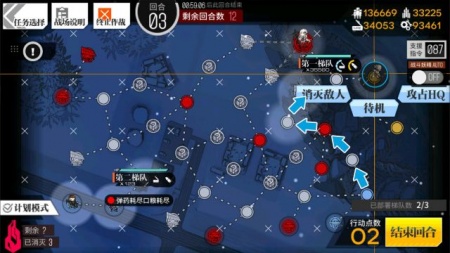
Notes on Gager fight:
- Gager will be paired with Disruptor, Gager herself frequently launch straight line AOE attacks down one row, player have to drag units out of the way of the attack should they wish to avoid the damage.
- Disruptor however just performs her normal attack and the charge attack like in 4-6 and 4-4E.
- This fight can be easily handled with high damage output units and high evasion SMG units.
Alternative tactic:
Route D "Minor Piece Draw"
E2-D1
Clear reward: Exp book x100
Notable drops: Naw
Victory Condition: Maintain supply line for 2 turns within 5 turns
Recommended Team Composition: High level 5x expansion ARSMG team x1, fodder squad x1
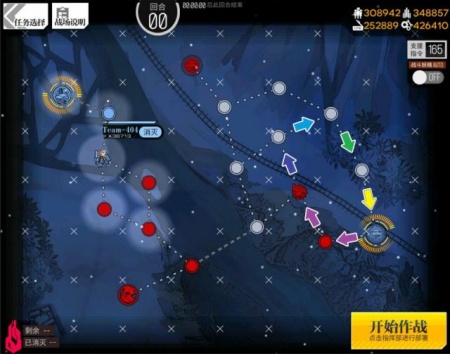
How to: This is the opposite of E2-B2, where the player's team plays as the distraction unit to bait Gager over the ridge, deploy fodder squadron on top of HQ to acquire an extra movement point, deploy fighting squadron on the air field to the right.
This is a potential path the player can follow, after capturing the radar station and confirm that Gager is on the right side of the ridge, adjust squadron path accordingly to maintain one space in between your squadron and Gager. Gager Cannot be fought on this map, as she is accompanied with three red bombs.
E2-D2
Clear reward: Memory fragment x150
Notable drops: Nope
Victory Condition: Maintain supply line for five turns within ten turns.
Recommended Team Composition: Armor piercing focused, high firepower ARSMG, RFHG, SGMG teams x3
Guide: There is a Typhoon class tank in the middle, which is almost impossible to take head on upon starting the level the tank deploys in a random direction, lead it to the top right corner and kite it with two nodes distance.
- Deploy squadrons on both top and bottom left corner to begin the level.
- Assume all ? nodes on the map are enemy encounters.
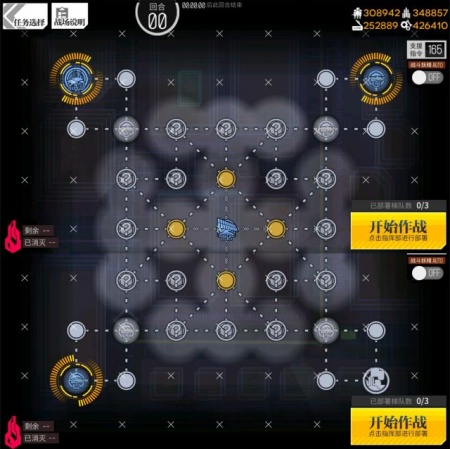
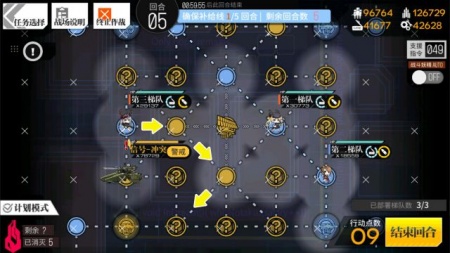
This is a potential way of completing this level.
Turn 1: deploy squadrons and have them capture air field just outside the drop
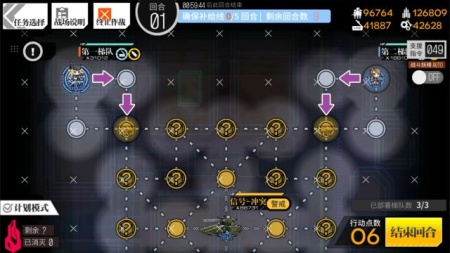
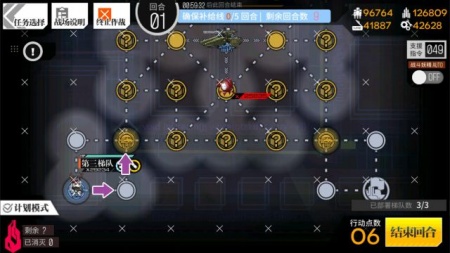
Turn 2:
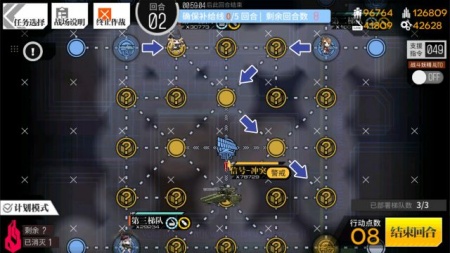
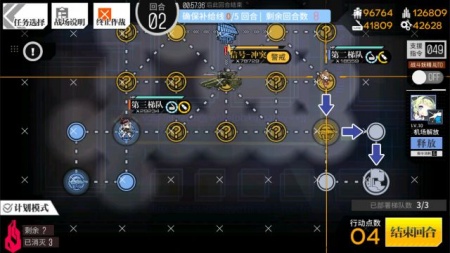
Turn 3: Continue supply line establishment
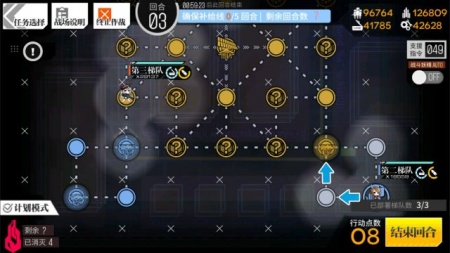
Turn 4: Connect supply line
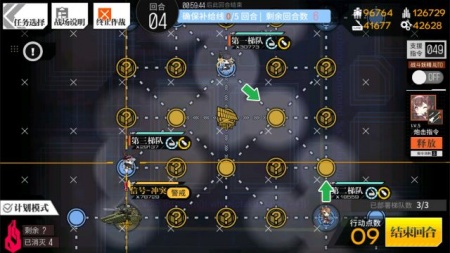
Turn 5-9: Kite the tank while waiting for completion.
E2-D3
Clear reward: Procurement tokens x100
Notable drops: HK416 Exclusive item
Victory Condition: Rescue four friendlies units within six rounds
Recommended Team Composition: Night battle squadrons, ARSMG, RFHG, high accuracy SGMG team x2
Step by step guide:
Turn 1: Deploy squad 1, rescue hostage, deploy squad 2, switch and extract hostage
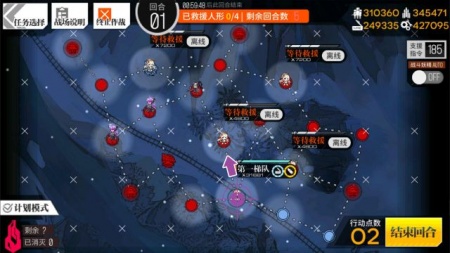
Turn 2: Squad 1 rescue hostage, squad 2 move towards northwest
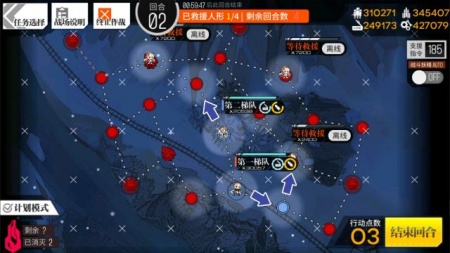
Turn 3: Squad 1 capture air field, squad 2 rescue hostage
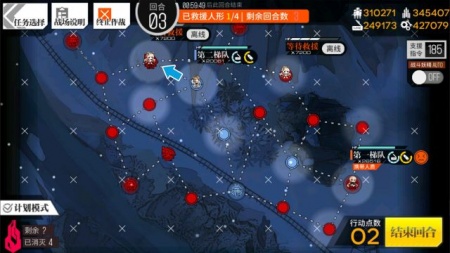
Turn 4: Squad 1 move according to arrow, squad 2 capture node in front of air field to secure escape route
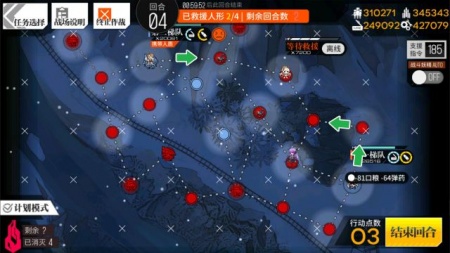
Turn 5: Squad 2 move to air field, extract hostage, squad 1 move to the node outside, switch places, extract hostage.
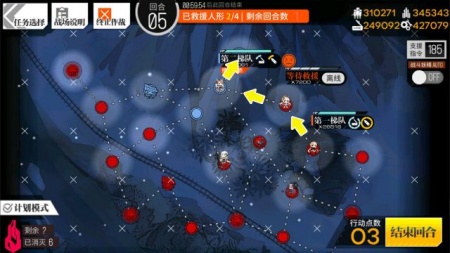
E2-D4
Clear reward: Profile background "Threatened"
Notable drops: HK416 Exclusive item (Agent boss/Dragoon unit combat loot and battle conclusion)
Victory Condition: Capture enemy HQ
Recommended Team Composition: High specification night fighting ARSMG team x1, base defending squad x1
How to:
Turn 1: Deploy fighting squad, move one node north, deploy base defend squad. Turn 2: Move according to arrow shown.
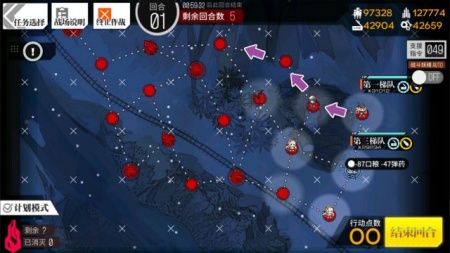
Turn 3: Move according to arrow, prepare to fight Agent on the last move
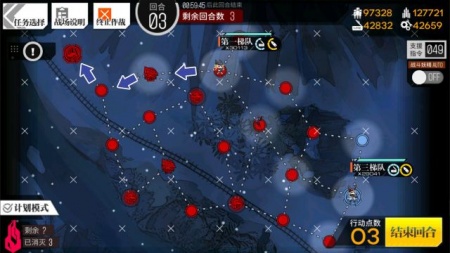
Note on Agent fight:
- Agent is alone with no extra enemies, she have a relatively large HP pool and low accuracy
- High evasion tanking units such as RO635, Suomi, MP7 with proper evasion buffs should
- No micro managements needed as Agent will not launch AOE attacks at your squadron, those who have two tanks in the formation can switch positions as Agent attacks only the nearest target to her
- At 80, 60, 40 and 20% health she summons clones, clones does minimum damage, can be disregarded
- At 15, 5% health she activates shields, if the shield is not broken down in time, squadron will take massive AOE damage
Chapter 2 Hidden Map: Survivor
Clear reward: WIP
Notable drops: WIP
Victory Condition:
Recommended Team Composition: WIP
Chapter 3 Terminal
Chapter 3 main story
E3-1
Clear reward: Exp disk x100
Notable drops: HG Five-seveNFive-seveNFive-seveN, RF wz.29wz.29wz.29, SMG M12M12M12, MG HK23HK23HK23
Victory Condition: Defeat all enemies
Recommended Team Composition: High fire power 5x expansion squadrons for blowing up the bombs, as long as it does damage, anything is fine.
How to:
There are no round limits, just go in and kill stuff.
E3-2
Clear reward: Memory shard x200
Notable drops: SG M1887M1887M1887, SMG TMPTMPTMP, HG P226P226P226, AR T65T65T65
Victory Condition: Maintain supply line for five rounds.
Recommended Team Composition: Armor piercing, several 5x expansion RFHG team and/or SGMG team, fodder squadron(s) for kiting tanks.
E3-3
Clear reward: Beginner training data x500
Notable drops: AR ART556ART556ART556, RF wz.29wz.29wz.29, SMG M12M12M12, AR T65T65T65
Victory Condition: Defeat all enemies
Recommended Team Composition: High damage output armor piercing, several 5x expansion RFHG team and/or SGMG team for armored units.
How to:
- Air strike fairy is recommended against shielder/dinergate units, other tactics such as Molotov throwers can also be used.
E3-4
Clear reward: Intermediate training data x500
Notable drops: RF JS05JS05JS05, SMG TMPTMPTMP, HG P226P226P226, MG HK23HK23HK23
Victory Condition: Defeat enemy boss unit (Agent)
Recommended Team Composition: High rating ARSMG squadron.
How to:
One turn, go deploy, attack Agent.
- Agent does not have any form of aoe skill that require formation shifting, but players may have to move units around to take turn soaking damage.
- High evasion main tanking units such as Suomi, RO635, MP7 are recommended, as the fight can be long duration.
- High damage units such as G11, G41, ART556 is also recommended, as Agent will deploy shields as dps check, unable to penetrate the shield in time will result in squad wide damage.
E3-5
Clear reward: Advanced training data x500
Notable drops: RF DSR-50DSR-50DSR-50, SMG TMPTMPTMP, RF wz.29wz.29wz.29, AR T65T65T65
Victory Condition: Go to a certain node (Enemy HQ)
Recommended Team Composition: ???
E3-6
Clear reward: Grifon Elite Medalion furniture and Grifon Elite Medalion profile medal
Notable drops: SMG MP7MP7MP7, HG P226P226P226, SMG M12M12M12, MG HK23HK23HK23
Victory Condition: Capture enemy HQ
Recommended Team Composition: Top equipment rating, max level, armor piercing focused RF/HG team x1 and MG/SG team x2.
Chapter 3 Hidden Map (Ranking): Hornet's Nest
Clear reward: WIP
Notable drops: WIP
Victory Condition:
Recommended Team Composition: WIP
Plot
Gallery
References[edit]
| Girls' Frontline Events |
|---|


