PNC Exploration
Overview[edit]
The Explore menu is where most of the gameplay of Project Neural Cloud is found. It contains the story and the stages that yield Doll upgrade materials.
For information about battles, see PNC Combat.
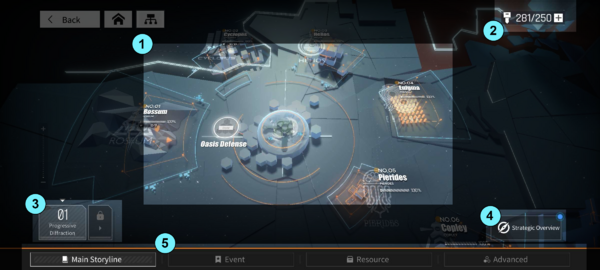
- Main Story stages.
- Current amount of Keys owned and available events.
- Switch between Main Story stages and Past events (coming soon).
- Strategic Overview (global attribute bonuses).
- The Event, Resource, and Advanced tabs.
Keys[edit]
All activities in the Explore menu (except Vulnerability Check and Enigma Black Hole) require Keys to access and obtain rewards. Keys are recovered at a rate of 12 per hour. Max number of keys start at 120 and increases by 10 every three Cognition Level (Player Rank) starting from Level 6. Current cap is 250 keys.
Doll Team[edit]
The player must compose their team before starting the stage and it cannot be changed while playing. There can be a maximum of five Dolls in the Main Team and three Backup Dolls (each backup slot is unlocked throughout the story). Backup Dolls can be swapped with the Main Team before each battle. Up to 8 team compositions can be saved and the team comps of other players who completed the stage can be displayed and copied (provided the players have access to the same Dolls). The total starting Team Power and Backup Power is calculated and compared to the recommended power for this stage (Team Power increases during the stage with accumulated Functions).
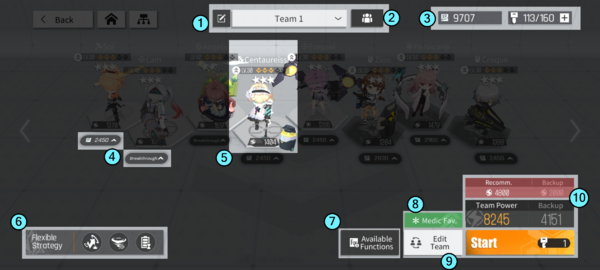
- Drop-down list of saved team comps. Tap the pen icon to rename the team. The arrows at both sides of the screen can also be used to switch between teams.
- Tap to see and use the team other players used to clear the stage.
- Amount of EXP and Keys currently owned.
- Shortcut to Level Up and/or Breakthrough a Doll.
- Doll Info: Class, Level, Breakthrough Status, Rarity, and Power.
- Tactical Skills. Can be changed later during battle preparation.
- Tap to see the list of Function Cards available in this stage.
- Doll Class favored in the stage (grants the class a free function at the start).
- Tap to access your Doll list and the Support Unit screen. Drag units from the list to add it to your team.
- Recommended Team Power in red against Current Team Power.
Main Story[edit]
Progressing through the Main Story chapters unlocks new functions in the game and yields various rewards on first completion, including Neural Fragments for Main Story Dolls.
Excluding the tutorial stage (Oasis Defense), there are currently 6 chapters in the game. Each chapter is divided into Standard, Dark Realm and Endless Exploration modes.
| Chapter | Logo | Sector Type/Name | Notes |
|---|---|---|---|
| 1 | 
|
Artificial Intelligence Sector | |
| 2 | 
|
Military Sector | |
| 3 | 
|
Environment and Energy Sector | A difficulty spike is present at the end of the chapter. |
| 4 | 
|
Computer Sector | |
| 5 | 
|
Art Sector | Unlocked after the first week of the Global Server. |
| 6 | 
|
Ecology Sector | The Permanent version of the event, Divine Heresy. |
Standard and Dark Realm[edit]
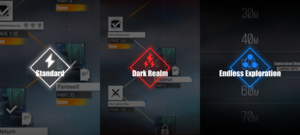
Standard mode stages include story stages and combat stages. Dark Realm stages is unlocked after an certain combat stage is cleared in Standard and tells a side story from the sector, with more difficult combat stages. Besting combat stages is necessary to unlock the next stages, but story stages can be easily skipped or reread later.
There are seven types of combat stages:
- Tactical Tutorial: Typical easy-clear tutorial stuff.
- Regular Battle: Standard exploration mechanics.
- Battle of Endurance: No exploration mechanics aside from Functions and Protocols; only a series of battles.
- Boss Fight: Like Regular Battle stages but with the story boss at the Output Terminal of each layer.
- Limited Deployment: Like Regular Battle stages but you can't bring your own Dolls.
- Function Library: Like Regular Battle but with much more Function Nodes.
- Portal: Like Regular Battle but with the ""Beware of Summons" Protocol active from the start and a Modesty enemy in each battle.
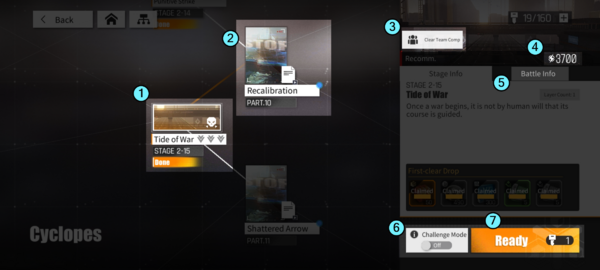
- Combat stage of type Boss Fight (with Challenge marks)
- Story stage
- Tap so the game doesn't load the last team you used to clear this stage the next time you play it
- Recommended Team Power to clear this stage
- Tap this tab to see available Function Cards in this stage
- Challenge Mode tick box, only available on some combat stages (will open a prompt explaining the rules and options to activate sub-challenges)
- Tapping the Ready button will show the team composition screen and not spend a Key yet.
Endless Exploration[edit]
This mode is unlocked after clearing all stages in a chapter. There are 40 stages with three layers of increasing difficulty. Clearing the harder stages will automatically clear the easier ones, so not all 40 stages need to be played (though you can only skip 50m each time). Clearing any stage for the first time will yield ![]() Strategic Blueprints which are used to unlock Procedural Efficency Nodes, bonuses that are applied to every stage.
Strategic Blueprints which are used to unlock Procedural Efficency Nodes, bonuses that are applied to every stage.
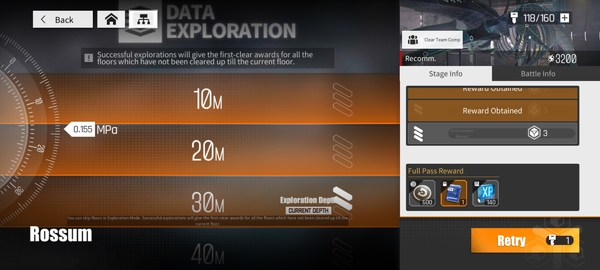
Ironically, Endless Exploration mode does have an end, since each one has 40 stages (0m to 400m).
Exploration Mechanics[edit]
The first rogue-like element of the game, the player is faced with multiple paths through several node types to the boss:
- Conflict Zone (Elementary, Intermediate or Advanced): Combat nodes. Compare power to the Team Power to gauge the difficulty. The Drop type indicates which Doll class will benefit from the looted Functions after the fight.
- Output Terminal: Final Conflict Zone of the layer. When clearing the Output Terminal of the final layer, the option to challenge a second and more difficult Output Terminal will be offered for better loot, at no cost if it is failed.
- Function Library: Will give a choice among three Functions at random.
- Recovery Area: A chance to heal 30% of the health of all Dolls or 80% health of the most damaged Doll, or to upgrade a Function Card for free, or to change it into a Trading Area (cannot be reverted).
- Trading Area: Buy and Sell Functions and buy Protocols with Cache Coins. Higher level Function Cards are worth more, and Protocols are quite expensive. Available Functions and Protocols can be refreshed once for free, then costing Cache Coins and becoming more expensive for subsequent Refresh.
- Anomaly Area: Very random, can give a Function for nothing, get a chance to get some Functions or heal, or even be a secret Conflict Zone. Usually needs to spend Cache Coins or a portion of the Doll's HP or Max HP.
- Deep Diagnosis Areas are special nodes appearing during boss stages to remove buffs from the boss.
Usually, it is only possible to navigate to the nodes on the right of the current node following the links displayed but some nodes enable movement between nodes in the same column.
The number of maps that must be cleared to complete the stage is indicated by the number of layers. All layers finish in an Output Terminal boss fight node. Dolls are always healed at the end of a layer. Retreating from a stage or expending all 10 continues after losing a battle will fail the whole stage. You can, however, choose to claim the rewards you've acquired during the run.
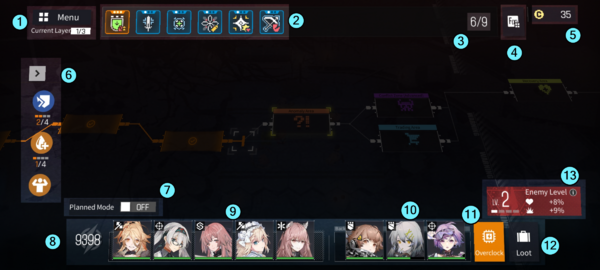
- Current layer in the stage and menu with options to retreat (abandon stage), to return to the main menu (pause stage to continue later), or to open the settings.
- Function Row. Tap a Function to see its details and slide to see more Functions if the bar is too full.
- Function Cards Deck Size. You will have to discard a Function if it goes over the limit but it can be upgraded by spending 100 Cache Coins right there or in Areas, or increased in some Anomaly Areas. Protocols will show up at the bottom if any are active. Hover over their icon to display their effect.
- Tap to see the list of Functions available in this stage.
- Current amount of Cache Coins. Used to buy Functions and Protocols at Trading Areas, buy more Function space, or start some events in Anomaly Areas. Gained during battle or by selling Functions. (If you meet Ranko in an Anomaly Area and take her deal, her icon will also appear there, showing your Cache Coins investment)
- Active Function Chains, tap the arrow to see details
- Planned Mode. Unlocked after Stage 2-13. When turned on, the computer will come up with an "Action Plan" and automatically choose which nodes to go to and conduct battle. This plan can then be manually configured by the player. At Cognition Level (player level) 5, this mode can be activated on stages that have not been completed yet.
- Team Power. Compounded from the power of all Dolls plus Function Cards bonuses.
- Doll Team and their individual HP. Tap to see their attributes and skills
- Backup Team, same as above
- Overclock
- Tap to see the loot you will be able to exchange for Keys at the end of the stage.
- Enemy Level. Increases by one bar for every node traveled (includes vertical movement through certain nodes). Buffs the HP, ATK and Hashrate of enemies up to level 11.
Challenge Mode[edit]
Challenge Missions will become available after clearing certain stages for the first time. Support Dolls are disabled in Challenge Mode and Doll stats are capped. Clearing a Challenge will award Key Memory Cards (basically stamina pots).
The default Challenge Mission caps the Rarity, Level, Breakthrough, and Skill level of ally Dolls and may disable Algorithms, Intimacy, and Specialty Training bonuses while boosting enemy attributes. Two supplementary Challenge Missions can be enabled, such as more buffs to enemies, debuffs and restrictions on certain Doll classes, or a limited number of allowed Dolls in the team.
Overclock[edit]
Starting with Stage 2-10, Cache Coins can be exchanged for Overclocks on the Exploration screen and before a battle.
- Increase HP of all Dolls deployed by 5% in this exploration. 10 CC
- Restore HP of ally unit with lowest HP percentage to 80%. 30 CC
- Double the amount of Cache Coins from clearing the next 3 Conflict Zone. 20 CC
- Obtain a random Function Card. 40 CC (Unlocked by clearing Stage 2-15)/ Obtain a selected Function Card. 50 CC (Unlocked through Procedural Efficiency
- Deposit the Cache Coins you currently have to claim them in the next battle phase, and continuously earn interest in this way. 20 CC
- Ally Dolls deal 10% more damage to bosses and elites. 80 CC (Dragonslayer Protocol)
Stage Results[edit]
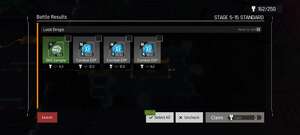
When the stage ends (either by completing it or retreating), the player gets to choose pieces of loot to keep. Each looted item costs Keys to get. Choosing to keep everything gives a 10% rebate on Key cost.
Node Defense[edit]
This mode has been featured in the events Divine Heresy and Perilous Advancement.
This mode takes place on a single special combat map and lasts for a set number of rounds. Enemies will appear in waves and attempt to reach the Defense Node to destroy it. If the HP of the Defense Node falls to 0, the battle is lost. The Defense Node cannot be healed, but during Perilous Advancement certain Functions can be used to give special properties to the Defense Node. The player starts with a set amount of units to deploy, and more units can be added between rounds.
The mechanics of this mode change depending on the event:
- In Divine Heresy (Chapter 6), this mode is a traditional tower defense where enemies follow a preset path and the player deploys units in real-time to the tiles that are allowed. A regular Function store is available between rounds.
- In Perilous Advancement, units can move freely around the stage. The player is offered a choice at the end of each round: spend 30 coins to choose a unit to deploy, or receive 30 coins and get an opportunity to deploy a unit from a randomly selected class. Coins in this version are used to buy Defense Node-specific Functions or Protocols.
Matrix Mode[edit]
Introduced with Divergent Shadows, Matrix Mode (warchess in game files) is a special exploration type taking place on a square grid, which combines normal combats and puzzles. Planned Mode and Overclock are not available in Matrix Mode, but Challenge Mode is compatible. Players assemble up to five teams, and deploy them at starting points on the grid to explore it. Most of the tiles are obscured at the start and what they contain become visible as the teams move on the board. Each teams has 3 Action Points per turn. Ending a turn replenishes the APs of all teams but also raises the Neural Strain level of the map, which is equivalent to the Enemy Level in standard exploration, but also applies special debuffs at certain levels. There is no easy mode for Matrix modes when they are failed.
Moving doesn't spend APs, but interacting with some objects on the map does. Teams can push certain objects around the map without spending APs, and can pass through other teams while moving. Movement may be impeded by colored security gates, which can only be opened by using a switch of the corresponding color, and pits, which can be plugged with moving obstacles. Functions that are found must be assigned to one of the deployed teams. Aside from Cache Coins, this mode also has Multiplex Cache Modules as a new currency that can be spent in trade nodes, to deploy additional teams or to expand the Function Row. A map is won when a team reaches an extraction point or beats the boss, or lost if a certain amount of turns pass.
Interactable objects found on Matrix Mode maps include:
- Enemies: Not Walkable. Interacting with enemies will start a regular combat. Tapping on an enemy will reveal their composition and their drop prior to entering the fight. Enemies are classified into Basic, Intermediate, Advanced and Ultimate (for bosses) difficulties, and Balanced, Close Combat, Firepower and War (for bosses) compositions. Some marked enemies will give chase for a set number of tiles each end of turn. Some scripted enemies might attack preemptively when a team is on a adjacent tile. Player teams defeated in battle remain on the field but can't heal or enter battle again.
- Unsealing Device/Door Switch: Walkable. A switch to open a security gate of the same color.
- Reorganization Node/Recuperation Node: Not walkable. Restores 1 AP and disappears.
- Recovery Node: Not Walkable. Consumes 1 AP and restores team health in exchange for Cache Coins or Cache Modules, then disappears.
- Cache Coins/Multiplex Cache Module: Not Walkable. Grants Cache Coins or Cache Module and disappears, can be obtained without spending AP.
- Function Crate: Not walkable. A supply crate that gives a Function.
- Trade Point: Not Walkable. The equivalent of a Trading Area in normal exploration.
- Buttons: Walkable. Lowers the gate of the corresponding color as long as a team or movable obstacle remains on top of it. Stepping on it costs 1 AP but not passing through.
- Watchtower: Not Walkable. Reveals nearby obscured tiles.
- Teleporters: Walkable. Transports teams to the other teleporter on the map, one-way only.
- Movable Obstacle: Not walkable, movable. Can be used to transform a pit into a walkable tile, keep a button pressed or prevent enemy pursuit.
- Laser turrets: Not Walkable. Fires in a set direction if there are no teams in its path (teams cannot be hurt by the laser either way). Can break fragile walls but cannot pass through other kinds of obstacles such as security gates.
- Lightrail Duct: Not Walkable, movable. Changes the direction of a laser turret shot entering it.
- Obstacle Reset Node: Walkable. Resets movable objects to their original position.
- Data Anomaly: Not Walkable. Acts like an Anomaly Node in normal exploration and disappears.
- Rare Data Anomaly: Not Walkable. Triggers a special event, grants the bonus reward of the map and disappears.
- Story Node: Not Walkable. Plays a story scene at no AP cost and may trigger changes on the map, then disappears.
Event Stages[edit]

Main Article: Event List
As of Global Version 1.4.0, the Events have been moved from the main screen and into the Event tab. All currently ongoing events will be accessible from here.
Resource Stages[edit]
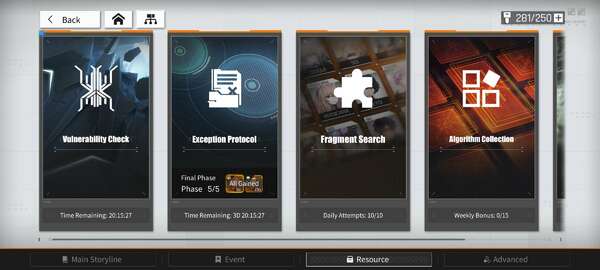
Fragment Search[edit]

Drops Neural Fragments for all owned Dolls but can only be attempted 10 times per day. Each attempt has a chance to drop two Fragments instead of one as well as random gifts.
Only units that are permanently available in the gacha pool are available in Fragment Search. “Limited” units which are only available during certain events and reruns are not available and their fragments must be purchased from the shop with ![]() Neural Kits.
Neural Kits.
Each available Doll has six stages which become unlocked at higher Intimacy levels with the Doll, starting from Level 2 until Level 6.
Resource Collection[edit]
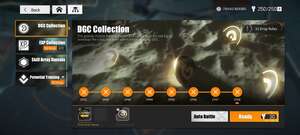
- DGC Collection: Cause damage to the DGC Receptacle for
 Diggcoins. Eight difficulties unlocked progressively throughout the story.
 - EXP Collection: Bully Baalia for
 Combat EXP. Eight difficulties unlocked progressively throughout the story.
 - Skill Array Domain: Unlocked with Stage 4-4. Defend the Professor for 30 seconds from enemy attack to acquire
 Skill Samples.
 - Potential Training: Five different stages for each Doll class where you battle standard enemies to acquire Breakthrough Widgets. Eight difficulties unlocked progressively throughout the story with higher difficulties dropping higher tiered Widgets up to
 Pioneering Widgets (not
  Superior Widgets).
These stages have a x2 Drop rotation: on certain days of the week, the first two clears of the stage will double the amount of materials dropped:
- Monday: DGC Collection and Potential Training - Guard
- Tuesday: Skill Array Domain and Potential Training - Sniper
- Wednesday: EXP Collection and Potential Training - Warrior
- Thursday: DGC Collection and Potential Training - Specialist
- Friday: Skill Array Domain and Potential Training - Medic
- Saturday: EXP Collection
- Sunday: DGC Collection, EXP Collection and Skill Array Domain
Failing a stage in Resource Collection will reimburse the Keys spent to enter the stage.
Algorithm Collection[edit]
Main Article: Algorithm
Unlocked with Stage 3-4. Drops Algorithms and Algorithm Boosters to be used in the Algorithm Slots of Dolls. At first only the Standard Collection stage in Collection Area 1 is available, Intermediate is unlocked with Stage 3-12 and Advanced with Stage 4-11.
Intermediate and Advanced Collection drops rotate according to a schedule. From Monday through Friday, drops for each day are restricted to certain Algorithm sets. For Saturday and Sunday, drops can be from any Algorithm set. For Algorithm sets and specific drop days, see Algorithm Set.
Vulnerability Check[edit]
Unlocked at Stage ?-?. Only one can be entered per day, stages have a completion time limit, Tactical Skills, Ultimate Skill Gauge and Dolls health does not carry between stages and four sets of Functions that can be used a limited amount of times each. Drops ![]() Glitter Chips, to be redeemed at the Special Supplies section of the Store. Doesn't spend Keys to attempt, and a failed stage can be continued with a new Doll team.
Glitter Chips, to be redeemed at the Special Supplies section of the Store. Doesn't spend Keys to attempt, and a failed stage can be continued with a new Doll team.
An update has enabled Quick Battle for this mode. Completing all fights in a tier without relying on support units or changing teams will unlock its Quick Battle.
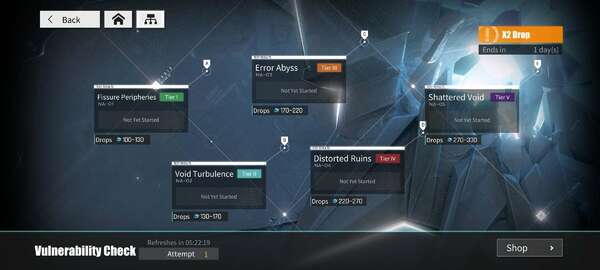
Comes in four tiers unlocked by progressing through the story:
- Tier 1 - Fissure Peripheries: Includes 5 stages with a final combat against Love. Drops 100 to 130
 Glitter Chips.
 - Tier 2 - Void Turbulence (Unlocks at Stage 3-5): Includes 6 stages with a final combat against Faith. Drops 130 to 170 Glitter Chips.
- Tier 3 - Error Abyss (Unlocks at Stage 4-5): Includes 7 stages with a final combat against Raven. Drops 170 to 220 Glitter Chips.
- Tier 4 - Distorted Ruins (Unlocks at Stage 5-15): Includes 7 stages with a final combat against Eucharist. Drops 220 to 270 Glitter Chips.
- Tier 5 - Shattered Void (Unlocks at Stage 6-28): Includes 7 stages with a final combat against Demiurge. Drops 270 to 330 Glitter Chips.
Exception Protocol[edit]
Exception Protocol appears to the right of Vulnerability Check. It is a challenge mode refreshed every two weeks, dropping ![]() Ether Tokens.
Ether Tokens.

During Stages (“Cleanups”) in Exception Protocol, a set list of 15 Dolls is available, including Dolls the player might not have unlocked from the gacha. The stats of these Dolls are adjusted so team composition and proper combat management have a greater impact on the outcome. Planned Mode is also unavailable. Dolls the player does not own and owned Dolls who are below minimum stats are set to minimum stats while owned Dolls over the maximum stats are set to maximum stats. Algorithms and Intimacy bonuses are ignored. There are multiple levels of difficulty:
- Basic Protocol
- Unranked
- Base 1× points bonus
- Doll Level range: 25 to 35
- Doll Rarity range: 2 to 3
- Skills Level range : 1
- Advanced Protocol
- Ranked
- Base 1.5× points bonus
- Doll Level range: 35 to 45
- Doll Rarity range: 3 to 4
- Skills Level range : 1 to 5
- Special Protocol (added 10 April 2023 in Global)
- Ranked
- Base 1.5× points bonus
- Doll Level range: 40 to 60
- Doll Rarity range: 3 to 5
- Skills Level range : ? to 10
- Time-limited
Before starting a Cleanup, extra protocols can be selected to add difficulty and gain a bonus percentage to the final amount of points. The player then goes through a 3-layers exploration stage as usual, but with a few changes:
- A Functions shop is available anytime.
- At every exploration step, a 10% interest is earned on the amount of Cache Coins currently owned, up to 25 bonus Cache Coins per step.
- Team composition can be changed at the new Support Doll Area events.
- The final bonus Output Terminal is replaced by a single boss that must be damaged as much as possible for bonus points.
Points are tallied when clearing or aborting the Cleanup:
- Percentage of the boss' HP bar drained in the bonus Output Terminal
- Number of Intermediate Conflict Zones cleared
- Number of Advanced Conflict Zones cleared
- Number of Output Terminals cleared (excluding bonus one)
- Amount of blue, purple and orange functions
- Stage completion bonus
- Completion time bonus
- Protocol Level bonus percentage
By clearing Exception Protocol multiple times and earning as much points as possible in one stage, players will earn ![]() Quartz Sand and
Quartz Sand and ![]() Ether Tokens. A total of 3,500 points will give a full clear and any more above that does not give anything (it is possible to acquire all of the rewards in one run). Every two weeks, the Dolls list change, and the leaderboard and rewards are reset.
Ether Tokens. A total of 3,500 points will give a full clear and any more above that does not give anything (it is possible to acquire all of the rewards in one run). Every two weeks, the Dolls list change, and the leaderboard and rewards are reset.
Advanced Stages[edit]
Enigma Black Hole[edit]
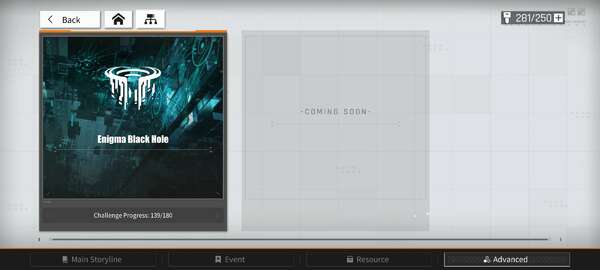
After clearing Stage 4-15, Neumann is looking for a way to awaken ENIAC. To stabilize its Neural Cloud, the Data Black Hole must be reopened, but the Enigma Sector no longer has the resources to explore it, and so Neumann requests the help of the Oasis to gather survey data. In Exchange, he will grant the Oasis operands and access to the Enigma Database, data from the past and extrapolations of the future. (This means that every stage map is copied from past or coming chapters and events.)
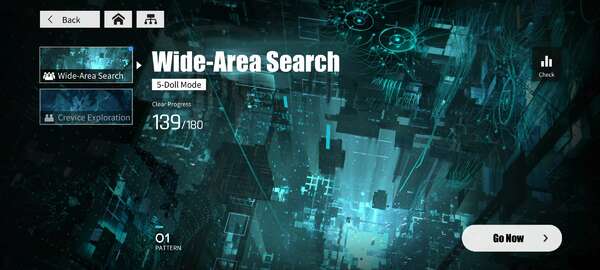
The Enigma Black Hole appears under the Enigma Sector on the map. It can be challenged without spending Keys. During a Wide-Area Search, the Dolls enter progressively more difficult stages as they plunge into the space-time curvature. There are 150 stages at launch, each stage must be completed under a specific time. Aside from first-clear rewards, certain stages unlock new lore entries under the Horizon Record (or Perception's Record) category.
Crevice Exploration, on the other hand, is only doable with two active Dolls but the stages are instead replaced by one enemy that the player must defeat.
Xenomension Abyss[edit]
Added on 14 January 2025 in Global. A version of Black Hole stages with 6 characters and tower defense-size maps favoring specialized team compositions. 10 levels of Periodic Exploration change every two weeks (with extra time attack prizes after completing all 10 stages), while 20 levels of Routine Exploration require clearing Spacetime Curvature - 120C (out of 200) in Enigma Black Hole Wide-Area Search to unlock.
Strategic Overview[edit]
This screen is for unlocking and upgrading Procedural Efficiency and Specialty Training nodes. These nodes give general bonuses in battle and more are unlocked by completing story chapters.
Procedural Efficiency[edit]
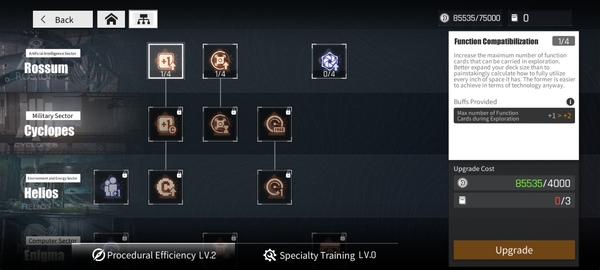
Unlocked at Stage ?-?. These nodes are unlocked and upgraded with ![]() Diggcoins and the
Diggcoins and the ![]() Strategic Blueprints earned in Endless Exploration.
Strategic Blueprints earned in Endless Exploration.
- Rossum nodes
- Cyclopes nodes
- Helios nodes
- Enigma nodes
- Pierides nodes
- Copley nodes
Specialty Training[edit]

Unlocked at Stage 2-12. Use ![]() Sampling Parameters which are dropped by using a specific Doll class in a stage to upgrade the nodes and confer general buffs to said Dolls of specific class. These upgrades directly increase a Doll's Power value.
Sampling Parameters which are dropped by using a specific Doll class in a stage to upgrade the nodes and confer general buffs to said Dolls of specific class. These upgrades directly increase a Doll's Power value.


