Deep Dive
| |
| Information | |
|---|---|
| Full name | Deep Dive |
| Event type | Story |
| Released on | CN, TW, KR, EN, JP |
| Available in campaign menu | CN (with Ranking), EN (with Ranking) |
| See Events Music | |
| View page template | |
Event stub. (ToDo)
Event run time[edit]
| Title | Period (start/end) | Server | Type | Comment |
|---|---|---|---|---|
| 深层映射 | 2017-07-27 03:00 - 2017-08-24 02:59 (UTC)
|
CN | Story Event | |
| Deep Dive | 2018-01-15 06:00 - 2018-02-12 05:59 (UTC)
|
KR | Story Event | |
| Deep Dive | 2019-04-30 18:00 - 2019-05-27 17:59 (UTC)
|
EN | Story Event | |
| Deep Dive | 2019-05-17 04:00 - 2019-06-14 03:59 (UTC)
|
JP | Story Event |
Ranking
| Title | Period (start/end) | Server | Type | Comment |
|---|---|---|---|---|
| 虚数迷宫 | 2018-11-15 03:00 - 2018-11-29 02:59 (UTC)
|
CN | Ranking | PLUS rerun |
Overview[edit]
Note: This event walkthrough is written by 炽焰的菲卡 from NGA.cn and translated by Girls' Frontline Wiki. Reposting not allowed without the author' s permission.
Overall difficulty
Since Operation Deep Dive is one of the major events, clearing all levels will be challenging for most commanders. Compared to last major event (Arctic Warfare), the first two chapters are easier, while the third chapter is much more difficult. Therefore, only the first two chapters rewards T-dolls so that new players can also get the most out of the event. New players should try their best to clear E2-4. Those who wants to clear the third chapter must be fully prepared. All types of enemy units are presented in the third chapter. Make sure your echelons can handle all situations.
New elements and mechanics
Two new game modes are introduced in this event -- rescuing hostages and supply line.
In rescuing hostages, commander needs to search for specific amount of hostages on the map and bring them back to an airfield or HQ. Hostages can be attacked. Each time a normal enemy attacks, hostage will lose one health and the enemy would be destroyed. BOSS unit and the advanced suicide unit (the red ball) will kill hostage on one attack regardless of hostage's health. Please be careful.
In supply line, commander needs to establish a route from the supply station all the way to HQ. Every single spot along the route must be blue for the supply line to be valid, and commander must maintain the supply line for certain rounds. If any spot on the supply line is taken by enemy, the counter will be reset. Please be careful.
These two new mechanics improve gameplay greatly, (Would be more interesting if hostage casualties are ranked. XD) and, in turn, the complexity of each map is increased greatly. However, it provides new way for clearing specific maps. If one is lucky, he/she won't have to confront BOSS to achieve victory. Might be good or bad news for different types of players.
Important: Tactical Fairies
Let me emphasize one: this event is NOT designed based on the new tactical fairy system. Therefore, don't panic if you don't have any tactical fairy. You can definitely clear the event without them.
However, having certain types of fairies does bring certain advantages. There is one type called "air drop fairy", which changes the gameplay to some extent. It provides shortcuts on certain maps which saves you from suffering from "long march". Meanwhile, tactical fairies provide considerable buff to your echelons. This will come in handy when clearing the third chapter. Also, if you plan to try out the ranked battle after chapter three, tactical fairies would definitely provide great helps. Therefore, if you have spare resources, it's highly suggested that you build some of them.
Operation Bomber Ball
(I don't know what the name is referring to) To deal with the red suicide bomber, the most feasible way is to run away from them as far as possible. If you try to confront them, in most cases, you will get destroyed. The only bomber we need to defeat is the black suicide bomber, which drops supply crate. And commander will spend a lot of time trying to catch them.
Also, this event maps consists of a lot of one way circle. It's very annoying and complicates the gameplay.
Tips for new players
You MUST learn how to change the position of your T-dolls during battle! If you don't know how, ask those who knows! BOSS is invincible while using skills. You should get used to it.
Event Maps
Chapter 1 Cognitive Disorders
E 1-1
Notable drops: HG SPP-1SPP-1SPP-1, AR 6P626P626P62, RF SSG 69SSG 69SSG 69, AR ASh-12.7ASh-12.7ASh-12.7
Recommended Team Composition:
- AR formation, especially with AR G11G11G11 and AR OTs-14OTs-14OTs-14 in the echelon.
- SG+MG formation.
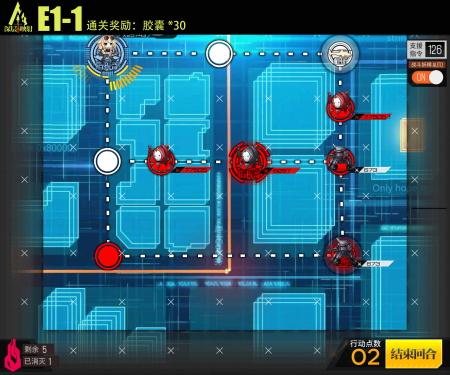
Turn 1: Deploy echelon, move two step downwards.
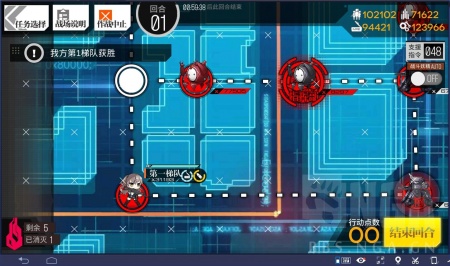
Turn 2: Move right and up towards enemy HQ.
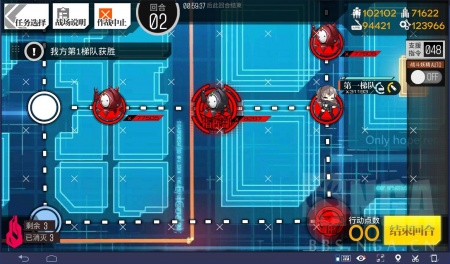
Turn 3: Defeat the black suicide bomber and occupy enemy HQ.
E 1-2

Notable drops: AR OTs-14OTs-14OTs-14, SMG MT-9MT-9MT-9, SMG F1F1F1, HG HK45HK45HK45
Recommended Team Composition: Any squad with sufficient fire power.
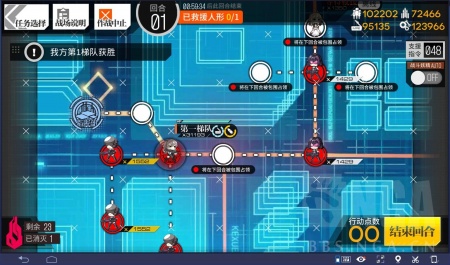
Turn 1: Deploy echelon and take the airfield.
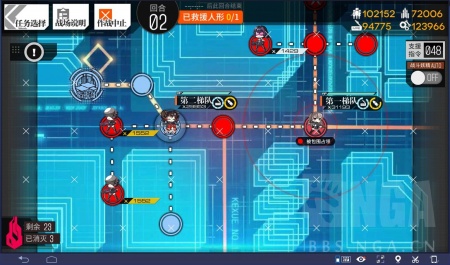
Turn 2: Deploy another echelon to defend the airfield. The first echelon moves ahead and rescue the hostage.
Turn 3: Bring hostage back to airfield.
E 1-3
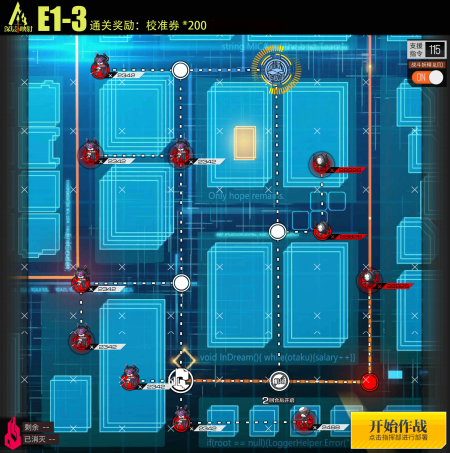
Clear reward: 200x File:Item Calibration Voucher.png
Notable drops: HG SPP-1SPP-1SPP-1, RF SSG 69SSG 69SSG 69, SMG F1F1F1, RF Type 81 CarbineType 81 CarbineType 81 Carbine
Recommended Team Composition:
- AR formation, especially with AR G11G11G11 and AR OTs-14OTs-14OTs-14 in the echelon.
- SG+MG formation.
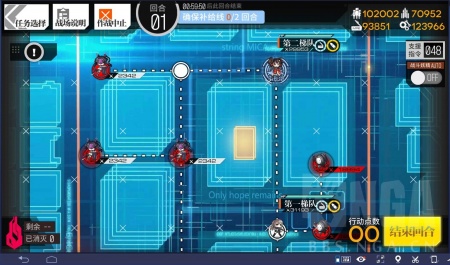
Turn 1: Deploy one echelon to defend HQ, and another one to move towards supply depot.
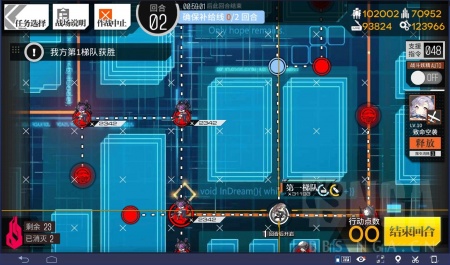
Turn 2: Defeat the black suicide bomber on the right and take the airfield.
Turn 3: Take the supply depot and defend the supply line.
E 1-4
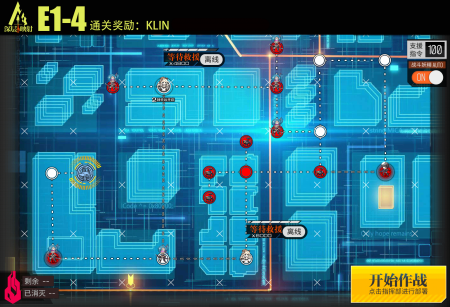
Clear reward: T-Doll SMG KLINKLINKLIN
Notable drops: RF PzB 39PzB 39PzB 39, AR ASh-12.7ASh-12.7ASh-12.7, AR 6P626P626P62, SMG MT-9MT-9MT-9, RF Type 81 CarbineType 81 CarbineType 81 Carbine
Recommended Team Composition:
- AR+SMG formation.
- SG+MG formation.
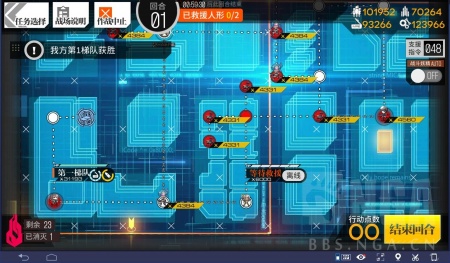
Turn 1: Deploy echelon and take the bottom left airfield.
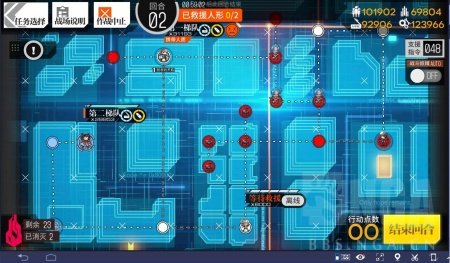
Turn 2: Rescue and evacuate hostage, and deploy any unit at HQ for additional movement point.

Turn 3: Move towards the next hostage.
Rescue hostage and return to the airfield.
Chapter 2 Hyperbolic Functions
E 2-1
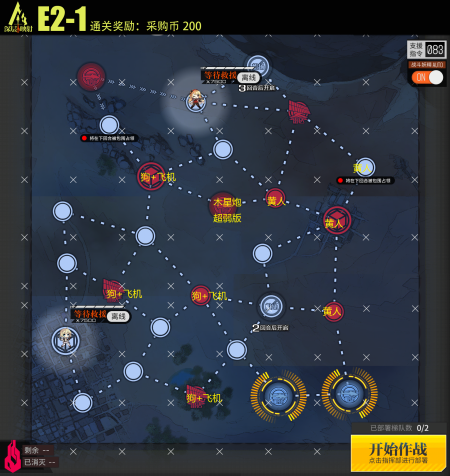
Clear reward: 200x File:Item Procurement Coin.png
Recommended Team Composition:
- AR+SMG formation.
- RF+HG formation.
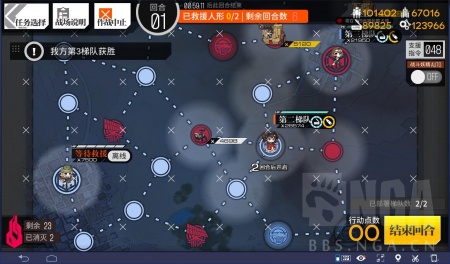
Turn 1: Deploy two echelons, one take the airfield, and another head straight up.
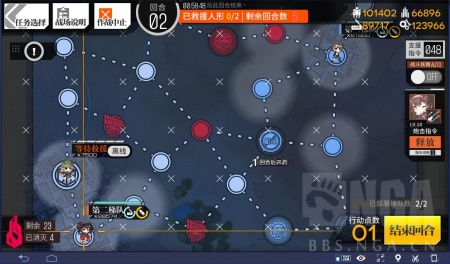
Turn 2: One echelon goes for the hostage on the bottom left.
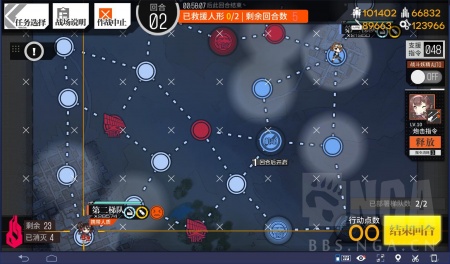
Exchange position with the hostage first and then rescue it.
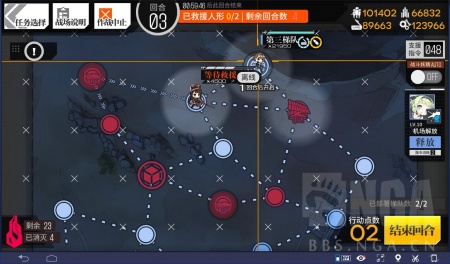
Turn 3: The team with hostage goes to airfield for extraction. The other team goes for the airfield near the last hostage.
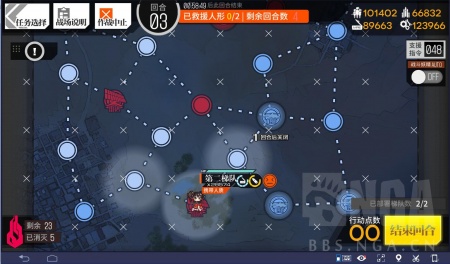
One more turn, and we can save all hostage.
E 2-2
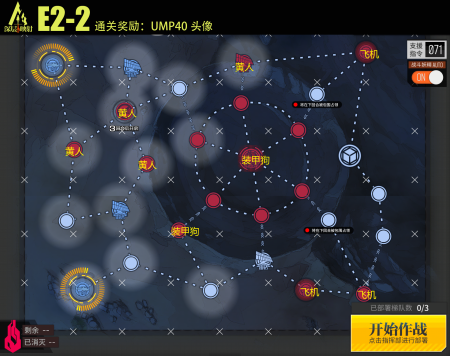
Clear reward: Portrait of SMG UMP40UMP40UMP40
Recommended Team Composition:
- SG+MG formation.
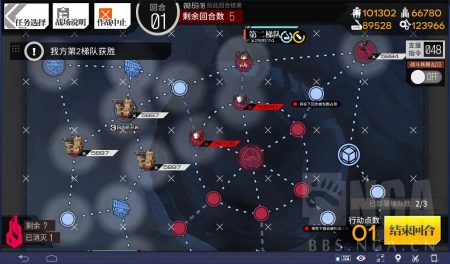
Turn 1: Deploy echelon on each of the two airfields. The upper left team take the radar. Wait one turn to see if the black suicide bomber can be spotted. If one is spotted, move ahead and destroy it.
The circle around the enemy HQ is designed such that there will always be 5 red suicide bombers and 1 black suicide bomber. The location of the black suicide bomber is random, but can be found at the 12 o'clock position for most of the time. If the black one is not there, occupy more radar to find it.
E 2-3
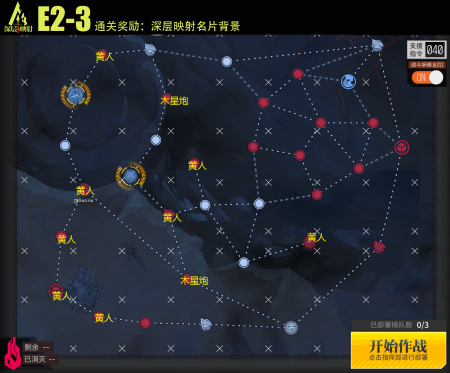
Clear reward: Deep Dive name card background
Recommended Team Composition:
- AR+SMG formation.
- RF+HG formation.
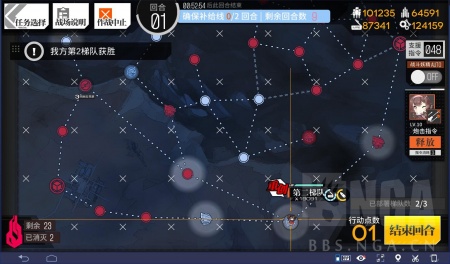
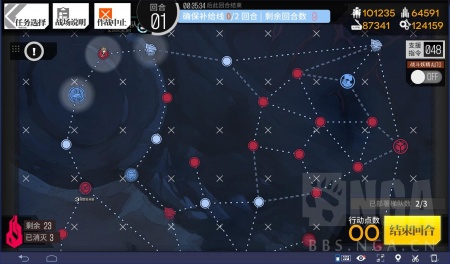
Turn 1: Deploy one echelon at the airfield, and move down to destroy the Jupiter Turret, which is weaker than regular ones. After that take the airfield on the bottom of the map. Deploy another echelon at HQ and destroy the enemy on the right. (If you have airdrop fairy, you can jump straight to the airfield on the bottom without attacking the Jupiter Turret.)
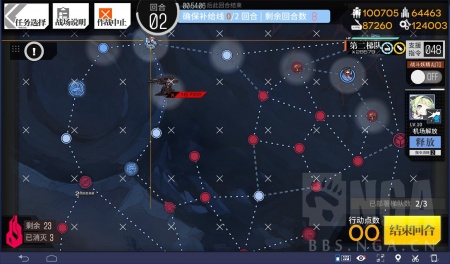
Turn 2: After repairing, the first team goes ahead and take the supply depot. The second team takes radar.
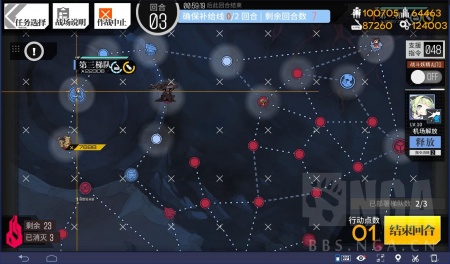
Turn 3: Establish supply line and defend. Pay attention to the situation around HQ to see if it needs to be defended.
E 2-4
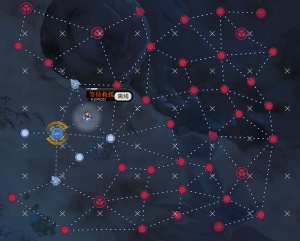
Clear reward: T-Doll RF DSR-50DSR-50DSR-50
Notable drops: UMP UX Exoskeleton
Recommended Team Composition:
- AR+SMG formation
Points of note:
- This map is heavily influenced by the random position and movement of the enemies so not every battle might be in your favor
- There are several freely moving enemy boss echelons on the map. Also, there are fixed positioned bosses on each of the nodes before the dispatch/reinforcement nodes, so you have to fight the boss at least once
- Remember: Capturing a single node without a connection to another blue node results in a loss of the node to the enemy so capture nodes turn by turn or move with two echolons
- Remember: You don't need to capture a supply node to resupply your echelon. Open the echelon details and press the resupply button
 while on the field
Example way of rescuing the wounded (Guide 1):
Turn 1: Deploy an echelon (A) at the main base and move it to node 1, picking up the wounded, then move to node 2.
Turn 2: Deploy a second echelon (B) for move-count purposes and move echolon (A) to node 3.
Turn 3: Move echelon (A) to the radar on node 4 and then to resupply node 5. Resupply there and then go back to node 4 to capture it.
Turn 4: Move echelon (A) to the supply node 5 and capture it.
Turn 5: Move echelon (A) to node 6 to beat the boss and capture this node. This will result in node 7 being turned blue.
Turn 6: Move echelon (A) to node 7 and dispatch the wounded.
Fighting the boss:
- The boss echelon consists of several Dinergates and the boss itself
- The boss has three attack patterns:
- Normally shooting with its MG
- Firing rockets in the vertical middle row
- Shooting a laser and rockets after charging up either at the top and middle row or the bottom and middle row dealing 100 dmg to each unit (While charging, the boss is invincible)
Ranking Map: Imaginary Maze
Gallery
-
-
Stills of CN PV.
References[edit]
| Girls' Frontline Events |
|---|


