Arctic Warfare

| |
| Information | |
|---|---|
| Full name | Arctic Warfare |
| Event type | Story |
| Released on | CN, TW, KR, EN, JP |
| Available in campaign menu | CN, EN |
| See Events Music | |
| View page template | |
Winter 2017 event.
Event run time[edit]
| Title | Period (start/end) | Server | Type | Comment |
|---|---|---|---|---|
| 失温症 | 2017-01-25 03:00 - 2017-02-23 02:59 (UTC) |
CN | Story Event | |
| Arctic Warfare | 2017-11-16 21:00 - 2017-12-15 00:59 (UTC) |
KR | Story Event | |
| Arctic Warfare | 2019-01-25 14:00 - 2019-02-23 07:59 (UTC) |
EN | Story Event | |
| Arctic Warfare | 2019-01-25 04:00 - 2019-02-22 03:59 (UTC) |
JP | Story Event |
Ranking
| Title | Period (start/end) | Server | Type | Comment |
|---|---|---|---|---|
| 坠入兔洞 | 2018-07-05 03:00 - 2018-07-19 02:59 (UTC) |
CN | Ranking | PLUS rerun |
Overview[edit]
The new event introduces three new battle mechanics:
- Enemy fixed emplacements that whose damage is vastly reduced when you capture the node on which they sit (i.e. the turn after you fully control all nodes surrounding the emplacement).
- Certain helipads on the map will appear to be crossed out, and cannot be used to resupply or deploy echelons, though they will still provide you with additional action points when captured. Some of those helipads will have a number displayed below them; that number represents the number of turns until they can be used, or until they can no longer be used, depending on the current state of the helipad.
- One-time use supply caches, which appear on the map as a cube. These nodes may be used to resupply an echelon once before being depleted, regardless of whether you have captured them or not.
New T-Dolls
_ToDo_
Event Maps
The map guides below are based off of this guide, used with permission from the author.
Chapter 1
Map 1
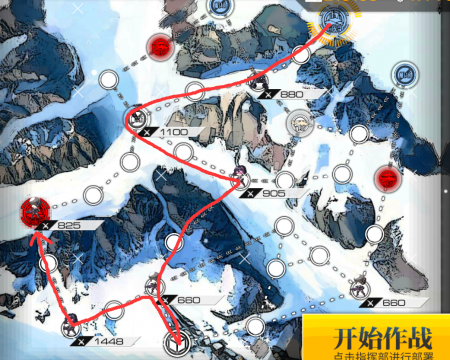
Recommended Level: N/A
Recommended Team Composition: Any one team
Comments: Occasionally the enemy AR team in the recommended path directly above the resupply point will move down and capture it. In those cases, fighting that AR team is not necessary, and you can rush straight to the enemy HQ without any trouble.
Map 2
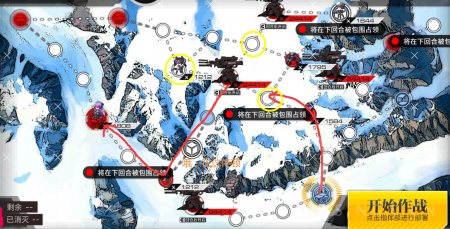
Clear reward: MP-446 "Sunflower" skin
Notable Drops: Type 56, Super SASS, EVO 3, AR70
Recommended Level: N/A
Recommended Team Composition: Any one team. Optionally may also use another team, a single handgun (deployed for extra actions), or both.
Comments: First capture the three points marked in yellow.
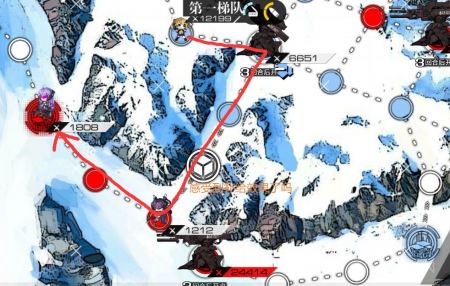
Then, proceed through the now-depowered fixed emplacement and proceed towards the enemy HQ, stopping midway to resupply at the supply node.
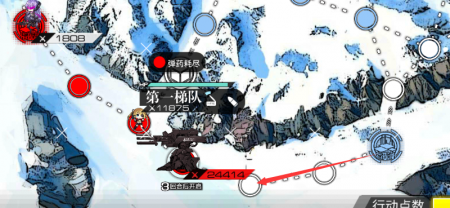
If you forgot to stop at the supply drop, you can deploy another echelon and take out the fixed emplacement along the way instead of resupplying the team you initially deployed.
Map 3
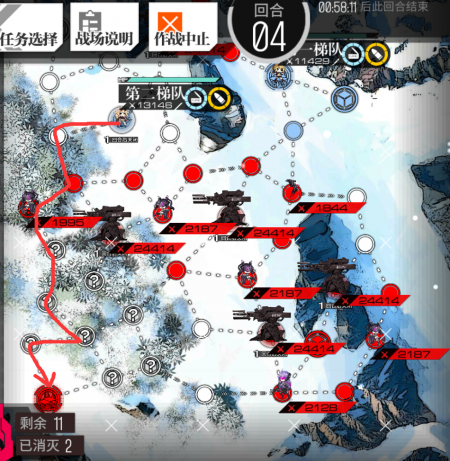
Clear reward: 20x Procurement Vouchers
Notable Drops: Type 56, Super SASS, AR70, OTs-44
Recommended Level: N/A
Recommended Team Composition: Any two or three teams.
Comments: Deploy one team and leave it to defend your HQ. The helipad on the left will allow you deploy an echelon on the fourth turn; use that echelon to rush the enemy HQ. If you're unlucky, it's possible to run into enough enemy ambushes to deplete your supplies. If your path forward is still blocked, you will have to deploy a third echelon.
Map 4
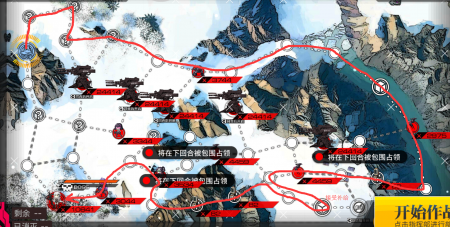
Clear reward: M1887 (5-star shotgun T-Doll)
Notable Drops: NZ75, G28, EVO 3, Type 59, OTs-44
Recommended Level: 70
Recommended Team Composition: Any one team, plus additional single handgun teams for extra movement.
Comments: Because enemy movements are somewhat random, depending on your luck it may be possible to reach the boss without having to resupply. The path marked on the map is a conservative route.
Chapter 2
Map 1
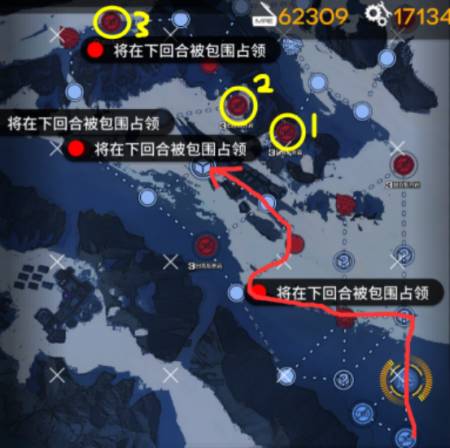
Recommended Level: 70
Recommended Team Composition: 2 RF/MG + 1 AR + 1 HG + 1 SMG/SG
Comments: Two enemy fixed emplacements will be randomly placed at two of the three marked nodes (1, 2, 3). If either there is no emplacement at either 1 or 2, you can continue directly onwards through that point to the enemy HQ.

If both 1 and 2 have an enemy fixed emplacement, make a detour to point 3, and rush to the enemy HQ after resupplying at the supply drop in the upper left corner.
Map 2

Clear reward: 16Lab Buckshot (5-star equpiment)
Recommended Level: 70
Recommended Team Composition: 2 RF + 1 AR + 1 HG + 1 SMG
Comments: On the first turn, follow the marked path, and check if the node circled in yellow turns red. If it does, that indicates that there is an enemy fixed emplacement there.
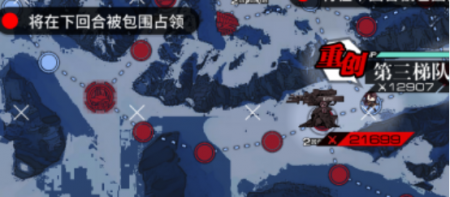
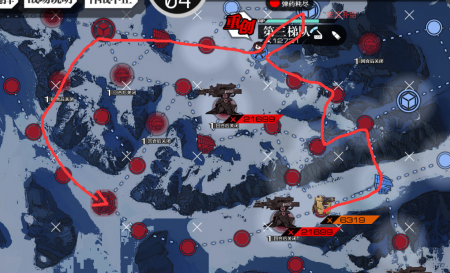

If that node does turn red, and you encounter an enemy fixed emplacement at the location marked in the first image, then proceed as shown in the second image. Otherwise you can directly rush to the enemy HQ.
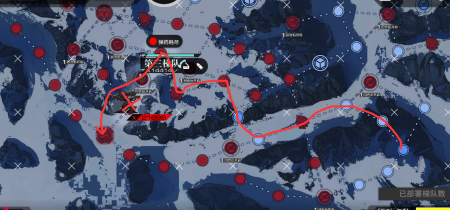
Otherwise, if the above node does not turn red, you can take the route marked to the left (the cannon in the image would not be there in that case).
You may need to make a trip to the supply drop above the marked node, as it's possible that you will run out of ammunition before making it to the enemy HQ.
Map 3

Clear reward: 30x Enhancement Pills
Recommended Level: 70
Recommended Team Composition: 2 RF + 1 AR + 1 HG + 1 SMG
Comments: Capture the helipad on the marked route and resupply there before continuing on.
If any of the helipads along the marked route lack enemy fixed emplacements, you can capture them, resupply, and rush the enemy HQ.
Map 4
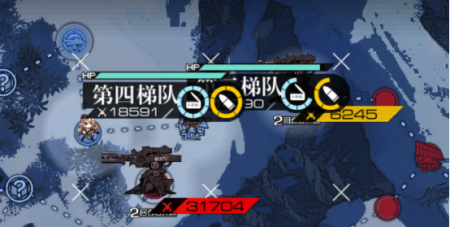
Clear reward: 16Lab Armored Vest (5-star equpiment)
Recommended Level: 70-90
Recommended Team Composition: One MG-centric team to lead the way, and one RF-centric team for killing the boss.
Comments: This map will have some weak fixed emplacements with 6000 combat rating instead of 31000 combat rating. You can use your MG team to directly push through those emplacements.
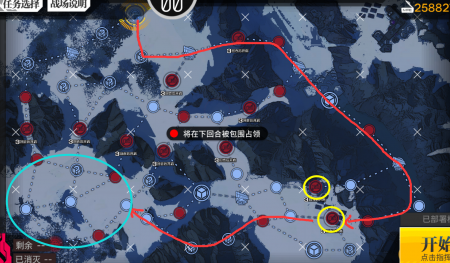
Lead the way with your MG team so that your RF team makes it to the boss with as much health left as possible. One of the two helipads marked in yellow will either have a weakened fixed emplacement or be missing it entirely. Capture the appropriate helipad and use it to repair and resupply as necessary.
The boss will be somewhere in the area circled in blue.
Chapter 3
Map 1
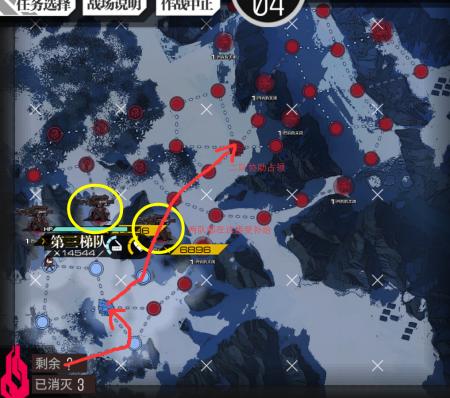
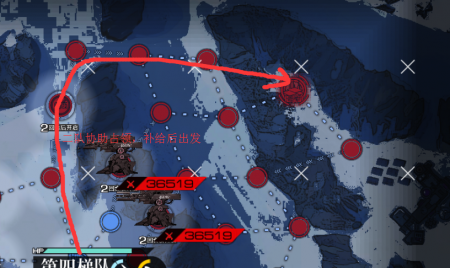
Clear reward: 500x Beginner Training Data
Recommended Level: 90
Recommended Team Composition: One MG-centric team, one team with 2 RF + 1 AR
Comments: Using two teams, capture the radar nodes and use the areas on the map to force your way through where the enemy fixed emplacements are weak. Resupply and repair at helipads you capture as necessary.
Map 2

Clear reward: 500x Intermediate Training Data
Recommended Level: 90
Recommended Team Composition: One team with 2 RF + 1 AR, and one team either with M37 with her skill maxed out or an AR team. Deploy other teams for extra actions as necessary.
Comments: One of the marked points will likely be missing a fixed emplacement; adjust your route as necessary. There are some enemy sniper teams that can cause some difficulties. You may wish to repair and resupply at a helipad before fighting them.
Map 3
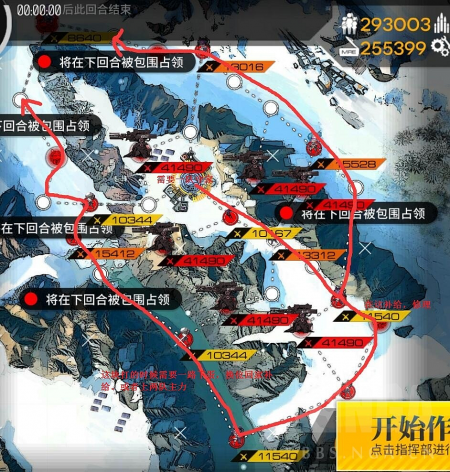
Clear reward: 500x Advanced Training Data
Notable Drops: NZ75, G28, Type 59, Type 56, Super SASS
Recommended Level: 90
Recommended Team Composition: At least three teams of any kind, plus additional teams for extra actions as necessary.
Comments: Keep at least one team on defense at your HQ.
Map 4
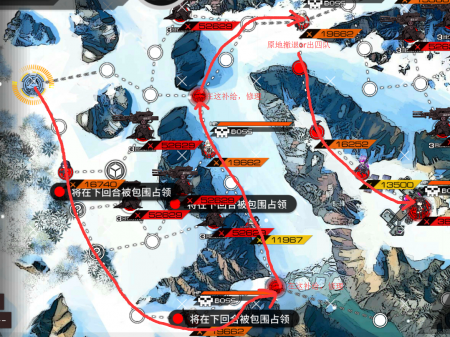
Clear reward: Grifon Elite Medal
Notable Drops: NZ75, G28, AR70, OTs-44, Type 59, EVO 3
Recommended Level: 90
Recommended Team Composition: Three teams of any kind, plus additional teams for extra actions as necessary.
Comments: Keep at least one team back to defend your HQ. Make your way down the marked path, repairing and resupplying at the marked nodes as necessary. It may take multiple attempts to kill each boss.
Ranking Map: Rabbit Hole
Plot
_ToDo_
Gallery
-
Login screen
References[edit]
| Girls' Frontline Events |
|---|


