Guide:Formation Menu: Difference between revisions
more stuff |
|||
| (16 intermediate revisions by 9 users not shown) | |||
| Line 1: | Line 1: | ||
{{Guide}} | {{Guide}} | ||
Formation Menu will cover echelon selection, formation building, T-Doll additional stats and equipment | Formation Menu will cover echelon selection, formation building, T-Doll additional stats and equipment usage. | ||
= Griffin Echelon = | |||
== Assigning T-Dolls and Fairy to Echelon == | |||
{{ThumbSlider|width=400|align=right|list= | |||
{{p|[[File:Echelon Display.jpeg|thumb||400px|Echelon interface.]]}} | |||
{{p|[[File:Echelon Selection T-Doll Menu.jpg|thumb||400px|T-Doll selection screen.]]}} | |||
{{p|[[File:Echelon Selection Fairy Menu.jpg|thumb||400px|Fairy selection screen.]]}} | |||
}} | |||
* Commanders can assign up to five T-Dolls to form a Griffin echelon. T-Dolls put on the first slot will act as the leader, and the remaining slots will act as members. | |||
* To assign T-Dolls to an echelon, simply tap the empty slot or already occupied T-Doll slot. This will bring up the T-Doll selection screen. Commanders may select one of the T-Dolls to assign to that slot. | |||
* Aside from T-Dolls, Commander can also assign one fairy to each echelon. [[Technical Fairies|Fairies]] provide aura and unique skills to aid T-Dolls in combat. | |||
* To assign a Fairy to an echelon, simply tap the empty slot or already occupied Fairy slot. This will bring up the Fairy selection screen. Commanders may choose one of the Fairies to assign to the echelon. | |||
* Commanders can display detailed informations for both T-Dolls and Fairy alike by tapping the button with magnifying glass icon. | |||
== Adjusting Formation == | |||
{{ThumbSlider|width=400|align=right|list= | |||
{{p|[[File:Formation Building.jpg|thumb||400px|Formation interface.]]}} | |||
{{p|[[File:Formation Building 2.jpg|thumb||400px|Buff tiles demonstration.]]}} | |||
}} | |||
From here, Commanders may see the formation of the selected echelon, together with some additional information. | |||
Formation composition and position offer different stats bonus and directly affects combat. So take into consideration when building echelons and formations!!! | |||
=== Buff Aura/Area of Effect Tiles === | |||
Generally, each type of T-Dolls will provide buffs to T-Dolls of different types. | |||
* Handgun (HG) provides buff tiles to all type. | |||
* Submachine Gun (SMG) provides buff tiles to Assault Rifle (AR). | |||
** There are few exceptions, such as {{doll name|UMP40|SMG|4}}, {{doll name|MP5|SMG|5|costume=costume5}}, {{doll name|Beretta Model 38|SMG|4|costume=costume1}}, {{doll name|Lusa|SMG|5}}, {{doll name|Dorothy|SMG|EXTRA}}, and {{doll name|Henrietta|SMG|EXTRA}}. | |||
* Assault Rifle (AR) provides buff tiles to Submachine Gun (SMG). | |||
** There are few exceptions, such as {{doll name|M4A1|AR|4}}, {{doll name|Ribeyrolles|AR|4}}, {{doll name|AUG|AR|5}}, {{doll name|Vepr|AR|3}}, {{doll name|StG44|AR|4|costume=costume1}}, {{doll name|AK-Alfa|AR|5}}, and {{doll name|Angelica|AR|EXTRA}}. | |||
* Rifles (RF) provides buff tiles to Handgun (HG). | |||
** With a few exceptions, such as {{doll name|Carcano M1891|RF|5}}, {{doll name|Carcano M91∕38|RF|5}}, {{doll name|KSVK|RF|5|costume=costume3}}, {{doll name|SL8|RF|5}} and {{doll name|Mondragon|RF|4}}. | |||
* Machine guns (MG) provides buff tiles to Shotgun (SG). | |||
** With a few exceptions, such as {{doll name|MG36|MG|5}} and {{doll name|RPK-16|MG|5}}. | |||
* Shotguns (SG) provides buff tiles to Machine Guns (MG). | |||
** With a few exceptions, such as {{doll name|DP-12|SG|5}} and {{doll name|Defender|SG|4}}. | |||
The T-Dolls will enter combat from the left side of the screen. Therefore, the T-Dolls in the far right column are the frontline, meaning that they '''WILL''' almost certainly take damage. T-Dolls in the middle row generally will be targeted by enemies first, and thus will take the most damage. | |||
If you have T-Dolls with multiple [[Guide:Factory Menu#Dummy Linking|dummy-links]], it will not only increase the versatility and survivability of the T-Doll itself, but the buff rate of it's T-Dolls also improved. | |||
The aura effect icons displayed in the formation menu represent, from left to right: | |||
* [[File:Icon_dmg.png|20px]] Damage | |||
* [[File:Icon_rof.png|20px]] Rate of Fire | |||
* [[File:Icon_acc.png|20px]] Accuracy | |||
* [[File:Icon_eva.png|20px]] Evasion | |||
* [[File:Icon_crit.png|20px]] Critical Hit Chance | |||
* Skill Cooldown | |||
* [[File:Icon_armor.png|20px]] Armor | |||
{{ThumbSlider|width=400|align=right|list= | |||
{{p|[[File:Formation Building 3.jpg|thumb||400px|Echelon preset 1.]]}} | |||
{{p|[[File:Formation Building 4.jpg|thumb||400px|Echelon preset 2.]]}} | |||
}} | |||
=== Using Echelon Presets === | |||
Echelon Presets allow players to "save" echelons (including the members and their positions) and "load" them when needed. This feature can be accessed by tapping the "Presets" tab on the right of the screen. Further instructions can be found in the following images. | |||
{{ | == Utilizing Equipment == | ||
{{ThumbSlider|width=400|align=right|list= | |||
[[File: | {{p|[[File:Equipment Toggle ON.jpeg|thumb||400px|Equipping or unequipping T-Doll accessories.]]}} | ||
{{p|[[File:Equipment Preset ON.jpeg|thumb||400px|Equipment presets.]]}} | |||
[[File: | |||
}} | }} | ||
* [[Equipment Index|Equipment]] is various accessories that can be equipped by T-Dolls to further increase their performance, offensively and defensively. | |||
* Each T-Doll is given three equipment slots; Accessories, Ammunition, and Body. | |||
** Accessory slot is used to mount equipments such as scopes, sight, and suppressor. | |||
** Ammunition slot is filled by ammunition-type equipment such as HV ammo, AP rounds, and HP ammo. | |||
** Body slot is used to don exoskeleton. | |||
* T-Doll level affects the ability to equip certain kind of ammunition, as well as equipment rarity. | |||
** Slot 1 is unlocked upon reaching level 20. Slot 2 is unlocked upon reaching level 50. Slot 3 is unlocked upon reaching level 80. | |||
** *1 equipment has no level requirement. *3 requires T-Doll to reach level 30. *4 and *5 need level 45 and 60 respectively. | |||
* Beware that equipments also have restrictions depends on it's type. For instance, HG, SG and AR (with the exception of 6P62) cannot equip AP ammo while RF and MG cannot equip ITI MARS. Some equipments are exclusive to a specific T-doll and thus can be only used by her. | |||
* As above, players can access the equipment menu from each T-Doll additional statistics menu. They can also access it by using the Equipment Display Menu from the main Formation Menu. Simply tap the "Display Equipment" to bring out the display menu. From here, tap the yellow "+" to go the Equipment Menu. | |||
= Coalition Echelon (Sangvis Ferri) = | |||
{{Spoiler|target=HOC Formation}} | |||
As of January 2020, players starting in Official CN server gained access to commanding Sangvis Ferri echelons. SF Coalition echelons are a different experience from conventional, total unit limits is increased from 5 (five) to 9 (nine), the total unit limit is likely due to tile limits, as player owned echelons can only have nine slots. Tile buff auras found on conventional T-Dolls are no longer present, additional equipment is no longer necessary and technical fairies are now simply incompatible. Coalition echelons can be deployed normally on the map without a special helipad, alongside normal echelons. They can also receive bonus from strategic type technical fairies, as well as HOC out-of-combat supports. On the subject of 'How to obtain Sangvis Ferri units', see [[Protocol Assimilation|main topic]] here. | |||
== Assigning units == | |||
{{ThumbSlider|width=400|align=right|list= | |||
{{p|[[File:Coalition_Echelon_Assign.jpg|thumb||400px|right|Confirmation dialogue box to switch from normal echelon to Coalition echelon.]]}} | |||
{{p|[[File:Coalition_Echelon_Formation.jpg|thumb||400px|right|Coalition unit formation interface.]]}} | |||
{{p|[[File:Coalition_Echelon_Unit_Selection.jpg|thumb||400px|right|Coalition unit selection interface.]]}} | |||
}} | |||
Commanders can assign any Coalition units that are already captured into combat echelons, to assign them to combat echelon, go to the formation menu, tap the empty position or already assigned doll, select the sub-categories on top of the menu to Coalition on the doll selection screen, and finalise selection. Upon selecting any coalition units, a dialogue box will prompt asking for confirmation to switch echelon type. To switch back to the conventional echelon type, simply reverse the process by selecting any T-Doll, and confirm on the message prompted. | |||
Coalition Echelon of Sangvis Ferri design consist of one leader and up to eight members, Commanders must select a leader first before assigning members of the echelon, note that Ringleader type units cannot be assigned as team members. Coalition echelons also has an unit limit known as 'Cost', each unit has their own cost, the higher the base rarity is, the higher the cost though there are some exceptions. Cost limit restricts Commanders from mindlessly stuffing powerful units into one echelon. | |||
{{clr}} | |||
{ | |||
== | == Ringleader units == | ||
{{ | {{ThumbSlider|width=400|align=right|list= | ||
{{p|[[File:Coalition_Echelon_Ringleader.jpg|thumb||400px|right|Coalition echelon interface with Executioner present.]]}} | |||
[[File: | {{p|[[File:Ringleader_Tactical_Chips.png|thumb||400px|right|Ringleader's Tactical Chip selection UI.]]}} | ||
{{p|[[File:Architect_Fire_Support_Aura.png|thumb||400px|right|UI with Architect's fire support interface]]}} | |||
[[File: | {{p|[[File:Architect Fire_Support_Cut_in.png|thumb||400px|right|Cut-in animation for 'Territorial Spirit']]}} | ||
{{p|[[File:Fighting_Spirit_Tactical_Chip_Aura.png|thumb||400px|right|UI with Ringleader's 'Fighting Spirit' Tactical Chip buff indicator]]}} | |||
{{p|[[File:Weaken_Tactical_Chip_Aura.png|thumb||400px|right|UI showing Intruder debuffing enemies using 'Weaken' Tactical Chip]]}} | |||
}} | }} | ||
Ringleader units, as story suggests, are field commanders for lesser SF units further down the chain of command, not only they are very capable of combat, they also act as force multipliers for other SF units present. | |||
*Ringleader units are exceptional combatants, boasting stats and ability beyond both ordinary and extraordinary T-Doll are capable of, with {{enemy name|Destroyer|boss}} boasting 930 damage per attack at maximum upgrades, and {{enemy name|Executioner|boss}} capable of unleashing a devastating attack calculating up to 25x of her base damage. | |||
*Ringleader comes with a wide variety of skills depending on their occupation for the previous employer. | |||
**Their trump card, the primary skill (skill 1) is a combat skill, which can be considered an ultimate move in combat, usually revolves around dealing massive damage to enemies in front of them. | |||
**Secondary, tertiary and quaternary skills differ between different Ringleaders, with ultimate assisting skills, pre-applied combat bonuses, out-of-combat fire support, self modifiers, and many more. | |||
*Simply leading the echelon, Ringleaders can apply combat buffs to the entire echelon, though different Ringleaders may apply bonuses to different type of units, as well as different attribute increases. | |||
**To further amplify the force-multiplier effect, Ringleaders can be equipped with (Up to 2) Tactical Chips, providing additional modifiers to their formation. | |||
*It is possible to Oath Ringleader type units as of September 2020. | |||
{{clr}} | |||
== Combat == | |||
[[File:Coalition_Units_InBattle.jpg|thumb|right]] | |||
Commanding an SF echelon is not so dissimilar to conventional echelons, with a few exceptions. Coalition echelons always deploy carrying 0 ammo 0 ration, they can be moved just like conventional echelons, and capable of engaging enemies, capturing nodes, destroying map infrastructures and rescuing hostages. Some other points of interest listed below: | |||
*Assimilation echelons have a fixed supply cost regardless of how many units are present in the formation, -72 Manpower to deploy them, -360 Rations/Ammo to supply them, Assimilation echelons also posses 10 ammo/ration pips, active battles the SF echelon engages will use 2 ammo pips and 1 ration pip. Echelons with a fire support capable ringleaders will consume 2 ammo and 1 ration pip to launch a fire support session. | |||
*When extracting an Assimilation echelon from a helipad, you'll refund their excess supply costs, for example if you supplied them at the start of the round, and then extracted them from a helipad, you'll get +360 Ammo/Rations back. | |||
*Assimilated units can be separated into two distinct classes; Melee and Ranged. Ranged units should be placed in the backline and will not be affected by players' Orders. Melee units should be placed on the frontline, these units will change their properties based on the orders Players' give them. | |||
*All 1* and 2* (non-Ringleader) units will auto use their combat skill, if they have the said skill(s) unlocked. Manually controlling SF unit skills are currently not possible. | |||
*Assimilation Echelons have a default vision radius of 1 tile in night battles. This radius can be expanded by another 1 tile, with the 'Night Combat FoV' Tactical Chip. | |||
*Assimilation Echelons are affected by the night battle accuracy penalty similar to regular echelons. This can be corrected by the 'Night Combat Ability' Tactical Chip which completely negates the echelons penalty. | |||
=== Assault, Eliminate and Guard === | |||
Players will notice distinct UI differences when entering combat sessions with an Coalition SF echelon, this is known as the Assault, Eliminate and Guard order. All combat session deploys with the echelon under 'Guard' stance. Entering battle, assimilation echelons will engage enemies much like regular T-Dolls, assuming units are occupying the rightmost tiles, ranged units will have max range and will target anything within range. | |||
Units moved away to engage enemies at melee range will still be 'tethered' to their tiles, but however they will not response to change position/swapping managements when they are not under 'Guard' order. The only real command a player can give to melee units is either move-to-engage, or return-to-position. While melee units are on the move all AoE attacks aimed at them will be aimed at their model's spot, lacking the precise control, the only way to micro-manage them away from the attack is to give the guard order. | |||
'''Guard:''' | |||
[[File:Command_Guard.png|thumb||400px|right|Coalition echelon holding their position]] | |||
The default stance, all units will stand their ground, will only attack enemies when they are within reach. This obviously does not affect ranged units, but melee units will stand their position. | |||
{{clr}} | |||
'''Eliminate:''' | |||
[[File:Command_Eliminate.png|thumb||400px|right|Executioner leading the charge]] | |||
Eliminate is the middle command, this will send all melee units to attack their closest enemy, range units will still attack as normal. | |||
{{clr}} | |||
'''Assault:''' | |||
[[File:Command_Assault.png|thumb||400px|right|Melee units performing a frontal assault on the enemy]] | |||
Assault mode sends melee units charging straight down their lane until encountering an enemy or edge of the 'kill-zone'. If encountering enemies during the process of the charge, melee units will initiate attack until either enemies are defeated or the guard order is given. Upon reaching the edge of the 'kill-zone' they will halt still, until no enemy remains in the 'kill-zone' or given the guard order. | |||
Melee units will only stay in their lane of the formation, and during the assault order, they will ignore all enemies that they do not make contact with, unless another order is given. | |||
{{clr}} | |||
= HOC Formation = | |||
ToDo | |||
= Popular Formations = | |||
Below are lists of popular formations recommended for new players. Keep in mind this section will only guide on the general formation building and you must make best of dolls you have to build the best echelon you can. | Below are lists of popular formations recommended for new players. Keep in mind this section will only guide on the general formation building and you must make best of dolls you have to build the best echelon you can. | ||
| Line 118: | Line 188: | ||
The roles in each cell will be in order from highest priority to lowest priority roles of the spots. | The roles in each cell will be in order from highest priority to lowest priority roles of the spots. | ||
=== AR-SMG/RF-HG Balanced === | |||
{| class="wikitable" style="text-align:center;" | {| class="wikitable" style="text-align:center;" | ||
|- | |- | ||
| Line 140: | Line 210: | ||
* It is not recommended to leave 8 empty, as it will cause the DPS doll on 7 to be targeted. | * It is not recommended to leave 8 empty, as it will cause the DPS doll on 7 to be targeted. | ||
==== [[Anti-Rain]] ==== | |||
{| class="wikitable" style="background-color: black; text-align:center;" | {| class="wikitable" style="background-color: black; text-align:center;" | ||
|- | |- | ||
| Line 156: | Line 226: | ||
|} | |} | ||
* Just like the original AR-SMG formation, this is a very balanced formation. | * Just like the original AR-SMG formation, this is a very balanced formation. | ||
* All dolls can be obtained through story, which is both an advantage and a | * All dolls can be obtained through story, which is both an advantage and a disadvantage. | ||
** As long as you complete the story all the way up to Ep.7, you have all the dolls needed for this. | ** As long as you complete the story all the way up to Ep.7, you have all the dolls needed for this. | ||
** All dolls are one-time only drop, so they all use cores to add dummy links. | ** All dolls are one-time only drop, so they all use cores to add dummy links. | ||
* If the enemies' damage is low enough, M16A1 with armor can stand as main tanker by switching places with RO635. | * If the enemies' damage is low enough, M16A1 with armor can stand as main tanker by switching places with RO635. | ||
* Although this echelon is powerful, this is not a very efficient way to use these powerful story-reward dolls, and can only be seen as a "concept" echelon rather than actual battle-efficient one. | |||
** {{doll name|ST AR-15|AR|4}} and {{doll name|M4 SOPMOD II|AR|4}} both possess powerful DPS and buff tiles, which are not being fully taken advantage of with only single SMG there to be buffed while lacking any significant DPS buff from multiple SMGs. | |||
** {{doll name|M16A1|AR|4}}, although with high evasion with some armor combined with the flashbang skill, is still an AR, not an SMG, and lacks sufficient tanking ability to be used as a tanker while also not being so good on DPS. She is generally not an efficient doll to be used under normal circumstances, and more commonly used for Corpse Dragging or when killing Golyat Plus(red beans) without a force shielder. | |||
=== MG-SG === | |||
{| class="wikitable" style="text-align:center;" | {| class="wikitable" style="text-align:center;" | ||
|- | |- | ||
| Line 199: | Line 250: | ||
|} | |} | ||
* This formation works with all MG-SG based formations. | * This formation works with all MG-SG based formations. | ||
* It should be noted that the MGs use a lot of ammo while SGs use a lot of rations, making this formation very resource-heavy. | |||
* You may use some HG to buff the MGs. It doesn't matter if the SG gets HG buffs or not as no HG formation buff increases armor, the SGs' source of tanking ability. | * You may use some HG to buff the MGs. It doesn't matter if the SG gets HG buffs or not as no HG formation buff increases armor, the SGs' source of tanking ability. | ||
=== Sole DPS "Exodia" === | |||
{| class="wikitable" style="text-align:center;" | {| class="wikitable" style="text-align:center;" | ||
|- | |- | ||
| Line 223: | Line 275: | ||
** The buffers are usually 5-link HGs, but for M4A1 and G11 you may consider using Ribeyrolles. | ** The buffers are usually 5-link HGs, but for M4A1 and G11 you may consider using Ribeyrolles. | ||
==== | === Corpse Dragging === | ||
{{Main|Guide:Strategies#Corpse Dragging}} | |||
{| class="wikitable" style="text-align:center;" | {| class="wikitable" style="text-align:center;" | ||
|- | |- | ||
|style="width:200px"| Tourist | |style="width:200px"| Tourist | ||
|style="width:200px"| | |style="width:200px"| | ||
|style="width:200px"| | |style="width:200px"| | ||
|- | |- | ||
| Line 235: | Line 288: | ||
|- | |- | ||
|style="width:200px"| Tourist | |style="width:200px"| Tourist | ||
|style="width:200px"| | |style="width:200px"| Tourist | ||
|style="width:200px"| | |style="width:200px"| | ||
|} | |} | ||
* This is a specialized formation for [[Guide:Strategies# | * This is a specialized formation for [[Guide:Strategies#Corpse Dragging|Corpse Dragging]]. See the page for more detail on its purpose. | ||
* There should be only '''one''' DPS doll, the only doll that gets supplied. | * There should be only '''one''' DPS doll, the only doll that gets supplied. | ||
* The "tourists" should be placed wisely to maximize their buff to the DPS doll. | * The "tourists" should be placed wisely to maximize their buff to the DPS doll. | ||
* Keep in mind that without supply, dolls won't use their skills either. | * Keep in mind that without supply, dolls won't use their skills either. | ||
| Line 270: | Line 322: | ||
* Accuracy - Affects hit probability: 1 - (Enemy Evasion)/(Enemy Evasion + T-Doll Accuracy) | * Accuracy - Affects hit probability: 1 - (Enemy Evasion)/(Enemy Evasion + T-Doll Accuracy) | ||
* Evasion - Affects evasion probability: (T-Doll Evasion)/(T-Doll Evasion + Enemy Accuracy) | * Evasion - Affects evasion probability: (T-Doll Evasion)/(T-Doll Evasion + Enemy Accuracy) | ||
* Rate of Fire - How many hits per 50 seconds (e.g. 50 ROF = 1 hit per second) | * Rate of Fire - How many hits per 50 seconds (e.g. 50 ROF = 1 hit per second). | ||
**The max RoF for SG is 60. | |||
**The RoF for all MG is a constant 150. | |||
**The max RoF for AR, SMG, RF, and HG is 120. | |||
* Movement Speed - How fast T-Dolls move | * Movement Speed - How fast T-Dolls move | ||
* Overall Operational Effectiveness | * Overall Operational Effectiveness | ||
| Line 280: | Line 335: | ||
** AR: 20% Critical Rate | ** AR: 20% Critical Rate | ||
** RF: 40% Critical Rate | ** RF: 40% Critical Rate | ||
** SG: | ** SG: 40% Critical Rate | ||
*Armor Penetration - How much armor will be mitigated: | *Armor Penetration - How much armor will be mitigated: 15 base armor penetration for all T-Dolls. | ||
*Armor - How much damage will be mitigated. | *Armor - How much damage will be mitigated. | ||
| Line 290: | Line 345: | ||
*Night Vision - % Reduction in night operation penalty. | *Night Vision - % Reduction in night operation penalty. | ||
**Night operations confers -90% accuracy. This penalty is multiplied by any other auras or buffs. | **Night operations confers -90% accuracy. This penalty is multiplied by any other auras or buffs. | ||
*Skill Cooldown Reduction- % Reduction in skill cooldown. Max 30% cooldown reduction. | |||
'''Affection''': At the bottom of the table is the Affection meter of the T-Doll. | '''Affection''': At the bottom of the table is the Affection meter of the T-Doll. | ||
| Line 297: | Line 353: | ||
Once players obtain a T-Doll, the Affection will always be at 50/100. The meter will go up gradually when you use that T-Doll in Combat. Additionally, Echelon Leader and T-Dolls who get MVP in combat will earn more Affection. On the other hand, the Affection can also goes down when a T-Doll lose all of her Health in combat and when the enemy get through to the farthest left screen. Once this happens, not only the dying T-Doll but all the T-Dolls in the Echelon will drop their Affections, so be careful!!! | Once players obtain a T-Doll, the Affection will always be at 50/100. The meter will go up gradually when you use that T-Doll in Combat. Additionally, Echelon Leader and T-Dolls who get MVP in combat will earn more Affection. On the other hand, the Affection can also goes down when a T-Doll lose all of her Health in combat and when the enemy get through to the farthest left screen. Once this happens, not only the dying T-Doll but all the T-Dolls in the Echelon will drop their Affections, so be careful!!! | ||
Affection buffs: When the Affection meter reaches 90 | Affection buffs: When the Affection meter reaches 90, the T-Doll will receive a +5% boost to her Damage, Accuracy and Evasion stats. | ||
Marriage: When a T-Doll's Affection reaches 100, a small heart symbol will appear on her card. And you can choose to marry her (Click the Button with the ring symbol at the right side of the Affection meter). A married T-Doll will have a ring symbol on her card, and her Max affection will increase to 150, upon reaching 140+, that T-doll will receive an additional +5% boost for Damage, Accuracy and Evasion (stack with the previous buffs to +10% boost). | |||
=== Skill === | === Skill === | ||
| Line 316: | Line 366: | ||
{| style="width:100%" | {| style="width:100%" | ||
|} | |} | ||
==Additional Help== | ==Additional Help== | ||
*[https://docs.google.com/document/d/1STNoii10S7cHSz573t39BWtKFEY0CFWqWMkas1472RE/edit?usp=sharing Introductory Principles of Doll Formations] | *[https://docs.google.com/document/d/1STNoii10S7cHSz573t39BWtKFEY0CFWqWMkas1472RE/edit?usp=sharing Introductory Principles of Doll Formations] | ||
Latest revision as of 19:03, 9 October 2020
Formation Menu will cover echelon selection, formation building, T-Doll additional stats and equipment usage.
Griffin Echelon[edit]
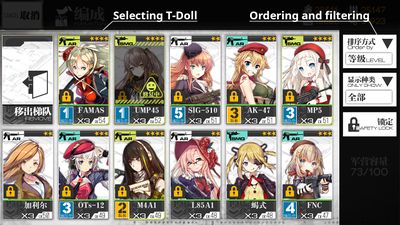
Assigning T-Dolls and Fairy to Echelon[edit]
- Commanders can assign up to five T-Dolls to form a Griffin echelon. T-Dolls put on the first slot will act as the leader, and the remaining slots will act as members.
- To assign T-Dolls to an echelon, simply tap the empty slot or already occupied T-Doll slot. This will bring up the T-Doll selection screen. Commanders may select one of the T-Dolls to assign to that slot.
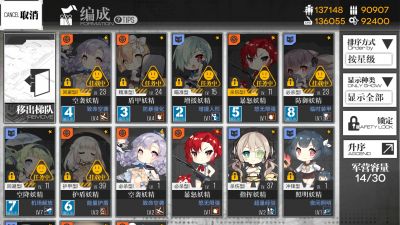
- Aside from T-Dolls, Commander can also assign one fairy to each echelon. Fairies provide aura and unique skills to aid T-Dolls in combat.
- To assign a Fairy to an echelon, simply tap the empty slot or already occupied Fairy slot. This will bring up the Fairy selection screen. Commanders may choose one of the Fairies to assign to the echelon.
- Commanders can display detailed informations for both T-Dolls and Fairy alike by tapping the button with magnifying glass icon.
Adjusting Formation[edit]
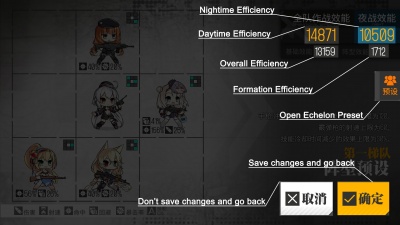
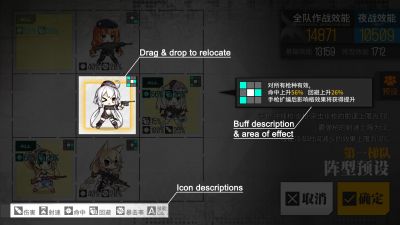
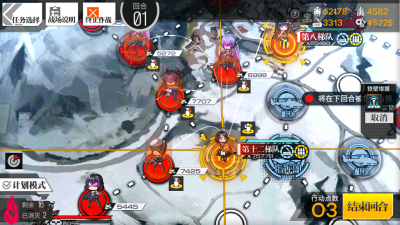
From here, Commanders may see the formation of the selected echelon, together with some additional information.
Formation composition and position offer different stats bonus and directly affects combat. So take into consideration when building echelons and formations!!!
Buff Aura/Area of Effect Tiles[edit]
Generally, each type of T-Dolls will provide buffs to T-Dolls of different types.
- Handgun (HG) provides buff tiles to all type.
- Submachine Gun (SMG) provides buff tiles to Assault Rifle (AR).
- There are few exceptions, such as SMG UMP40UMP40UMP40, SMG MP5MP5MP5, SMG Beretta Model 38Beretta Model 38Beretta Model 38, SMG LusaLusaLusa, SMG DorothyDorothyDorothy, and SMG HenriettaHenriettaHenrietta.
- Assault Rifle (AR) provides buff tiles to Submachine Gun (SMG).
- There are few exceptions, such as AR M4A1M4A1M4A1, AR RibeyrollesRibeyrollesRibeyrolles, AR AUGAUGAUG, AR VeprVeprVepr, AR StG44StG44StG44, AR AK-AlfaAK-AlfaAK-Alfa, and AR AngelicaAngelicaAngelica.
- Rifles (RF) provides buff tiles to Handgun (HG).
- With a few exceptions, such as RF Carcano M1891Carcano M1891Carcano M1891, RF Carcano M91∕38Carcano M91∕38Carcano M91∕38, RF KSVKKSVKKSVK, RF SL8SL8SL8 and RF MondragonMondragonMondragon.
- Machine guns (MG) provides buff tiles to Shotgun (SG).
- Shotguns (SG) provides buff tiles to Machine Guns (MG).
- With a few exceptions, such as SG DP-12DP-12DP-12 and SG DefenderDefenderDefender.
The T-Dolls will enter combat from the left side of the screen. Therefore, the T-Dolls in the far right column are the frontline, meaning that they WILL almost certainly take damage. T-Dolls in the middle row generally will be targeted by enemies first, and thus will take the most damage.
If you have T-Dolls with multiple dummy-links, it will not only increase the versatility and survivability of the T-Doll itself, but the buff rate of it's T-Dolls also improved.
The aura effect icons displayed in the formation menu represent, from left to right:
Using Echelon Presets[edit]
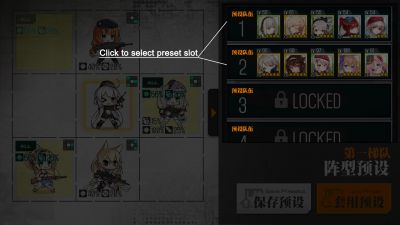
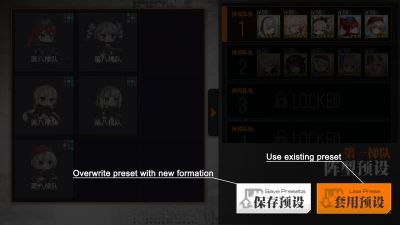
Echelon Presets allow players to "save" echelons (including the members and their positions) and "load" them when needed. This feature can be accessed by tapping the "Presets" tab on the right of the screen. Further instructions can be found in the following images.
Utilizing Equipment[edit]
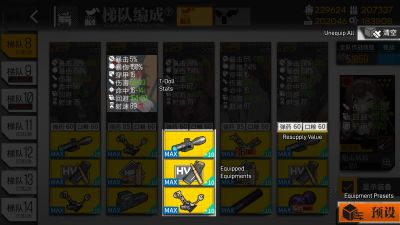
- Equipment is various accessories that can be equipped by T-Dolls to further increase their performance, offensively and defensively.
- Each T-Doll is given three equipment slots; Accessories, Ammunition, and Body.
- Accessory slot is used to mount equipments such as scopes, sight, and suppressor.
- Ammunition slot is filled by ammunition-type equipment such as HV ammo, AP rounds, and HP ammo.
- Body slot is used to don exoskeleton.
- T-Doll level affects the ability to equip certain kind of ammunition, as well as equipment rarity.
- Slot 1 is unlocked upon reaching level 20. Slot 2 is unlocked upon reaching level 50. Slot 3 is unlocked upon reaching level 80.
- *1 equipment has no level requirement. *3 requires T-Doll to reach level 30. *4 and *5 need level 45 and 60 respectively.
- Beware that equipments also have restrictions depends on it's type. For instance, HG, SG and AR (with the exception of 6P62) cannot equip AP ammo while RF and MG cannot equip ITI MARS. Some equipments are exclusive to a specific T-doll and thus can be only used by her.
- As above, players can access the equipment menu from each T-Doll additional statistics menu. They can also access it by using the Equipment Display Menu from the main Formation Menu. Simply tap the "Display Equipment" to bring out the display menu. From here, tap the yellow "+" to go the Equipment Menu.
Coalition Echelon (Sangvis Ferri)[edit]
As of January 2020, players starting in Official CN server gained access to commanding Sangvis Ferri echelons. SF Coalition echelons are a different experience from conventional, total unit limits is increased from 5 (five) to 9 (nine), the total unit limit is likely due to tile limits, as player owned echelons can only have nine slots. Tile buff auras found on conventional T-Dolls are no longer present, additional equipment is no longer necessary and technical fairies are now simply incompatible. Coalition echelons can be deployed normally on the map without a special helipad, alongside normal echelons. They can also receive bonus from strategic type technical fairies, as well as HOC out-of-combat supports. On the subject of 'How to obtain Sangvis Ferri units', see main topic here.
Assigning units[edit]
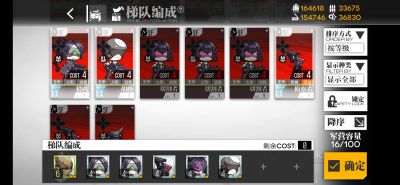
Commanders can assign any Coalition units that are already captured into combat echelons, to assign them to combat echelon, go to the formation menu, tap the empty position or already assigned doll, select the sub-categories on top of the menu to Coalition on the doll selection screen, and finalise selection. Upon selecting any coalition units, a dialogue box will prompt asking for confirmation to switch echelon type. To switch back to the conventional echelon type, simply reverse the process by selecting any T-Doll, and confirm on the message prompted.
Coalition Echelon of Sangvis Ferri design consist of one leader and up to eight members, Commanders must select a leader first before assigning members of the echelon, note that Ringleader type units cannot be assigned as team members. Coalition echelons also has an unit limit known as 'Cost', each unit has their own cost, the higher the base rarity is, the higher the cost though there are some exceptions. Cost limit restricts Commanders from mindlessly stuffing powerful units into one echelon.
Ringleader units[edit]
Ringleader units, as story suggests, are field commanders for lesser SF units further down the chain of command, not only they are very capable of combat, they also act as force multipliers for other SF units present.
- Ringleader units are exceptional combatants, boasting stats and ability beyond both ordinary and extraordinary T-Doll are capable of, with Destroyer boasting 930 damage per attack at maximum upgrades, and Executioner capable of unleashing a devastating attack calculating up to 25x of her base damage.
- Ringleader comes with a wide variety of skills depending on their occupation for the previous employer.
- Their trump card, the primary skill (skill 1) is a combat skill, which can be considered an ultimate move in combat, usually revolves around dealing massive damage to enemies in front of them.
- Secondary, tertiary and quaternary skills differ between different Ringleaders, with ultimate assisting skills, pre-applied combat bonuses, out-of-combat fire support, self modifiers, and many more.
- Simply leading the echelon, Ringleaders can apply combat buffs to the entire echelon, though different Ringleaders may apply bonuses to different type of units, as well as different attribute increases.
- To further amplify the force-multiplier effect, Ringleaders can be equipped with (Up to 2) Tactical Chips, providing additional modifiers to their formation.
- It is possible to Oath Ringleader type units as of September 2020.
Combat[edit]
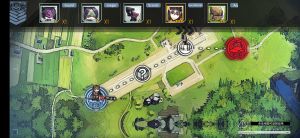
Commanding an SF echelon is not so dissimilar to conventional echelons, with a few exceptions. Coalition echelons always deploy carrying 0 ammo 0 ration, they can be moved just like conventional echelons, and capable of engaging enemies, capturing nodes, destroying map infrastructures and rescuing hostages. Some other points of interest listed below:
- Assimilation echelons have a fixed supply cost regardless of how many units are present in the formation, -72 Manpower to deploy them, -360 Rations/Ammo to supply them, Assimilation echelons also posses 10 ammo/ration pips, active battles the SF echelon engages will use 2 ammo pips and 1 ration pip. Echelons with a fire support capable ringleaders will consume 2 ammo and 1 ration pip to launch a fire support session.
- When extracting an Assimilation echelon from a helipad, you'll refund their excess supply costs, for example if you supplied them at the start of the round, and then extracted them from a helipad, you'll get +360 Ammo/Rations back.
- Assimilated units can be separated into two distinct classes; Melee and Ranged. Ranged units should be placed in the backline and will not be affected by players' Orders. Melee units should be placed on the frontline, these units will change their properties based on the orders Players' give them.
- All 1* and 2* (non-Ringleader) units will auto use their combat skill, if they have the said skill(s) unlocked. Manually controlling SF unit skills are currently not possible.
- Assimilation Echelons have a default vision radius of 1 tile in night battles. This radius can be expanded by another 1 tile, with the 'Night Combat FoV' Tactical Chip.
- Assimilation Echelons are affected by the night battle accuracy penalty similar to regular echelons. This can be corrected by the 'Night Combat Ability' Tactical Chip which completely negates the echelons penalty.
Assault, Eliminate and Guard[edit]
Players will notice distinct UI differences when entering combat sessions with an Coalition SF echelon, this is known as the Assault, Eliminate and Guard order. All combat session deploys with the echelon under 'Guard' stance. Entering battle, assimilation echelons will engage enemies much like regular T-Dolls, assuming units are occupying the rightmost tiles, ranged units will have max range and will target anything within range.
Units moved away to engage enemies at melee range will still be 'tethered' to their tiles, but however they will not response to change position/swapping managements when they are not under 'Guard' order. The only real command a player can give to melee units is either move-to-engage, or return-to-position. While melee units are on the move all AoE attacks aimed at them will be aimed at their model's spot, lacking the precise control, the only way to micro-manage them away from the attack is to give the guard order.
Guard:
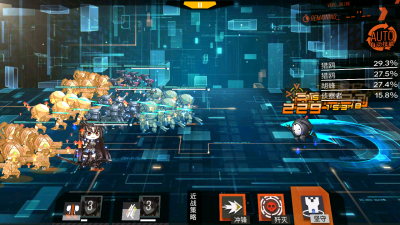
The default stance, all units will stand their ground, will only attack enemies when they are within reach. This obviously does not affect ranged units, but melee units will stand their position.
Eliminate:
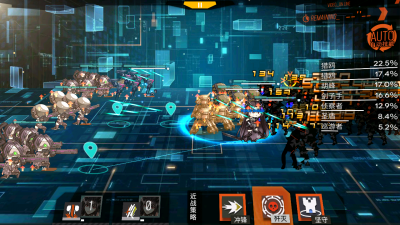
Eliminate is the middle command, this will send all melee units to attack their closest enemy, range units will still attack as normal.
Assault:
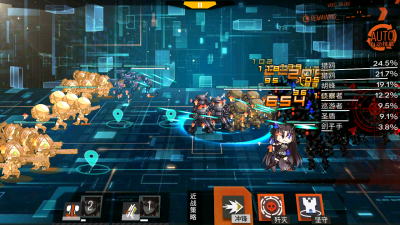
Assault mode sends melee units charging straight down their lane until encountering an enemy or edge of the 'kill-zone'. If encountering enemies during the process of the charge, melee units will initiate attack until either enemies are defeated or the guard order is given. Upon reaching the edge of the 'kill-zone' they will halt still, until no enemy remains in the 'kill-zone' or given the guard order.
Melee units will only stay in their lane of the formation, and during the assault order, they will ignore all enemies that they do not make contact with, unless another order is given.
HOC Formation[edit]
ToDo
Popular Formations[edit]
Below are lists of popular formations recommended for new players. Keep in mind this section will only guide on the general formation building and you must make best of dolls you have to build the best echelon you can.
We'll be using keypad location to refer to each positions.
| 7 | 8 | 9 |
| 4 | 5 | 6 |
| 1 | 2 | 3 |
The roles in each cell will be in order from highest priority to lowest priority roles of the spots.
AR-SMG/RF-HG Balanced[edit]
| DPS | Tank / Buff / DPS | |
| Buff / DPS | Tanker | |
| DPS | Tank / Buff / DPS |
- This formation is the most commonly used and the most balanced in all aspects.
- 741, the DPS spots, are usually taken by AR or RF.
- 4 as buffer spot is usually taken by HG, but AR M4A1M4A1M4A1 or AR RibeyrollesRibeyrollesRibeyrolles can work as buff-DPS hybrid as well on 3-AR formations.
- 5, the Main-Tanker spot, is usually taken by SMG/HG with high evasion and health.
- 82, the Sub-Tanker spot, usually use DPS or smoke/flash SMGs or HG buffer.
- It is not recommended to leave 8 empty, as it will cause the DPS doll on 7 to be targeted.
Anti-Rain[edit]
| AR ST AR-15ST AR-15ST AR-15 | AR M16A1M16A1M16A1 | |
| AR M4A1M4A1M4A1 | SMG RO635RO635RO635 | |
| AR M4 SOPMOD IIM4 SOPMOD IIM4 SOPMOD II |
- Just like the original AR-SMG formation, this is a very balanced formation.
- All dolls can be obtained through story, which is both an advantage and a disadvantage.
- As long as you complete the story all the way up to Ep.7, you have all the dolls needed for this.
- All dolls are one-time only drop, so they all use cores to add dummy links.
- If the enemies' damage is low enough, M16A1 with armor can stand as main tanker by switching places with RO635.
- Although this echelon is powerful, this is not a very efficient way to use these powerful story-reward dolls, and can only be seen as a "concept" echelon rather than actual battle-efficient one.
- AR ST AR-15ST AR-15ST AR-15 and AR M4 SOPMOD IIM4 SOPMOD IIM4 SOPMOD II both possess powerful DPS and buff tiles, which are not being fully taken advantage of with only single SMG there to be buffed while lacking any significant DPS buff from multiple SMGs.
- AR M16A1M16A1M16A1, although with high evasion with some armor combined with the flashbang skill, is still an AR, not an SMG, and lacks sufficient tanking ability to be used as a tanker while also not being so good on DPS. She is generally not an efficient doll to be used under normal circumstances, and more commonly used for Corpse Dragging or when killing Golyat Plus(red beans) without a force shielder.
MG-SG[edit]
| MG | SG | |
| MG / HG | HG | SG |
| MG | SG |
- This formation works with all MG-SG based formations.
- It should be noted that the MGs use a lot of ammo while SGs use a lot of rations, making this formation very resource-heavy.
- You may use some HG to buff the MGs. It doesn't matter if the SG gets HG buffs or not as no HG formation buff increases armor, the SGs' source of tanking ability.
Sole DPS "Exodia"[edit]
| Buff | Buff | |
| DPS | Buff / Tank | |
| Buff | Buff |
- This is a formation where the single DPS doll receives as much buff as possible.
- This formation is mainly used for grinding without a tanker or for killing the boss with minimum possible resource.
- The common DPS doll used are RF IWS 2000IWS 2000IWS 2000, AR M4A1M4A1M4A1 Mod 3, and AR G11G11G11.
- It's crucial to pick out the right HG to build the formation with, focusing on Rate of Fire and Damage for IWS 2000 and M4A1, and Damage and Accuracy for G11.
- This isn't an easy formation to build as it requires all the dolls in the formation to be at maximum efficiency for giving buff, like skill level 10 or 5-link HG.
- The buffers are usually 5-link HGs, but for M4A1 and G11 you may consider using Ribeyrolles.
Corpse Dragging[edit]
| Tourist | ||
| DPS / Tourist | DPS / Tourist | Tank |
| Tourist | Tourist |
- This is a specialized formation for Corpse Dragging. See the page for more detail on its purpose.
- There should be only one DPS doll, the only doll that gets supplied.
- The "tourists" should be placed wisely to maximize their buff to the DPS doll.
- Keep in mind that without supply, dolls won't use their skills either.
T-Doll Additional Statistics[edit]
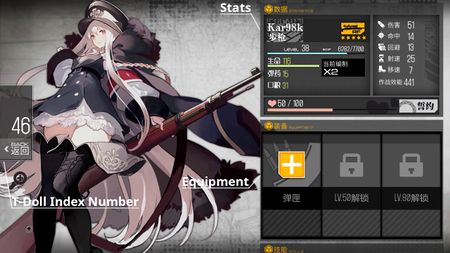
Access by tapping the yellow button with the "+" inside the magnifying glass located at the lower right corner of T-Doll card. From here, player can view all of their statistics, skills and Buff Tiles.
Stat/Statistics Table[edit]
In the left column, from top to bottom and from left to right, these are:
- T-Doll name and type
- T-Doll level and the amount of experience needs to advance to the next level
- Health bar
- Ammunition
- Rations
- The current number of Dummy-links
In the right column, from top to bottom:
- Damage - Damage per hit: max(2, damage - armor)
- Accuracy - Affects hit probability: 1 - (Enemy Evasion)/(Enemy Evasion + T-Doll Accuracy)
- Evasion - Affects evasion probability: (T-Doll Evasion)/(T-Doll Evasion + Enemy Accuracy)
- Rate of Fire - How many hits per 50 seconds (e.g. 50 ROF = 1 hit per second).
- The max RoF for SG is 60.
- The RoF for all MG is a constant 150.
- The max RoF for AR, SMG, RF, and HG is 120.
- Movement Speed - How fast T-Dolls move
- Overall Operational Effectiveness
Hidden stats unless modified:
- Critical Rate (Only shown if modified) - Percent chance of a hit being a critical, which deals 150% damage post-mitigation.
- MG: 5% Critical Rate
- HG: 20% Critical Rate
- AR: 20% Critical Rate
- RF: 40% Critical Rate
- SG: 40% Critical Rate
- Armor Penetration - How much armor will be mitigated: 15 base armor penetration for all T-Dolls.
- Armor - How much damage will be mitigated.
- SG: armor based on T-Doll
- Others: 0 armor
- Night Vision - % Reduction in night operation penalty.
- Night operations confers -90% accuracy. This penalty is multiplied by any other auras or buffs.
- Skill Cooldown Reduction- % Reduction in skill cooldown. Max 30% cooldown reduction.
Affection: At the bottom of the table is the Affection meter of the T-Doll.
Main article: Affection
Once players obtain a T-Doll, the Affection will always be at 50/100. The meter will go up gradually when you use that T-Doll in Combat. Additionally, Echelon Leader and T-Dolls who get MVP in combat will earn more Affection. On the other hand, the Affection can also goes down when a T-Doll lose all of her Health in combat and when the enemy get through to the farthest left screen. Once this happens, not only the dying T-Doll but all the T-Dolls in the Echelon will drop their Affections, so be careful!!!
Affection buffs: When the Affection meter reaches 90, the T-Doll will receive a +5% boost to her Damage, Accuracy and Evasion stats.
Marriage: When a T-Doll's Affection reaches 100, a small heart symbol will appear on her card. And you can choose to marry her (Click the Button with the ring symbol at the right side of the Affection meter). A married T-Doll will have a ring symbol on her card, and her Max affection will increase to 150, upon reaching 140+, that T-doll will receive an additional +5% boost for Damage, Accuracy and Evasion (stack with the previous buffs to +10% boost).
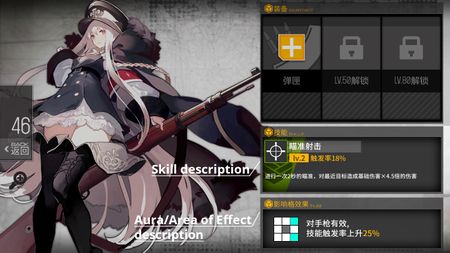
Skill[edit]
This part is about the T-Doll primary skill and its detailed descriptions.
Buff Tiles[edit]
Description of the T-Doll's Effect Tiles. Also, the tile shows the direction of buff bonus for T-Dolls.


