Guide:Formation Menu
Formation Menu will cover echelon selection, formation building, T-Doll additional stats and equipment using.
Echelon Selection
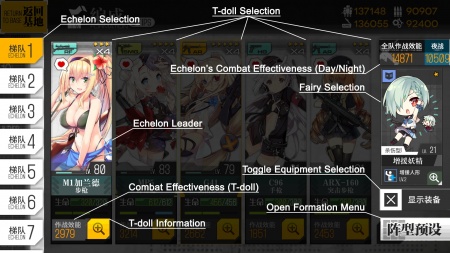
In this menu, players will be able to select and assemble Combat Echelons. The steps are as follows:
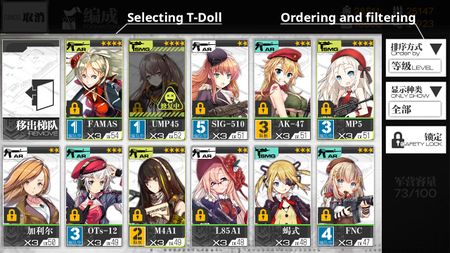
- Click a slot to access T-Doll selection menu. Each echelon can have a maximum of 5 members and one fairy. Keep in mind that the first slot to the left of the screen (leader slot) cannot be empty
- Select the T-Doll you want to add the echelon, doing this will also get you back the main Echelon menu.
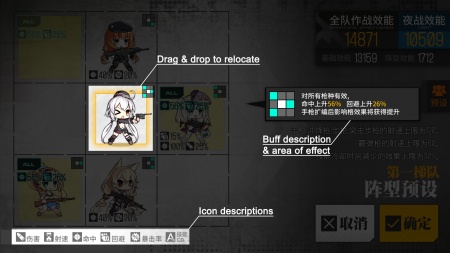
- You can swap the orders of T-Dolls in an Echelon by dragging them to the position your like.
- The first slot in the echelon (the farthest to the left) is the echelon leader.
- Echelon leaders gain additional experience.
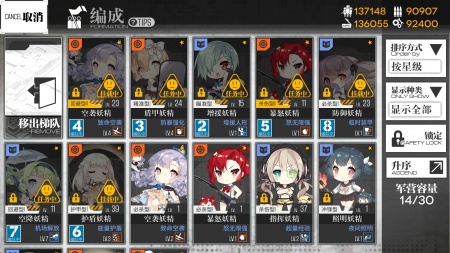
- Faries provide buffs and unique skills that can be activated in battles and can only be obtained through "Heavy Equipment Construction", which can be unlocked by obtaining 60 gold medals (doing so will also unlock the fairy slot). Selecting fairy is the same as selecting T-Doll and equipments. Fairies list can be found at Equipment Production.
- Tapping the yellow button with the "+" inside the magnifying glass of each T-Doll to access that T-Doll additional statistics.
- Tapping the Formation Menu to get to the Formation Building Menu.
NOTE: On the right side of the T-Doll selection menu, players can change the showing order and filtering of T-Dolls:
For "Order by", there are:
- By Level : From highest to lowest levels
- By Rarity : From 5 to 2 stars
- By AcquireSequence : The order players acquired their T-Dolls
- By Name : Alphabetical order according to T-Doll names.
- By Emotion : Emotions depend on the T-Doll activities (Auto-battle, Logistics Operations, Repairing, Skill Researching,...)
For Filtering "Only Show", there are:
- Show All
- Pistol (HG)
- Submachine Gun (SMG)
- Rifle (RF)
- Assault Rifle (AR)
- Machine Gun (MG)
Formation Building
From here, player can see the formation of the selected echelon, together with some additional information.
Formation composition and position offer different stats bonus and directly affects combat. So take into consideration when building echelons and formations!!!
Buff Aura/Area of Effect Tiles
Generally, T-Dolls will provide buffs to T-Dolls of specific types.
- Handguns (HG) affect all T-Doll types.
- Submachine guns (SMG) affect Assault Rifle (AR), with the exception of UMP40, who affects SMGs instead of ARs.
- Assault rifles (AR) affect Submachine guns (SMG), with the exception of M4A1, Ribeyrolles, and AUG, who affects ARs, ARs, and all T-Doll types.
- Rifles (RF) affect Handguns (HG), with the exception of Carcano sisters, who affects RFs instead of HGs.
- They only give skill cooldown reduction buffs.
- Machine guns (MG) affect Shotguns (SG).
- Shotguns (SG) affect Machine Guns (MG).
The T-Dolls will enter combat from the left side of the screen. Therefore, the T-Dolls in the far right column are the frontline, meaning that they WILL almost certainly take damage. T-Dolls in the middle row generally will be targeted by enemies first, and thus will take the most damage.
If you have a T-Dolls have a greater amount of clone, it will not only increase the versatility and survivability of the T-Doll itself, but the buff rate of it's T-Dolls also improved.
The aura effect icons displayed in the formation menu represent, from left to right:
- Damage
- Rate of Fire
- Accuracy
- Evasion
- Critical Hit Chance
- Skill Cooldown
Using Echelon Presets
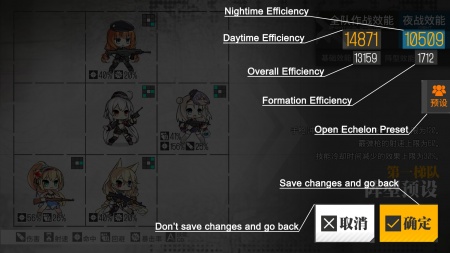
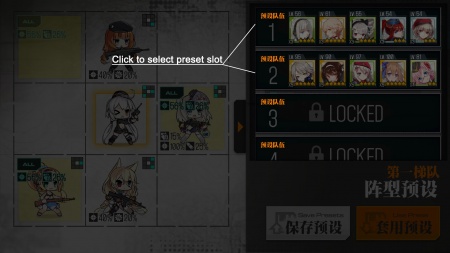
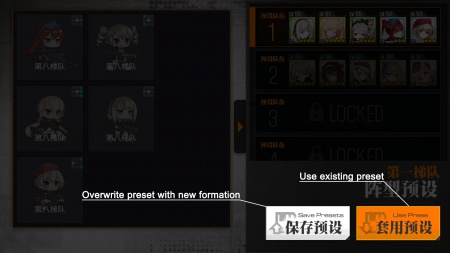
Echelon Presets allow players to "save" echelons (including the members and their positions) and "load" them when needed. This feature can be accessed by tapping the "Presets" tab on the right of the screen. Further instructions can be found in the following images.
Popular Formations
Below are lists of popular formations recommended for new players. Keep in mind this section will only guide on the general formation building and you must make best of dolls you have to build the best echelon you can.
We'll be using keypad location to refer to each positions.
| 7 | 8 | 9 |
| 4 | 5 | 6 |
| 1 | 2 | 3 |
The roles in each cell will be in order from highest priority to lowest priority roles of the spots.
AR-SMG/RF-HG Balanced
| DPS | Tank / Buff / DPS | |
| Buff / DPS | Tanker | |
| DPS | Tank / Buff / DPS |
- This formation is the most commonly used and the most balanced in all aspects.
- 741, the DPS spots, are usually taken by AR or RF.
- 4 as buffer spot is usually taken by HG, but AR M4A1M4A1M4A1 or AR RibeyrollesRibeyrollesRibeyrolles can work as buff-DPS hybrid as well on 3-AR formations.
- 5, the Main-Tanker spot, is usually taken by SMG/HG with high evasion and health.
- 82, the Sub-Tanker spot, usually use DPS or smoke/flash SMGs or HG buffer.
- It is not recommended to leave 8 empty, as it will cause the DPS doll on 7 to be targeted.
Anti-Rain
| AR ST AR-15ST AR-15ST AR-15 | AR M16A1M16A1M16A1 | |
| AR M4A1M4A1M4A1 | SMG RO635RO635RO635 | |
| AR M4 SOPMOD IIM4 SOPMOD IIM4 SOPMOD II |
- Just like the original AR-SMG formation, this is a very balanced formation.
- All dolls can be obtained through story, which is both an advantage and a disavantage.
- As long as you complete the story all the way up to Ep.7, you have all the dolls needed for this.
- All dolls are one-time only drop, so they all use cores to add dummy links.
- If the enemies' damage is low enough, M16A1 with armor can stand as main tanker by switching places with RO635.
AR-SMG DPS
| AR | ||
| M4A1 | HG / AR | SMG |
| AR |
- This formation focuses on wiping out the enemies before they even get the chance to attack.
- This formation uses a lot of ARs in order to maximize overall DPS.
- No RF should be used here as they lack DPS compared to ARs. RFs' advantage is that they attack the enemy DPS dolls in the back first to reduce the damage taken by the tankers on battles that take time, but this formation focuses on cleaning out all enemies as quickly as possible.
- 5 is usually a buffer spot, putting cross-shaped formation buff HG. However, you can use Ribeyrolles here too, although it should be noted that Ribeyrolles' skill has long initial cooldown.
- The SMG spot is best occupied by a DPS SMG, whether it is grenade skill or self-buffing skill. However, if the echelon's DPS is not sufficient to deal with the enemies before they get in close, a tanker SMG can be used, but if such thing was to happen, it's better to use 3AR-2SMG formation above.
- For the DPS skills, shorter the initial cooldown the better, like AR Type 95Type 95Type 95.
MG-SG
| MG | SG | |
| MG / HG | HG | SG |
| MG | SG |
- This formation works with all MG-SG based formations.
- It should be noted that the MGs use a lot of ammo while SGs use a lot of rations, making this formation very resource-heavy.
- You may use some HG to buff the MGs. It doesn't matter if the SG gets HG buffs or not as no HG formation buff increases armor, the SGs' source of tanking ability.
Sole DPS "Exodia"
| Buff | Buff | |
| DPS | Buff / Tank | |
| Buff | Buff |
- This is a formation where the single DPS doll receives as much buff as possible.
- This formation is mainly used for grinding without a tanker or for killing the boss with minimum possible resource.
- The common DPS doll used are RF IWS 2000IWS 2000IWS 2000, AR M4A1M4A1M4A1 Mod 3, and AR G11G11G11.
- It's crucial to pick out the right HG to build the formation with, focusing on Rate of Fire and Damage for IWS 2000 and M4A1, and Damage and Accuracy for G11.
- This isn't an easy formation to build as it requires all the dolls in the formation to be at maximum efficiency for giving buff, like skill level 10 or 5-link HG.
- The buffers are usually 5-link HGs, but for M4A1 and G11 you may consider using Ribeyrolles.
Resource Preservative Runs
| Tourist | ||
| DPS / Tourist | DPS / Tourist | Tank |
| Tourist | Tourist |
- This is a specialized formation for Resource Preservative Runs. See the page for more detail on its purpose.
- There should be only one DPS doll, the only doll that gets supplied.
- The "tourists" should be placed wisely to maximize their buff to the DPS doll.
- In case of a "leak" of enemies through top or bottom, the tanker should be moved up and down to attract fire.
- Keep in mind that without supply, dolls won't use their skills either.
T-Doll Additional Statistics
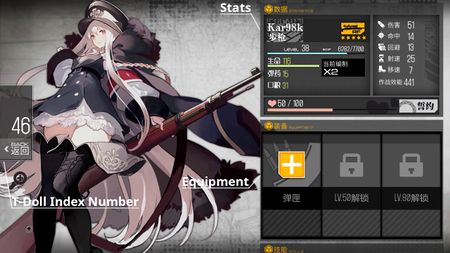
Access by tapping the yellow button with the "+" inside the magnifying glass located at the lower right corner of T-Doll card. From here, player can view all of their statistics, skills and Buff Tiles.
Stat/Statistics Table
In the left column, from top to bottom and from left to right, these are:
- T-Doll name and type
- T-Doll level and the amount of experience needs to advance to the next level
- Health bar
- Ammunition
- Rations
- The current number of Dummy-links
In the right column, from top to bottom:
- Damage - Damage per hit: max(2, damage - armor)
- Accuracy - Affects hit probability: 1 - (Enemy Evasion)/(Enemy Evasion + T-Doll Accuracy)
- Evasion - Affects evasion probability: (T-Doll Evasion)/(T-Doll Evasion + Enemy Accuracy)
- Rate of Fire - How many hits per 50 seconds (e.g. 50 ROF = 1 hit per second)
- Movement Speed - How fast T-Dolls move
- Overall Operational Effectiveness
Hidden stats unless modified:
- Critical Rate (Only shown if modified) - Percent chance of a hit being a critical, which deals 150% damage post-mitigation.
- MG: 5% Critical Rate
- HG: 20% Critical Rate
- AR: 20% Critical Rate
- RF: 40% Critical Rate
- SG: 50% Critical Rate
- Armor Penetration - How much armor will be mitigated: 10 base armor penetration for all T-Dolls.
- Armor - How much damage will be mitigated.
- SG: armor based on T-Doll
- Others: 0 armor
- Night Vision - % Reduction in night operation penalty.
- Night operations confers -90% accuracy. This penalty is multiplied by any other auras or buffs.
Affection: At the bottom of the table is the Affection meter of the T-Doll.
Main article: Affection
Once players obtain a T-Doll, the Affection will always be at 50/100. The meter will go up gradually when you use that T-Doll in Combat. Additionally, Echelon Leader and T-Dolls who get MVP in combat will earn more Affection. On the other hand, the Affection can also goes down when a T-Doll lose all of her Health in combat and when the enemy get through to the farthest left screen. Once this happens, not only the dying T-Doll but all the T-Dolls in the Echelon will drop their Affections, so be careful!!!
Affection buffs: When the Affection meter reaches 90%, the T-Doll will receive +5% boost for her Damage, Accuracy and Evasion stats.
Marriage: When a T-Doll's Affection reaches 100%, a small heart symbol will appear on her card. And you can choose to marry her (Click the Button with the ring symbol at the right side of the Affection meter). A married T-Doll will be a ring symbol on her card, and her Affection will reach 140%, providing additional boost, +5% for Damage, Accuracy and Evasion (stack with the previous buffs to +10% boost).
Equipment
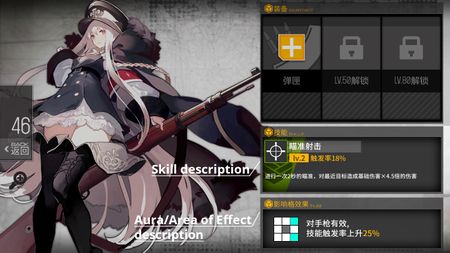
From here, player can access equipment menu for the T-Doll.
Equipment List: Equipment Production
Equipment Recommendation: There's an easy to digest information on what equipment for what weapon type here.
Skill
This part is about the T-Doll primary skill and its detailed descriptions.
Buff Tiles
Description of the T-Doll's Effect Tiles. Also, the tile shows the direction of buff bonus for T-Dolls.
Using Equipment
Equipment List: Equipment Production
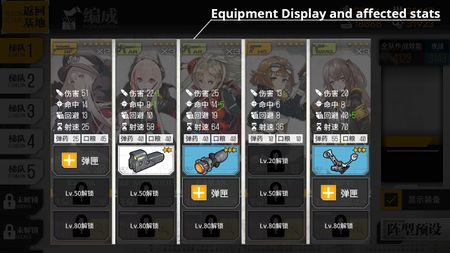
Equipment give different improvements and penalties to T-Dolls depending on their types. Equipment availability varies by T-Doll types, ranges from scopes, ammunition types to powered exoskeletons. Deciding what equipment to put on your T-Dolls is a very important decision since it can greatly change how a T-Doll performs and allows you to cater to your own personal style of play.
Equipment slots are gradually opened for T-Doll when they reach a certain level. More specifically, the first slot will open at Level 20, the second at Level 50, and the third slot at Level 80. The same for equipment rarity, as a T-doll will be able to use higher rarity eqipments when she reaches higher level (30 for 3*, 45 for 4* and 60 for 5*). Each slot allows one equipment of specific types, depends on the T-doll's class (with some exceptions).
Beware that equipments also have restrictions depends on it's type. For instance, HG, SG and AR (with the exception of 6P62) cannot equip AP ammo while RF and MG cannot equip IR pointers. Some equipments are exclusive to a specific T-doll and thus can be only used by her.
As above, players can access the equipment menu from each T-Doll additional statistics menu. They can also access it by using the Equipment Display Menu from the main Formation Menu. Simply tap the "Display Equipment" to bring out the display menu. From here, tap the yellow "+" to go the Equipment Menu.
The Equipment Display Menu also show the exact modding values of the equipment on the T-Doll.
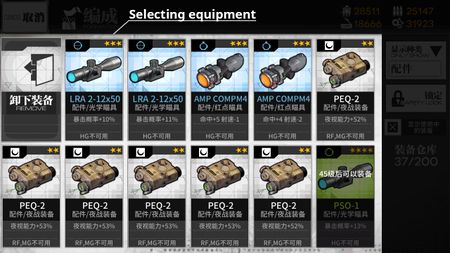
From here, just tap the equipment you want the T-Doll to use, you will then be bring back to the previous menu, now with the T-Doll equipping with the equipment.

