Shattered Connexion/Chapter 2
The Following commanders contributed to this guide:
- Lv.164: HellScythe42 (Administrator)
- Lv.144: Brassy (Administrator)
Below is the Node information for this chapter
| Node Count | 12 |
|---|---|
| Battle Nodes | 4 |
| Story Nodes | 8 (3 Locked) |
E2-1 "A Bound Ghost II"[edit]
| Battle Type | Day Battle |
|---|---|
| Recommended CE | 2500+ |
| Map Objectives | Base objectives:
S-Rank objectives:
|
| Clear Rewards | |
| Drop Types | T-Dolls |
| Limited Drops | RF SSG 3000SSG 3000SSG 3000 |
| Buffed T-dolls | Team Anti-Rain:
Griffin and Kryuger: |
ToDo ~
| Battle Type | Day Battle |
|---|---|
| Recommended CE | 28500+ |
| Map Objectives | Base objectives:
S-Rank objectives:
|
| Clear Rewards | |
| Drop Types | T-Dolls |
| Limited Drops | RF SSG 3000SSG 3000SSG 3000 |
| Buffed T-dolls | Team Anti-Rain:
Griffin and Kryuger: |
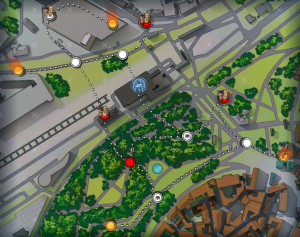
Note that this map has an echelon limit of 1. Manage your action points carefully and use encirclement to take as many nodes as possible.
- For Objective 1, simply move your echelon south and fight the enemy Pyxis turret. This will trigger the Manticore to move down into the Heavy Helipad after the turn ends, resulting in a victory.
- For Objective 2, prepare a team that's capable of fighting Scouts, Dinergates, Pyxis turrets, and Manticores, along with one HOC. Start by capturing the northern end of the map and picking up the Abandoned Golyat on the first two turns, use the Golyat on the invulnerable Manticore to destroy it, then continue downwards, using encirclement to capture all but the bottom-right-most helipad. At this point you should have one turn remaining- destroy any remaining enemies and end your turn on the last indicated helipad to complete the objective.
E2-2 "A Phantom Sigh"[edit]
| Battle Type | Day Battle |
|---|---|
| Recommended CE | 3500+ |
| Map Objectives | Base objectives:
S-Rank objectives:
|
| Clear Rewards | |
| Drop Types | T-Dolls |
| Limited Drops | None |
| Buffed T-dolls |
ToDo ~
| Battle Type | Day Battle |
|---|---|
| Recommended CE | 29000+ |
| Map Objectives | Base objectives:
S-Rank objectives:
|
| Clear Rewards | |
| Drop Types | T-Dolls |
| Limited Drops | None |
| Buffed T-dolls |
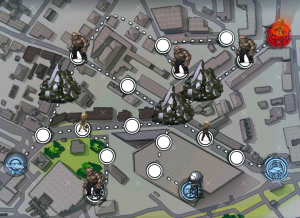
No matter which objective you're doing, you will need to destroy Rubble Pile 1 using the leftmost Abandoned Golyat (defended by a 72k CE Smasher) in order to access the second Abandoned Golyat. Stepping on the node next to Rubble Pile 1 will change the top left Smasher to change its pathfinding.
- The Smashers are dangerous, but the highest priority should be given to clearing out the cannon fodder ELID infectees the Smashers in this map start with, otherwise they will deal heavy damage to your frontline early on. Use an ARSMG team and reset their targeting at the beginning of the battle by quickly swapping the positions of your ARs twice (this will make them take a step towards the other AR, before immediately stepping back to where they were and selecting a new target). Always prioritize killing the smaller infectees over the Smasher, getting what damage you can in to the Smasher in-between waves.
- The 168k CE Smashers are VERY dangerous, and should be avoided if possible, as it is very likely they will overwhelm your dolls with the first wave. Bait them out of the way, and then sneak into the base as soon as you see an opening.
- If you destroy Rubble Pile 2 instead of Rubble Pile 3, you will need to bait both 168k CE Smashers out of the way, or just outright brute force them with superior firepower. In either case, be prepared to make sacrifices.
- If you destroy Rubble Pile 3, the map becomes a matter of simply avoiding contact with the leftmost 168k Smasher, and waiting for an opening before slipping into the enemy HQ.
E2-3 "Nameless Exiles I"[edit]
| Battle Type | Day Battle |
|---|---|
| Recommended CE | 4000+ |
| Map Objectives | Base objectives:
S-Rank objectives:
|
| Clear Rewards | |
| Drop Types | T-Dolls |
| Limited Drops | None |
| Buffed T-dolls | Griffin and Kryuger:
|
ToDo ~
| Battle Type | Day Battle |
|---|---|
| Recommended CE | 29500+ |
| Map Objectives | Base objectives:
S-Rank objectives:
|
| Clear Rewards | |
| Drop Types | T-Dolls |
| Limited Drops | None |
| Buffed T-dolls | Griffin and Kryuger:
|
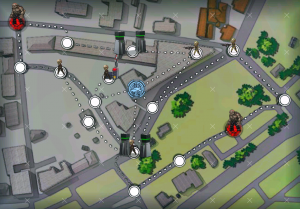
This map introduces enemies that can destroy Structures, indicated by the orange wrench icon. The Smashers in this case will finally live up to their name and destroy closed Gates within a 1-node radius of them during their turn. Smashers will only destroy structures which are in their way and not structures they are standing on. Thankfully, this does not make them immune to having the door closed on them, and you can abuse this to complete Objective 1 by waiting until the Smashers have arrived at the open gates to close the door in their face repeatedly. This will leave their ELID infectee friends at 1 hp, allowing you to easily mop up the initial wave and attack the Smasher without distractions until it summmons another wave.
- For Objective 2, you will not be able to use the gates at all, which means you will have to either bait the Smashers away from your HQ, or kill them. Once again, an ARSMG team equipped with a high-level Mortar Fairy proves invaluable here.
E2-4 "Nameless Exiles II"[edit]
| Battle Type | Day Battle |
|---|---|
| Recommended CE | 4500+ |
| Map Objectives | Base objectives:
S-Rank objectives:
|
| Clear Rewards | |
| Drop Types | T-Dolls |
| Limited Drops | MG KordKordKord |
| Buffed T-dolls | Team Anti-Rain:
|
ToDo ~
| Battle Type | Day Battle |
|---|---|
| Recommended CE | 30000+ |
| Map Objectives | Base objectives:
S-Rank objectives:
|
| Clear Rewards | |
| Drop Types | T-Dolls |
| Limited Drops | MG KordKordKord |
| Buffed T-dolls | Team Anti-Rain:
|
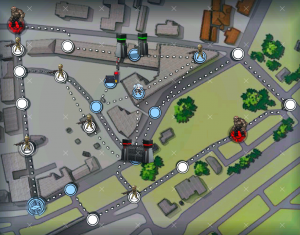
The last map of Chapter 2. Much like before, the Smashers here will destroy the gates, and this time, you're not going to make it to the control panel this time to save them. To make matters worse, HG Desert EagleDesert EagleDesert Eagle is trapped in a horde of infectees and only has 3 links left! This time, however, you have access to something helpful: a single Heavy Helipad, from which you can call down a HOC for fire support.
- Moving over Desert Eagle's position will trigger a change to the Smasher's patrol pattern, and they will begin actively hunting the nearest Griffin echelon instead of heading for Desert Eagle's original position.
- You can move over the Uplink Station that controls the gates, but in order to achieve Objective 2, you must not activate them (do not touch the buttons on the left side of the screen).
- 2B14 or M2 Mortar are extremely useful for clearing out the waves of ELID, and since there's no enemies with Force Shields in this map, or enemy Structures that need to be destroyed, you don't have to worry about the mortars' low shield penetration stat.
- A Parachute Fairy will make completing Objective 2 much easier, as all you need to do is race the Smashers to Desert Eagle before parachuting back to base.
- For Objective 1, a high-level Mortar (MTR) Fire Support Team, along with an AR-SMG team and a fairy such as Nian Fairy or Mortar Fairy will help thin the first horde of ELID cannon fodder during the Smasher fights. Depending on how high level your Heavy Ordinance Corps are, you may still need to reset your AR targeting.
- Once the gates have been broken open by the Smashers, keep an eye on how close the bottom Smasher is, as he will pass within range to attack your HQ and heavy helipad. Make sure to move any units away so that he doesn't move in that direction.


