Guide:Formation Menu: Difference between revisions
No edit summary |
No edit summary |
||
| Line 5: | Line 5: | ||
== Echelon Selection == | == Echelon Selection == | ||
[[File:Echelon Selection.jpg|right| | [[File:Echelon Selection.jpg|right|450px]] | ||
In this menu, players will be able to select and assemble Combat Echelons. The steps are as follows: | In this menu, players will be able to select and assemble Combat Echelons. The steps are as follows: | ||
| Line 13: | Line 13: | ||
|} | |} | ||
[[File:Echelon Selection T-Doll Menu.jpg|right| | [[File:Echelon Selection T-Doll Menu.jpg|right|450px]] | ||
* You can swap the orders of T-Dolls in an Echelon by dragging them to the position your like. | * You can swap the orders of T-Dolls in an Echelon by dragging them to the position your like. | ||
* The first slot in the echelon (the farthest to the left) is the echelon leader. | * The first slot in the echelon (the farthest to the left) is the echelon leader. | ||
| Line 43: | Line 43: | ||
== Formation Building == | == Formation Building == | ||
[[File:Formation Building.jpg|right| | [[File:Formation Building.jpg|right|450px]] | ||
From here, player can see the formation of the selected echelon, together with some additional information. | From here, player can see the formation of the selected echelon, together with some additional information. | ||
| Line 112: | Line 112: | ||
== Using Equipment == | == Using Equipment == | ||
[[File:Equipment Display.jpg|right| | [[File:Equipment Display.jpg|right|450px]] | ||
Equipment give different improvements and penalties to T-Dolls depending on their types. Equipment availability varies by T-Doll types, ranges from scopes, ammunition types to powered exoskeletons. Deciding what equipment to put on your T-Dolls is a very important decision since it can greatly change how a T-Doll performs and allows you to cater to your own personal style of play. | Equipment give different improvements and penalties to T-Dolls depending on their types. Equipment availability varies by T-Doll types, ranges from scopes, ammunition types to powered exoskeletons. Deciding what equipment to put on your T-Dolls is a very important decision since it can greatly change how a T-Doll performs and allows you to cater to your own personal style of play. | ||
| Line 123: | Line 123: | ||
|} | |} | ||
[[File:Equipment Selecting.jpg|right| | [[File:Equipment Selecting.jpg|right|450px]] | ||
From here, just tap the equipment you want the T-Doll to use, you will then be bring back to the previous menu, now with the T-Doll equipping with the equipment. | From here, just tap the equipment you want the T-Doll to use, you will then be bring back to the previous menu, now with the T-Doll equipping with the equipment. | ||
Revision as of 23:44, 14 October 2016
Formation Menu will cover echelon selection, formation building, T-Doll additional stats and equipment using.
Echelon Selection
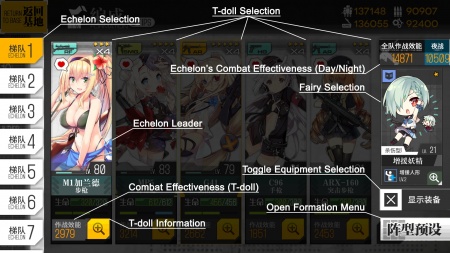
In this menu, players will be able to select and assemble Combat Echelons. The steps are as follows:
- Click the "+" button on an empty slot to access T-Doll selection menu.
- Select the T-Doll you want to add the echelon, doing this will also get you back the main Echelon menu.
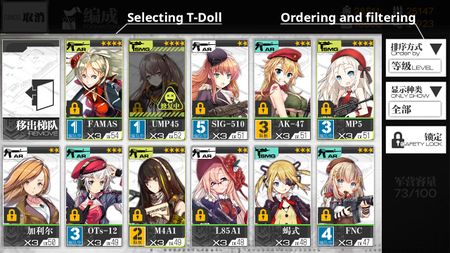
- You can swap the orders of T-Dolls in an Echelon by dragging them to the position your like.
- The first slot in the echelon (the farthest to the left) is the echelon leader.
- Echelon leaders gain additional experience.
- Tapping the yellow button with the "+" inside the magnifying glass of each T-Doll to access that T-Doll additional statistics.
- Tapping the Formation Menu to get to the Formation Building Menu.
NOTE: On the right side of the T-Doll selection menu, players can change the showing order and filtering of T-Dolls:
For "Order by", there are:
- By Level : From highest to lowest levels
- By Rarity : From 5 to 2 stars
- By AcquireSequence : The order players acquired their T-Dolls
- By Name : Alphabetical order according to T-Doll names.
- By Emotion : Emotions depend on the T-Doll activities (Auto-battle, Logistics Operations, Repairing, Skill Researching,...)
For Filtering "Only Show", there are:
- Show All
- Pistol (HG)
- Submachine Gun (SMG)
- Rifle (RF)
- Assault Rifle (AR)
- Machine Gun (MG)
Formation Building
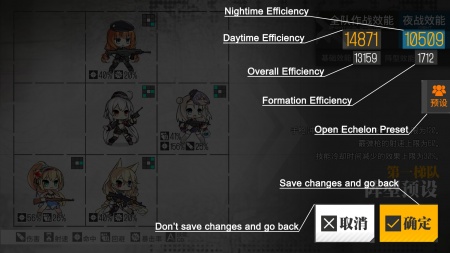
From here, player can see the formation of the selected echelon, together with some additional information.
Formation composition and position offer different stats bonus and directly affects combat. So take into consideration when building echelons and formations!!!
Buff Aura/Area of Effect Tiles
Depending on T-Doll types, most T-Dolls will provide buffs to a certain tiles adjacent to them.
- Handguns (HG) affect all T-Doll types.
- Submachine guns (SMG) affect Assault Rifle (AR).
- Assaulr rifles (AR) affect Submachine guns (SMG).
- Rifles (RF) affect Handguns (HG).
- Machine guns (MG) don't provide buffs.
The T-Dolls will enter combat from the left side of the screen. Therefore, the T-Dolls in the far right column are the frontline vanguards, this means that they are the meat shields of the formations and WILL definitely take damage. Additionally, the T-Doll at the centre of the frontline will be the main target of enemies' fire and will take the most damage.
ADDITIONAL NOTICE
- AR Team members, M4A1, M4 SOPMOD II, M16A1 and ST AR15 buff Assault rifles (RF), NOT Submachine guns (SMG).
T-Doll Additional Statistics
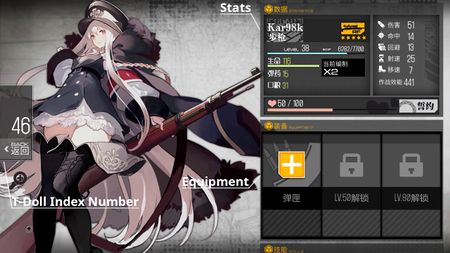
Access by tapping the yellow button with the "+" inside the magnifying glass located at the lower right corner of T-Doll card. From here, player can view all of their statistics, skills and Buff Tiles.
Stat/Statistics Table
In the left column, from top to bottom and from left to right, these are:
- T-Doll name and type
- T-Doll level and the amount of experience needs to advance to the next level
- Health bar
- Ammunition
- Rations
- The current number of Dummy-links
In the right column, from top to bottom:
- Damage
- Accuracy
- Evasion
- Rate of Fire
- Movement Speed
- Overall Operational Effectiveness
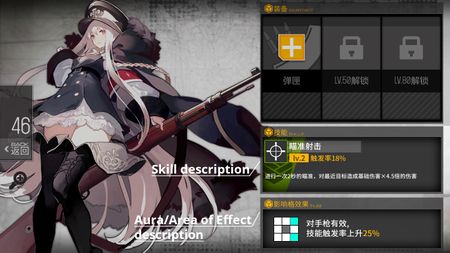
Equipment
From here, player can access equipment menu for the T-Doll.
Skill
This part is about the T-Doll primary skill and its detailed descriptions.
Buff Tiles
Description of the T-Doll's Effect Tiles.
Using Equipment
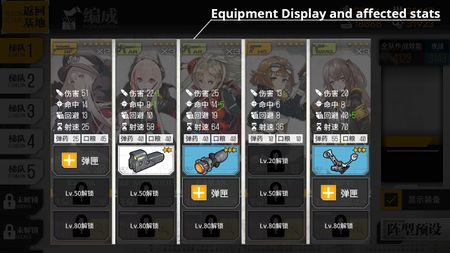
Equipment give different improvements and penalties to T-Dolls depending on their types. Equipment availability varies by T-Doll types, ranges from scopes, ammunition types to powered exoskeletons. Deciding what equipment to put on your T-Dolls is a very important decision since it can greatly change how a T-Doll performs and allows you to cater to your own personal style of play.
Equipment slots are gradually opened for T-Doll when they reach a certain level. More specifically, the first slot will open at Level 20, the second at Level 50, and the third slot at Level 80.
As above, players can access the equipment menu from each T-Doll additional statistics menu. They can also access it by using the Equipment Display Menu from the main Formation Menu. Simply tap the "Display Equipment" to bring out the display menu. From here, tap the yellow "+" to go the Equipment Menu.
The Equipment Display Menu also show the exact modding values of the equipment on the T-Doll.
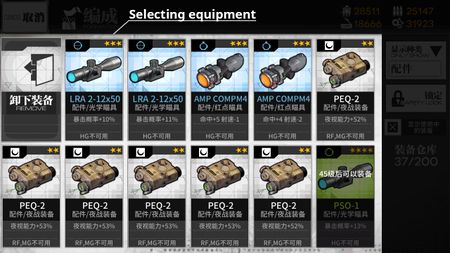
From here, just tap the equipment you want the T-Doll to use, you will then be bring back to the previous menu, now with the T-Doll equipping with the equipment.

