Hitoribocchi: Difference between revisions
mNo edit summary |
Pianoforte (talk | contribs) mNo edit summary |
||
| Line 16: | Line 16: | ||
* New collab Extra T-Dolls: | * New collab Extra T-Dolls: | ||
** AR type T-doll [[Murata_Himeko|Murata Himeko]] (Acquired after beating "Entry is Forbidden") | ** AR type T-doll [[Murata_Himeko|Murata Himeko]] (Acquired after beating "Entry is Forbidden") | ||
** HG type T-doll [[ | ** HG type T-doll [[Kiana|Kiana Kaslana]] (Acquired after beating "Inflating Ambitions") | ||
** RF Type T-doll [[Raiden_Mei | ** RF Type T-doll [[Raiden_Mei]] (Can be acquired as a drop in levels "Kiana Advances", "Entry is Forbidden" and "Inauspicious Thunder") | ||
** RF type T-doll [[ | ** RF type T-doll [[Bronya|Bronya Zaychik]] (Can be acquired as a drop in levels "Inflating Ambitions", "Curse" and "I Wish That One Day...") | ||
** HG type T-doll [[ | ** HG type T-doll [[Theresa|Theresa Apocalypse]] (Can be exchanged at the shop with nyan kings) | ||
** SG type T-doll [[ | ** SG type T-doll [[Seele|Seele Vollerei]] (Can be exchanged at the shop with nyan kings) | ||
* New collab Extra fairies: | * New collab Extra fairies: | ||
** [[Yae_Sakura|Yae Sakura]] (Acquired after beating "Inauspicious Thunder") | ** [[Yae_Sakura|Yae Sakura]] (Acquired after beating "Inauspicious Thunder") | ||
Revision as of 17:28, 20 November 2017
Note: Work in progress
Event Overview
ToDo
- Information about the event
- Short Information about Honkai Gakuen
Overall event difficulty
ToDo
New elements and mechanics
ToDo
- New collab Extra T-Dolls:
- AR type T-doll Murata Himeko (Acquired after beating "Entry is Forbidden")
- HG type T-doll Kiana Kaslana (Acquired after beating "Inflating Ambitions")
- RF Type T-doll Raiden_Mei (Can be acquired as a drop in levels "Kiana Advances", "Entry is Forbidden" and "Inauspicious Thunder")
- RF type T-doll Bronya Zaychik (Can be acquired as a drop in levels "Inflating Ambitions", "Curse" and "I Wish That One Day...")
- HG type T-doll Theresa Apocalypse (Can be exchanged at the shop with nyan kings)
- SG type T-doll Seele Vollerei (Can be exchanged at the shop with nyan kings)
- New collab Extra fairies:
- Yae Sakura (Acquired after beating "Inauspicious Thunder")
- Kaguya Hime (Can be exchanged at the shop with nyan kings)
- Chloe (Can be exchanged at the shop with nyan kings)
- Collectable crystals
- Players defeating set enemies on event maps (see blue crystal like symbol below map selection) with S rating will be given item: "Super Diamond Nyan King"
- You can spend your "Super Diamond Nyan King" at the shop. Just open the event-only shop entry.
- Event Reward Items
- Irreversible Fate (Pink feathers, a gift you can give a T-Doll to gain 3 affection)
- Poem of Light (Yellow feathers a gift you can give a T-Doll to gain 10,000 exp)
Tips for new players
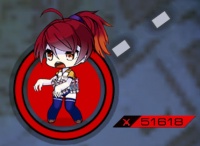
Make sure to stay away from those red haired zombies as they will be too strong for your echelon. Depending on the map there are different patterns of their movement.
It is similiar to the red bombers of Operation Deep Dive.
General Story
ToDo
Chapter 1 A ship with red sails and black mast
E 1-1 Honkai Arrival
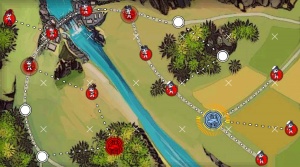
Clear reward: 50x Irreversible Fate (dormitory gift, increases T-Doll affection)
Notable drops: None
Victory condition: Occupy the enemy headquarters
Recommended Team Composition: Use two teams, one for clearing the map and one for guarding your HQ. Make sure that you occupy the enemy helipads and resupply - you will end up wasting movement points, but that's expected.
For very new players, we recommend using a mixed team with AR RF SMG (level 30+), which you can train up while clearing the map. For example, your team might be composed of Sten MkII, MAC-10, FNC, M14, and [[SV-98]. If absolutely necessary, you can clear the map with only one combat team.
Otherwise just optimize for reducing resource consumption.
Points of note:
- At the very beginning of the map you have to deploy two echelons
- The first echelon is the one you start the map with. Send it to the west/left node.
- The second echelon is needed to defend your base from the three enemy echelons on the east/right side.
- Watch out for the red haired Zombie on the far north west / top left node.
E 1-2 Curiosity Killed the Cat
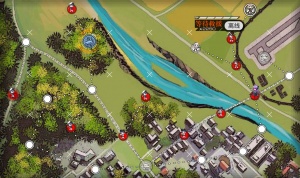
Clear reward: 50x Poem of Light(dormitory gift, increases T-Doll experience)
Notable drops: None
Victory condition: Rescue two hostage teams
Recommended Team Composition: Use two combat teams to clear the map.
For very new players, ideally both your teams should be at least level 30-40, as you will need to defend your HQ, and the enemies that come calling aren't particularly weak. It's possible to clear the map with only one team, but you will forfeit your chance at a gold medal for the map (which can speed up unlocking LSC).
E 1-3 Kiana Advances
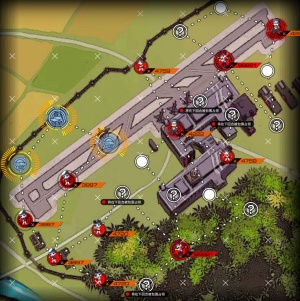
Clear reward: Player information card avatar
Notable drops: Raiden Mei
Victory condition: Occupy the enemy headquarters
Recommended Team Composition: This map can be cleared using one combat team and three non-combat teams.
Points of note:
- None so far
E 1-4 Entry is Forbidden
Clear reward: Murata Himeko
Notable drops: Raiden Mei
Victory condition: Establish and defend a supply line for two turns
Recommended Team Composition: This map can be cleared using one combat team, though it will be somewhat slow. With decent equipment, it is possible to clear with one level 60 team, but you will likely need to repair before fighting the boss. You can use the helipad that appears before the boss for this, as the boss does not move (though this approach is rather expensive).
For best effects, use a team that is at least level 70.
Points of note:
- This map has to be won three times to be cleared
- The nodes form the word miHoYo which is the name of the company behind Guns Girl Z
Fighting the boss:
- The boss' special skills will mark their target field before they hit. Move your unit away from this field.
Chapter 2 Twilight of the Valkyrja
E 2-1 Inauspicious Thunder
Clear reward: Yae Sakura
Notable drops: Raiden Mei
Victory condition: Occupy the enemy headquarters within 11 turns.
Guide: Original may be found here. This translation is reposted here with the permission of the author.
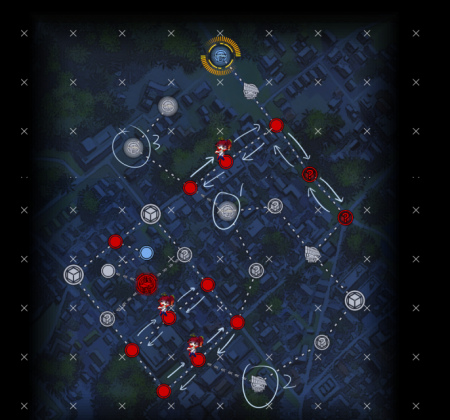
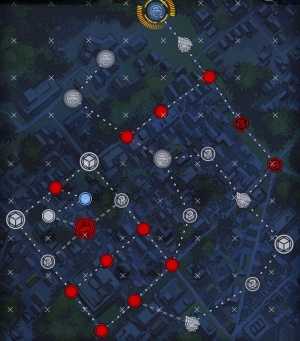
The movement patterns of the red zombies on this map are displayed to the right.
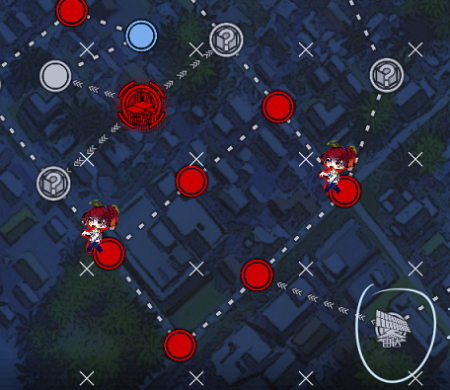
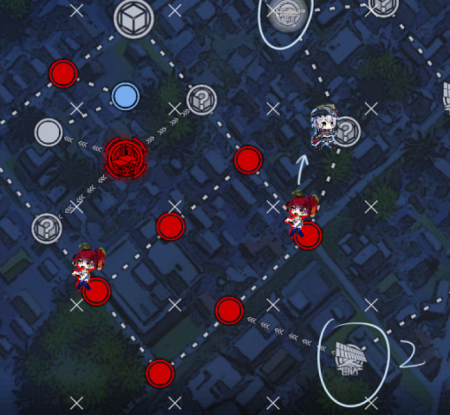
We recommend using two teams to surround and destroy the Jupiter cannons. However, with the right team composition, it is possible to kill the cannons without deactivating them first.
This map requires two combat teams to surround the enemy headquarters, both mixed RF/AR teams. Although there are are armored enemies that appear next to the enemy HQ, they're pretty weak, so one RF should be sufficient. Don't forget to include at least one HG for night vision.
On the first turn, deploy non-combat team 1. In the next two turns, beeline to helipad 1 with combat team 1. Afterwards, capture helipad 3 with non-combat team 2, and deploy and send combat 2 to radar 2. Once helipad 3 is captured, withdraw non-combat team 2 and redeploy it at helipad 1.
Then proceed to clear the map as normal.
Note that in Chapter 2, the aggro radius of the red zombies is 1 square, not two.
If the red zombies you encounter before reaching the HQ don't move in sync (if they appear as in the figure to the left), you will be unable move combat team 2 past them. In those situations, you can use non-combat team 2 to aggro one of the red zombies to clear a path for combat team 2.
E 2-2 Inflated Ambitions

Clear reward: Kiana Kaslana
Notable drops: Bronya Zaychik
Victory condition: Maintain a supply line for three turns
Guide: Original may be found here. This translation is reposted here with the permission of the author.
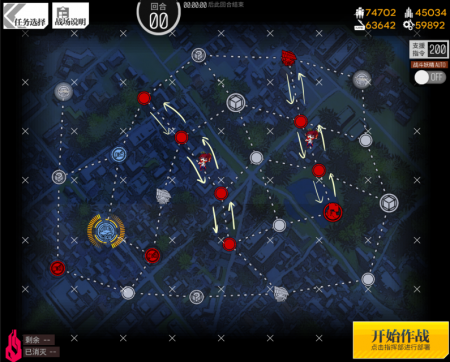
The movement patterns of the red zombies on this map are displayed to the right. (Note that the red zombie to the right does not move until the boss node is cleared; after which it begins moving downward.)
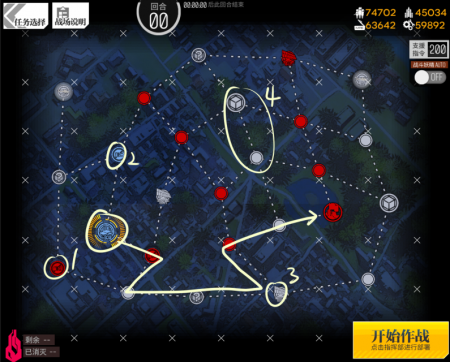
Recommended pathing is displayed to the right.
This map is the hardest map this event. If you can clear it, then you have the ability to complete the event.
Use two combat teams to push to the boss. Both teams should be at least level 80 (one AR team for the boss, one RF team to kill the mobs along the way).
Leave a non-combat team on node 2 to pull the red zombie. Occupy node 1 with your combat teams first, then follow the marked path to node 3.
A strong armored enemy will spawn on one of the nodes marked 4 (one is guaranteed to spawn on point 3). If it nears your supply line, you will need to send your RF team to deal with it.
You will need to use teams to pull the red zombies away from your supply line. After the other enemies are cleared from the map, you can use your combat teams for this purpose. Note that you will need to do this before fighting the boss; if you capture the radar and helipad in the upper right corner you can use that helipad to deploy your bait echelons.
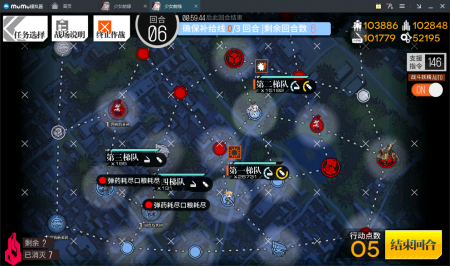
Red zombies will only move at most one node off their given patch, echelons further past that will be safe. In the situation displayed to the right, the friendly HQ is safe from attack.
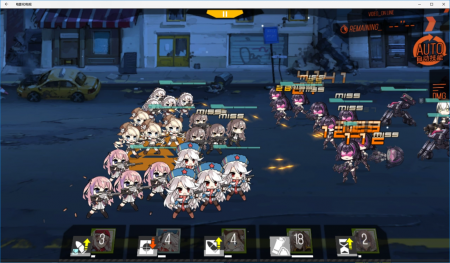
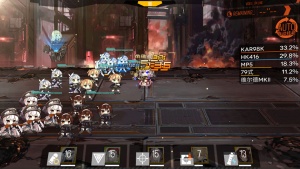
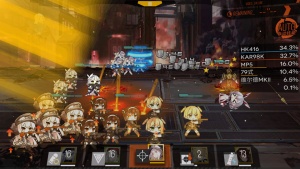
The boss for this map is a weaker version of Gaia in the Summer '17 event. However, the mobs that spawn with the boss have been strengthened. The mortars that begin firing from the very beginning of the fight are particularly annoying. If you want to clear the boss with an S-rank, you will have to micro.
E 2-3 Curse
Clear reward: Player information card background
Notable drops: Bronya Zaychik
Guide: Original may be found here. This translation is reposted here with the permission of the author.
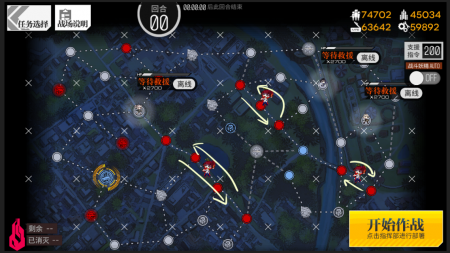
The movement patterns of the red zombies on this map are displayed to the right.
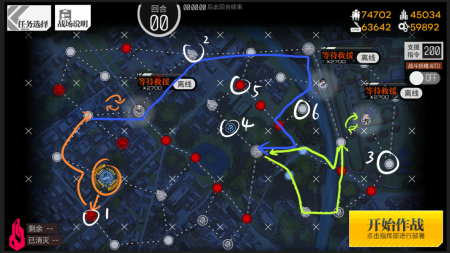
We recommend you take the upper route when rescuing hostages. Nodes 4, 5, and 6 will have enemies, while the pathing for surrounding the helipad in the middle of the map by occupying the node in the bottom is not ideal.
One level 90 team is sufficient to clear the map, in conjunction with a level 70 team defending your HQ. We recommend that you use an RF team for your clear team; using Type 59/SPP-1/FNP-9 as your HGs seems to be ideal.
While carrying the second hostage echelon, make sure you have enough movement points to avoid any red zombies that might show up. After rescuing the second hostage, don't move next to the third hostage yet, so as to avoid running into a red zombie.
Be aware that Node 2 and both nodes next to the third hostage have strong armored enemies.
E 2-4 I Wish That One Day...
Clear reward: Sleeping fairy (furniture)
Notable drops: Bronya Zaychik
Guide: Original may be found here. This translation is reposted here with the permission of the author.
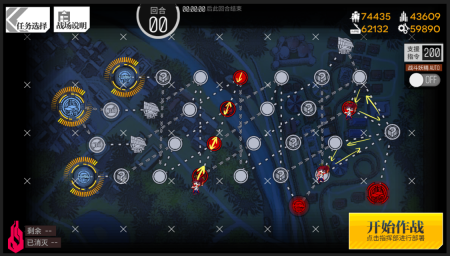
The movement patterns of the red zombies on this map are displayed to the right.
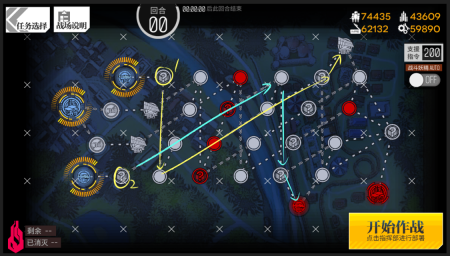
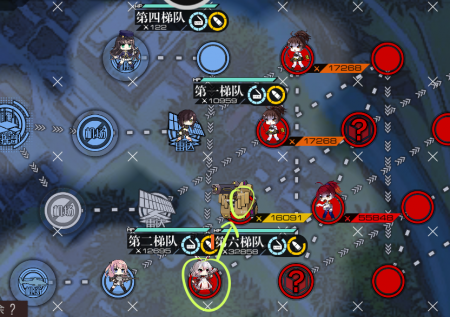
We recommend using RF teams both for clearing the map and for fighting the boss.
At the time of this writing, the spawn points of the red zombies are fixed. In theory, you can send out your combat teams from any starting point, and wait for a good opportunity to push towards the boss. However, we recommend that you follow the pathing shown on the right.
Even though the paths look complicated, no matter where you encounter the first red zombie, it is always possible to sidestep it (see the second image to the right).
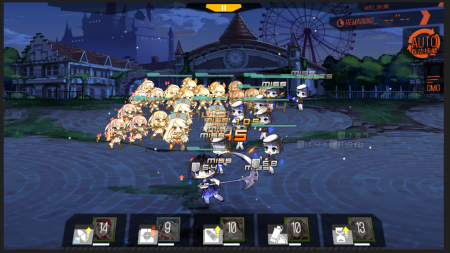
When entering the boss fight, make an X shape with your T-Dolls. Make sure you don't leave any empty columns, or the boss will move past your team and force you to retreat.
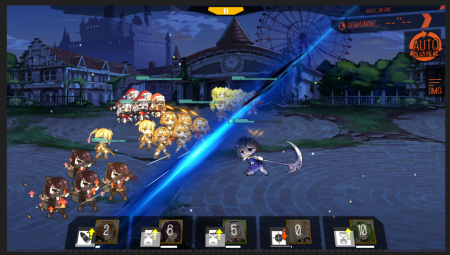
Don't panic when the boss activates her skill; you can avoid its effects with good micro.
Points of note:
- This map is a night battle map.


