
Reverse Collapse: Code Name Bakery/Chapter 4


This is a list of levels in Chapter 4 of Reverse Collapse: Code Name Bakery. Players will be familiar with many of the levels in this chapter.
During this chapter, the Timeline menu is available in the preparation phase. The timeline shows the possible sequences of levels in the chapter. Certain levels represented by stars are Divergence Points, where the timeline branches depending on the objective attained to complete the level. Reaching the end of a timeline grants Memory Points (sometimes called "Jump Points"), which enable Memory Leaps (or "Visual Leaps") to the preparation phase of a previously completed Divergent Point. All upgrades are kept between jumps, making runs easier as players progress through the chapter (though it is still important to not overspend resources). It is also possible to jump ahead to a level farther in the current timeline, expending one memory point per level skipped. These systems disappear after The Final Battle II is completed and free replay is unlocked.
Not all Divergence Points will be available at the start. Reaching a "bad ending" in each of the two main branches of the chapter will unlock the Divergence Points leading to the "true ending".
Due to the lack of linearity in this chapter, levels are ordered by their internal ID.
Divergence Point
Jefuty unlocks the special skill Backtrack at the start of this level.
- Story
Jefuty meets with the shadow in her garden. The shadow announces that their fated moment has come, and that "she" will now face a test to bring them to a completely different future. Jefuty remarks that "her" misfortune was even greater than her and the shadow's.
Jefuty's memories arrive to the point in time just after Lige was destroyed by the tank. The projection of consciousness gives her her choices : help Mendo survive the attack on Squad Fox 2-1's convoy, or hurry to the URNC base to save Lige. Though the temptation to give up and stop looping time remains, she can't waste the efforts of her previous selves and can't get used to the deaths of her comrades. When Jefuty chooses to help Mendo, she remembers that he died for her sake in another future, and wonders if this is the right choice.
- Units
- Playable
- Jefuty
- Enemies
- Scouts
- Elite Scout
- Sniper
- Commandos
- Elite Commando
- Svarog
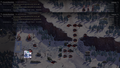
- Map
- Exiting the map from the left leads to the level Fighting Side by Side.
- Exiting the map from the right leads to the level Iron Bridge Conflict.
A Sniper holding a weapon accessory for Jefuty will arrive from the bottom on turn 2.
- Secrets
-
Location of Secret Document "".
-
 Location of Collectible "VR Gaming Device".

Fighting Side by Side
- Story
Jefuty wants Mendo to follow her without asking too many questions at that point, but he insists to share his plan to leave the main road and reach the refugees transport. Jefuty actually knows a shortcut that will take them there faster, and she also reveals she knows about the safe house at Ika Mine, pretending that Anderson shared this intel with her.
When they follow Mendo's plans, they reach the bridge and Jefuty convinces Mendo not to take the refugee transport to the safe house. Using the snowmobile, they reach the safe house at night. Jefuty gives as many details as possible to Atena to try and convince her to go to the URNC base, but this fails to convince her and Jefuty doesn't react fast enough to prevent Atena from tranquilizing her. Jefuty then runs away from the safe house and waits for Mendo to join her outside.
- Units
- Playable
- Jefuty
- Mendo
- Enemies
- Scouts
- Elite Scout
- Snipers
- Elite Sniper
- Commandos
- Elite Commando
- Machine Gunners
- Commander
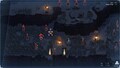
- Map
- Exiting the map from the left leads to the level Preemeptive Strike.
- Exiting the map from the right leads to the level Support in the Woods (bad end!).
The same map as Chapter 1 Act 1 (feeling nostalgic?). The Elite Commando holds a sight weapon accessory.
- Secrets
-
 Location of Secret Document "Transcript of Zone Definitions - Illustration".
 -
 Location of Collectible "Small Notepad".


Support in the Woods
- Story
After escaping the ambush at the safe house, Mendo attempts to push through the URNC encirclement. Jefuty joins him and they flee the URNC trap, but she refuses to return to help Atena, considering that her choices in this timeline has already condemned her. With midnight approaching, Jefuty rushes to the URNC base to save Lige. At the cliff overlooking the base, Jefuty connects with Lige's mind to check her condition, considering that she could handle the Shrikes that would soon arrive using blood bullets.
- Units
- Playable
- Jefuty
- Mendo
- Enemies
- Scouts
- Elite Scouts
- Snipers
- Elite Sniper
- Commandos
- Elite Commandos
- Medic
- machine Gunners
- Commanders
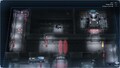
- Map
- This level leads to Deviation
Same map as Chapter 1 Act 5 and Chapter 2 Act 4, but starting from the top instead of the bottom or the middle. By turn 4, Mendo will be in critical danger.
The first visible Elite Sniper holds RC bomb materials, and a hidden Elite Commando nearby will hold a pulser weapon accessory.
- Secrets
-
 Location of Secret Document "Application of Doll Technology in the Late 90s".
 -
Location of Collectible "".

Deviation
- Story
Jefuty and Mendo meet the assault of the URNC troops at Küie Cliff, but as they start retreating they are overwhelmed by many Shrike mitotic specimens. Mendo is killed protecting Jefuty, and Jefuty kills herself with a grenade to warn the next Jefuty of the trap waiting for them at the cliff.
- Units
- Playable
- Jefuty
- Mendo
- Enemies
- Scouts
- Elite Scouts
- Snipers
- Elite Sniper
- Commandos
- Elite Commandos
- Machine Gunners
- Elite Medic
- Commanders
- Svarog
- Shirke mitotic specimen
- Map
- This level is a bad end. It will yield a Memory Point.
Same map as Chapter 1 Act 6 (and others). The map can end early if you manage to defeat every enemy before the next wave has a chance to arrive. The Elite Commando at the top holds the components for two tier 1 turret and one tier 2 turret, the Elite Sniper arriving later a barrel weapon accessory, and the Svarog tank a pulser weapon accessory.
- Secrets
-
Location of Secret Document "".
-
 Location of Collectible "Mr. P*zza".

Preemptive Strike
- Story
The TASA force fight their way to the entrance of the mine. As trapping the troublesome Jevon inside the mine is necessary to rescue Lige according to her memories, Jefuty detonates the charges at the entrance. Going straight for the base while passing through Küie Cliff for Atena to hack the transmission towers, Jefuty doesn't try to connect with Lige and prepares to lure the URNC out of the base.
- Units
- Playable
- Jefuty
- Mendo
- Jevon
- Atena
- Enemies
- Scouts
- Elite Scouts
- Sniper
- Elite Sniper
- Commandos
- Elite Commandos
- Medics
- Machine Gunners
- Elite Machine Gunner
- Elite Commander
- Elite Machine Gunner - Gouo
- Map
- This level leads to High Ground Setup.
The map is the same as Chapter 2 Act 5, but your units start on the bottom left instead of the center. Multiple enemy reinforcements will try to flank you as you advance.
Beware of the Elite Machine Gunner, which is not only beefy but capable of inflicting Untreatable to your units, preventing the use of healing for 1 turn after an attack. The boss Machine Gunner is not only even beefier at 1400 HP and 114 evasion, but boosts the crit rate of allies 5 tiles away by 30% and has several effects immunities.
The Elite Scout directly before you at the start holds a suppressor weapon accessory. An Elite Commando on the top left holds the materials for a tier 2 turret.
- Secrets
-
 Location of Secret Document "Radiation Sickness Treatment Report".
 -
 Location of Collectible "Weird Scale".


High Ground Setup
The Max AP of the entire team is increased and Training Simulation - Stealth is unlocked at the start of this level.
- Story
Jefuty, Mendo and Atena are scouting Küie cliff before staging their diversion, and Jefuty informs them that they will face armored units.
When deciding to avoid a big fight, Jefuty informs Atena of Carl's backdoor in the URNC network and they hatch a plan for Jefuty and Mendo to search for Lige in the quarantine zone (taking care to avoid the amusement park) while Atena and Carl prepare their evacuation.
When deciding to ambush the enemy, the AU force realizes there ar emore URNC troops than expected and they can't break through to the base. While trying to retreat to the west, they run into the URNC armors and are forced to jump down into the quarantine zone, where another ambush is awaiting them.
- Units
- Playable
- Jefuty
- Mendo
- Atena
- Enemies
- Scouts
- Elite Scouts
- Snipers
- Commandos
- Elite Commandos
- Machine Gunner (if spotted)
- Elite Machine Gunner (if spotted)
- Map
- Choosing to ambush the enemies leads to Panicked Battle (Bad End route!).
- Choosing to evacuate leads to Zombieland.
Depending on your approach, a pretty technical stealth map (going on a sleeping dart spree in the final stealth phase isn't possible due to the watchtower, make good use of the changing visual range of the patrolling commando), or a big combat map with lots of enemies. You'll be able to choose which route to follow either way. Don't sleep on the purple tiles containing an advanced upgrade blueprint and a sight weapon accessory.
- Secrets
-
Location of Secret Document "".
-
 Location of Collectible "Exquisite Lock".

Panicked Battle
- Story
While trying to break out of the Epihyllum field, Jefuty senses Lige approaching. They damage Lige enough to send her into unconscious phagocytosis, but need for her to stabilize before capturing her. The AU forces try to leave using the bridge, but the path is blocked by Sugar and they jump into the underground river. Jefuty reflects that avoiding Sugar might not be the best option, and that awakening Lige might not be possible as early as the Epiphyllum field battle. After 5AM that night, Jefuty, Mendo and Atena approach the URNC base for a second attempt at securing Lige.
- Units
- Playable
- Jefuty
- Mendo
- Atena
- Enemies
- Scouts
- Elite Scouts
- Snipers
- Commandos
- Elite Commandos
- Medics
- Elite Medics
- Machine Gunners
- Commanders
- Special Forces - Skull
- Elite Special Forces - Nightmare
- Lige
- Map
- This level leads to Deep in the Tiger's Den.
Lige won't move until a significant amount of enemies have been killed. She'll prepare her instakill map-wide skill targeting Jefuty her first turn, so you should advance your units as close as possible to deal with her before that. She also holds a sight weapon accessory, and the Commander holds a suppressor.
- Secrets
-
 Location of Secret Document "Global Affairs and Impacts on Religion".
 -
 Location of Collectible "Gas Mask".


Deep in the Tiger's Den
- Story
After Atena shuts down the power grid of the base, she infiltrates from the north while Jefuty and Mendo enter from the south. Atena wants to send a drone to scout the central area of the base as they approach the lab, but Jefuty rushes in to save Lige because she loses control. They see Kirill exiting the lab, he tries to contact someone on the radio, but receives no response, and Sugar takes him to the command room to discuss some matter.
After they leave, the AU forces sedate the guards and Jefuty insists to enter alone to pacify Lige. She sends Atena to hack a nearby signal tower to conceal her intrusion in the lab, and Mendo to clear an escape route. Jefuty starts emptying the culture fluid in Lige's tank, but she finds her unusally placid even though the Progenitor should control her mind. She attempst to connect with her telepathically, but Lige suddenly breaks out of the tank and runs her through with a blade arm. Jefuty realizes she's too late and the Progenitor has completely engulfed Lige's consciousness, and she shoots herself in the head.
- Units
- Playable
- Jefuty
- Mendo
- Atena
- Enemies
- Scouts
- Elite Scouts
- Elite Sniper
- Commandos
- Elite Commandos
- Machine Gunners
- Commander
- Elite Commander
- Map
- This level is a bad end. It will yield a Memory Point.
The same map as Chapter 2 Act 9, but with more guards patrolling (the tank also takes a different route). You'll have an opportunity to make some enemies go away, and to deactivate the searchlights for a few turns.
The purple tile in the bottom containers is a tier 3 turret material, the one in the middle containers a barrel weapon accessory, and the one in the left containers a compensator weapon accessory.
- Secrets
-
 Location of Secret Document "Phone Log 7:03".
 -
 Location of Collectible "Damaged Stun Gun".


Iron Bridge Conflict
- Story
Jefuty arrives at the bridge ahead of schedule. She notices that the soldiers there are stronger than in previous loops. Her choices are to quickly cross the bridge while it is lightly guarded, or handle the enemies in the base to facilitate Mendo's retrieval of the bridge's code later, in which case they reunite and try to make their way towards the refugees transport.
If she decides to go alone to the URNC base, Jefuty takes the snowmobile, forgetting about its loud engine and has to abandon it to escape her pursuers, hoping the unexpected chaos threw some enemy troops off of Mendo's back.
- Units
- Playable
- Jefuty
- Enemies
- Scouts
- Commandos
- Elite Commandos
- Sniper
- Machine Gunners
- medic
- Map
- Eliminating all enemies leads to the level Race Against Time.
- Crossing the bridge leads to the level Choice.
This mission can be handled with pure stealth, or a combination of stealth and force depending on the chosen objective. Bring soporific darts to make your life easier in any case, giving you the option to sedate all enemies in the first area and come back to kill them once you've cleared the base. There's a gap in the rounds of the guards on the bridge making it possible to sedate them from the overlooking cliff without causing an alert. Stealth is no longer an option once you reach the base due to overlapping enemy fields of vision.
The purple tile in front of the bridge contains an intermediate weapon blueprint (if you used stealth and sedated the Scout on this tile, making it impossible to stop on the tile, pass through to get the item). The purple tile in the base contains a grip weapon part.
- Secrets
-
Location of Secret Document "".
-
 Location of Collectible "Quartz Watch".

Choice
The Max AP of the entire team is increased at the start of this level.
- Story
Jefuty is spotted while trying to break through the URNC's encirclement. She stalls until a snowstorm picks up, planning to sneak through under the cover of snow. But before the weather can worsen, Mendo arrives, having missed the refugees transport and chosen to descend from the mountain as well.
In one case, Jefuty decides to try not relying on the AU to save Lige and leaves Mendo to fight the URNC alone. However, she runs into Shrike mitotic specimens earlier than expected and cannot shake off the URNC soldiers.
In another case, Jefuty and Mendo eliminate the URNC soldiers. She threatens him so he obey her orders before leaving the area. She freely talks about the information at her disposal, including that it is too late for them to get to Squad Razor's safe house, and the danger of involving Crane. She plans to free Carl, who she knows has been discovered and made prisoner in the URNC base, and to have him warn Jevon and Atena to evacuate. Jefuty agrees to wait until later that day to sneak into the base, using the time where the base's gate will be opened to allow deliveries.
- Units
- Playable
- Jefuty
- Enemies
- Scouts
- Elite Scouts
- Commandos
- Elite Commandos
- Snipers
- Elite Snipers
- Commander
- Medic
- Map
- Leaving without Mendo leads to the level Cornered Beast (bad end!).
- Eliminating all enemies without Mendo entering critical condition leads to the level Secret War.
The same map as Chapter 1 Act 4. There will be two waves of reinforcements from all sides. The Elite Sniper on the right holds a sight weapon accessory.
- Secrets
-
Location of Secret Document "".
-
 Location of Collectible "Flash Mine".

Cornered Beast
- Story
Jefuty is cornered by the URNC troops at Küie Cliffs, and is weakened by the amount of blood she needs to use to eliminate the Shrikes. Before passing out, she admits that she needs the support of the AU and shoots herself in the head with her sidearm.
- Units
- Playable
- Jefuty
- Enemies
- Scouts
- Elite Scouts
- Elite Snipers
- Commandos
- Elite Commandos
- Machine Gunners
- Elite Machine Gunners
- Commanders
- Shrike Mitotic Specimen
- Map
- This level is a bad end. It will yield a Memory Point.
Same map as the second phase of Chapter 1 Act 6. The Shrike holds a choke weapon accessory, the Scout on the left EMP mine materials, and the Elite Commando on the right a pulser weapon accessory.
- Secrets
-
 Location of Secret Document "Internal Reference: Investigation Report on the Antarctic Union's Relics".
 -
Location of Collectible "".

Zombieland
- Story
Jefuty and Mendo must cross a highly irradiated former tourist area, crawling with ELIDs. After sneaking through a zoo inhabited by a Lambda ELID, they prepare blood bullets and Jefuty disapproves of Mendo's fascination for ELIDs when he plan to lure the Lambda into the URNC forces. Instead of going for the Epiphyllum field, Jefuty plans to lure Lige to the checkpoint, where they will meet Atena and Carl and be able to use the ELIDs in the fight against the Werewolves.
- Units
- Playable
- Jefuty
- Mendo
- Enemies
- Terminally Infected Individual
- Transmogrified Infected Individual
- Super Mutant Lambda
- Map
- This level leads to Escape.
A less convoluted version of Chapter 3 Act 1, where stepping on "Fragile Wooden Bridge" tiles will leave an impassable tile and bring in more enemies. Activating the Control Room on the right edge of the bottom forest will open the gates of the zoo but make the Lambda start patrolling, forcing you to crawl.
Secret Skip (will grant an achievement): Look carefully for the yacht under the fountain on the top left corner of the map. Once both Jefuty and Mendo are on the tiles next to the yacht on the central platform, the rest of the level will be skipped.
The purple tile on the way to the second part of the map is a grip weapon accessory and the one in the zoo a sight weapon accessory.
As in 3-1, Jefuty will start shivering in fear if Mendo is over 4 tiles away.
- Secrets
-
Location of Secret Document "".
-
Location of Collectible "".
Escape
- Story
While the "phonographs" set up by the TASA team have gathered enough "zombies" to slow down the URNC reinforcements, their road to the quarantine wall is blocked when ELIDs move wrecked vehicles in the way, forcing their to make a detour. To Jefuty's distaste, Mendo also managed to lure the Lambda ELID to the area. They run into Lige and manage to weaken her, but Sugar seemingly knew about their plans and prevents them from capturing her. The TASA force blows up the quarantine gate to run away with Carl. Jefuty plans to recover Lige in the base again, as Sugar is supposed to get crushed and momentarily taken out of the picture in this way, while searching for more ways to secure a neural inhibitor.
- Units
- Playable
- Jefuty
- Mendo
- Atena
- Enemies
- Scouts
- Snipers
- Elite Snipers
- Commandos
- Elite Commandos
- Machine Gunners
- Commander
- Special Forces - Skull
- AA-03s
- Devana
- Mitotic Shrike Specimens
- Lige
- Sugar
- Terminally Infected Individual
- Transmogrified Infected Individual
- Map
- This level leads to Night Scouting.
Same map as Chapter 3 Act 3. Bring both power weapons and distraction equipment. Starts as a stealth mission, then turns into a boss fight against a beefy Lige amidst the ELID/URNC fighting. Make a manual save at the start of this phase and make good use of the blood grenades to boost your damage against Lige (you should have enhanced Jefuty's Collapse Bombardment skill to the point where it can quickly deal with her). Phase 3 will have you destroy the quarantine door again, either with a bombardment tower or with your own power weapons.
Remember that the Lambda ELID can hear you from far away and make you a target for other ELIDs. The Lambda will not be as reliable at clearing enemies as before due to the possibility of it getting insta-killed by the Shrikes. Kill enemies with bombardments to give your units some SP to use. Killing Sugar might be tempting, but it won't yield any reward.
The purple tile in the center is an advanced blueprint, and the ones on the bottom a cheat item, the materials for a tier 3 turret and a sight weapon accessory.
- Secrets
-
 Location of Secret Document "Copy of Lycoris' Testimony".
 -
Location of Collectible "".

Night Scouting
- Story
After easily entering into the undermanned base, Jefuty and Mendo plant bombs while Atena hacks into the signal tower and Carl searches for a neural inhibitor. Carl finds files about the inhibitor, but their content has been destroyed. At the lab, Jefuty decides to enter the lab alone as to not endanger Mendo, sending him to set up more bombs with Carl. Jefuty removes as much of the Progenitor's erosion from Lige's Virtual Cognition Image as possible before the lab explodes and Sugar appears.
After coming back to this point in the timeline, Jefuty preemptively asks Carl to look have MID look into Beria's file. While they still can't find the neural inhibitor during their infiltration, MID finds that Beria has a deep hatred for the Shrike, and Jefuty understands that Beria is the one who has the neural inhibitor. With just one hour before Lige falls under the Progenitor's influence, she must decide between trying to negotiate with Beria, or prioritize rescuing Lige. In the former case, she asks Carl to have the team regroup in a warehouse on the north side of the base, which is its least patrolled area.
- Units
- Playable
- Jefuty
- Mendo
- Carl
- Enemies
- Scouts
- Elite Scouts
- Commandos
- Machine Gunners
- Commanders
- Elite Commander
- Map
- Initially, this level only leads to Blood Horror (bad ending!).
- After unlocking the Divergence Point, choosing Beria after completing the first objective leads to Confrontation.
The same stealth map as Chapter 3 Act 5, but shorter as the area previously assigned to Mendo alone is now split into him and Jefuty, and the searchlights will be down starting turn 3. On the first run, you'll only need to get one character to the top right of the screen to complete the mission after planting the bombs, but all three will need to reach the goal of the true route.
Carl can enter the buildings along his route. From left to right, they contain: fragmentation grenades, EMP mine materials and medicine, soporific darts, 400 parts (choose to enter a random password), RC Bomb materials, and 600 parts. Searching all six locations will net you an achievement.
The purple tile on the left side contains a sight weapon accessory. The purple tile on the bottom of the right side is a grip weapon accessory, and the one on top contains a Camouflage Standee material and cheat item.
- Secrets
-
 Location of Secret Document "Audio Record of June 19th – June 25th, 2030".
 -
Location of Collectible "".

Lone Infiltrator
- Story
Concealed by the replacement of all surveillance footage and camo spray, Jefuty enters the lab and is guided by Atena to the elevator leading to the level where Lige is kept. After freeing her, the AU force leaves the URNC base before it is destroyed by the air strike, and the transport moves to the enw extraction point. The sisters can sense that Sugar is still tracking them down, and they prepare to fight her.
- Units
- Playable
- Jefuty
- Enemies
- Scouts
- Elite Scouts
- Commandos
- Medics
- Special Forces - Skull
- Simargls
- Map
This level leads to Treacherous Road.
Another stealth map like Chapter 2 Act 8, where everything on the map can only move one tile at a time. Save often.
Jefuty can avoid the infrared detectors by hiding in a cardboard box like a certain serpent. On the second level, you'll have access to some limited edition "Metal Suit" mecha comics to distract the guards for 2 turns, but you can be detected if a guard passes next to you while reaching the lure.
The purple tile on the first floor contains a sight weapon accessory, the one on the second floor is a suppressor weapon accessory.
- Secrets
-
 Location of Secret Document ""Carpenter" Working Group Record 1".
 -
Location of Collectible "".

Caged Bird
- Story
Despite the blanket search in the base, the AU force approaches the lab, but are forced back and located after blood mist seeps out of the building. They detonate the bombs planted in advance to throw the URNC troops in disarray, but are trapped between Sugar and the β Shrike. They manage to neutralize both and Jefuty enters Lige's VCI to stabilize her, but even as they manage to take down the troops trying to stop them from evacuating, Sugar resurrects the URNC casualties. Eventually, only Jefuty is left standing, and she commits suicide with a grenade.
- Units
- Playable
- Jefuty
- Mendo
- Carl
- Atena
- Enemies
- Scouts
- Elite Scouts
- Snipers
- Elite Snipers
- Commandos
- Elite Commandos
- Elite Medic
- Machine Gunner
- Special Forces - Skull
- Scouts (Shrike)
- Commandos (Shrike)
- β Shrike
- Sugar
- Map
Both bosses will become mobile on turn 2. Your obvious priority is the β Shrike, to prevent it from resurrecting dead enemies. Detonating the existing bombs will not only damage enemies, but also block the paths.
The Elite Scout on the bottom left holds a suppressor weapon accessory, the β Shrike an elite upgrade kit, and Sugar
- Secrets
-
 Location of Secret Document ""Carpenter" Working Group Record 2".
 -
 Location of Collectible "Target Dummy".


Blood Horror
- Story
Entering Lige's VCI, which has the form of a manor garden, Jefuty finds that is has been strongly eroded by the Progenitor, and must fight off the Shrike Consciousnesses keeping Lige captive. After Lige regains consciousness, she opens the doors of the garden and they flee. However, the mansion at the center of the VCI remains eroded, and the core Shrike Consciousness (as revealed in Nightmare) watches the sisters as they leave.
Lige's consciousness is now temporarily freed from the Progenitor's erosion, speeding up her recovery to the point that Jefuty is able to leave the lab before the explosion occurred, and the TASA force drives toward Squad Razor in Krasnoyarsk Mountains as the base is hit by the air strike. The Werewolves' pursuit again forces them to abandon their vehicle some way from Razor, and Jefuty hopes that Jevon will be able to hold Oleg back this time as they prepare to fight their pursuers.
- Memory Fragments I and II
Lige has a flashback to her time as "β Organism-19782", when she was first released from confinement, feeling like she had forgotten something important. A voice then promised her that she could escape all pain as long as she did what she said. The voice called her "a carrier before the shift in destinies" and claimed that she cannot abandon those born as one with her, as part of her destiny. At that time, Jefuty first felt that she was a strange Shrike mitotic specimen because she had a consciousness and could hear her. Lige found Jefuty's name familiar, and Jefuty warned that she shouldn't let the other Shrike consciousnesses discover her and pledged to help her.
During the GAVIRUL Project in 2084, Professor Philip and Jefuty were forced to run tedious experiments on William's orders, as he was the only one who could supply them with genetic samples from the Goddesses. Though Philip felt the situation was mutually beneficial since William also needed their work to confirm his findings, he did call William a perverted man. Jefuty loathed William, mocking his strenuous security protocols as a proof that he feared death, and calling him a monster for not feeling any remorse from creating and killing en masse the human-looking Shrikes. She felt that Philip would pay the price for working with William.
Jefuty was used to run basal consciousness tests on mitotic specimens, trying to detect a consciousness in the subjects. William and Philip then proceeded with gene comparison and analysis of the differences in the specimens' superimposed divisions compared to the original Ensign Cells. William's end goal was to produce a subject with a virtual consciousness, able to elicit consciousness resonance and access Nirvana, a condition to interact with Relics. Jefuty believed this couldn't happen in artificial beings and that William should have her make contact with he Relic he wanted to use, but treaties ruling Relics as off-limit prevented William from doing so freely.
Though she hated the process, Jefuty cooperated that day as she felt a strange reaction from one of the test subjects, and identified the source as the only specimen who displayed fear when she was presented to her. She also felt that she was familiar, in a different way from "the other one". Though Jefuty claimed to William that she couldn't feel a consciousness in the specimen, she still asked to meet her directly instead of through safety glass. Philip was opposed to endanger Jefuty, but William claimed they should always follow the words of their "goddess". After making contact with the specimen, Jefuty accessed her own memories from the future, and found another VCI like her own. Feeling pain from the intrusion into her VCI, the specimen attempted to strangle Jefuty, who managed to soothe her. The guards eliminated the specimen and returned it to its petri dish, but Jefuty insisted to keep her alive while still denying that she possessed a consciousness. Jefuty privately asked Philip to get the specimen transferred to his lab so she could inspect her consciousness further.
The voice ordered Lige to tell Jefuty which memories were not hers to feel better, and Jefuty told Lige not to fear the Shrikes as they were just imitations. Jefuty saved Lige because she had not met anyone possessing a VCI ever since William had shut down the Relic response experiment, and Lige possessed one while still being connected to the Progenitor's consciousness due to her nature as a Shrike. Jefuty then claimed they were sisters, though both inhuman, as evidenced by their telepathic abilities. After she was brought to Philip and Helena's lab, Lige felt that Jefuty had more reasons to protect her that she had shared, and Jefuty indeed also intended to deny William his prize. Lige's hair was cut shorter and Jefuty had the staff take a picture of them, before giving Lige her name. Jefuty then promised to make her a gift that would make her life free from worry, a neural inhibitor Jefuty designed herself. Helena arranged the surgical removal of Lige's frontal lobe, making her undetectable to the Shrike's Progenitor (called "Noylu") and giving them time to install the inhibitor before it regenerated.
Jefuty feared that her extreme demands would strain the professors' trust in her, and that her intentions were impure because she didn't only felt the need to save Lige, but also to deny William his success. But both Philip and Helena believed in her intentions, even if they were mixed with pragmatic choices, and should have a family like a normal child, even if she possessed knowledge and memories not her own. Helena also opened up about being torn between being a mother to Jefuty, whom she had birthed, and a researcher who kept using her as a research tool. To this, Jefuty replied that Helena shouldn't blame herself as her and Philip had demonstrated their kindness outside of experiments, despite forming a fake family (though she argued there wasn't enough ground to consider Philip as her father). Jefuty concluded that she had grown beyond just being the successful embryo used as a tool to study Relics thanks to Philip and Helena, and wanted to try loving someone else than the professors and protecting her family.
The inhibitor was a success, and Lige was freed from the voices of the Shrikes. Jefuty took her on a weapons training course, knowing that they would need it in the future. Helena found a mutation in Lige's genetic sequence, proving that most of her body, including skeletal structure, organs, blood vessels and nervous system, was very similar to Jefuty's, though made of Shrike cells. This finding would help her and Philip formulate the anti-Shrike serum they planned to use on Jefuty. This was around the same time Jefuty and Mendo met for the first time, as Helena and Philip had brought him to the lab in order to use their own child, whose genetic sequence was closest to Jefuty due to their shared mother, as a test subject for the serum. Helena had only agreed because her own body could no longer take the stress of the tests, and they perceived it as their punishment for agreeing to work with William. Philip optimistically saw it as giving their son a chance to fight the fate they burdened him with, and a chance to make him a potential human world-saver, instead of a fully-immune individual.
- Units
- Playable
- Jefuty
- Lige
- Enemies
- Shrike Consciousnesses
- Scouts (illusion)
- AA-03s (illusion)
- Map
- This level leads to Snow Mountain Interception.
Similar level to Nightmare. No items or skills in this puzzle map, where your goal is to protect Lige from the Shrikes. Jefuty is healed after each successful segment. The direction of the turrets can be adjusted if you are standing near them, they will need to be carefully adjusted so their firing turns don't overlap.
As in Nightmare, the Memory Shards will combine into two Memory Fragments key items (not shown on-screen), which are necessary to see the whole post-level story.
- Secrets
-
Location of Secret Document "".
-
Location of Collectible "".
Snow Mountain Interception
The Max SP of the entire team is increased from 70 to 80 and Training Simulation - Hunt is unlocked at the start of this level.
- Story
While the TASA force is fighting its way to Squad Razor, Razor and Jevon arrive on the battlefield, soon followed by Oleg. Lige wakes up and also joins the battle. The AU forces eventually break through and board the transport to the evacuation point. En route, they receive a call from Crane, who accuses them of trying to kill him in the bombardment and keep his pay, and warns that the Central Defense Bureau has deployed forces en masse to recapture Lige. He offers to reveal a weak spot in the URNC's defenses to land the evacuation aircraft, and give them Lige's neural inhibitor. He demands five Reverse-Collapse devices in exchange, to be delivered in person in an abandoned village at the foot of Mount Kushtau. Carl agrees to make use of the delay before the transport arrives to meet Crane and pacify Lige, and Jefuty insists to take Lige with them so she can't massacre the TASA forces.
Crane is absent at the meeting point, and Jefuty warns the AU soldiers of the incoming armored ambush through the old heavy artillery unit tracks in the area.
- Units
- Playable
- Jefuty
- Mendo
- Atena
- Carl
- Jevon
- Lige
- Enemies
- Scouts
- Elite Scouts
- Snipers
- Elite Snipers
- Commandos
- Elite Commandos
- Medics
- Elite Medics
- Special Forces - Skulls
- Special Forces - Nightmares
- Special Forces - Cyclones
- Elite Special Forces - Cyclones
- Simargls
- Porevits
- Marzannas
- Filins
- AA-03s
- AA-03B4M
- Svarogs
- Oleg
- Map
- This level leads to Lure the Enemy.
Same map as Chapter 3 Act 6, but with much limited opportunities to cause avalanches and much tougher enemies. Jevon will arrive as you ascend to attack enemies from the rear with his ultimate skill already active, giving you an opportunity to replenish your items (the TASA soldiers won't join the battle). The enemy will also send reinforcements shortly after when Oleg arrives on the field, but you'll have another preparation phase where Lige joins your team. Lige is specialized in close combat and drains enemy HPs, but doesn't have a lot of HP.
The AA-03 on the left side has a muzzle weapon accessory, and the boss carries a tier 3 turret material and advanced upgrade blueprint. The purple tile on the barricade contains a barrel weapon accessory.
- Secrets
-
Location of Secret Document "".
-
Location of Collectible "".
Lure the Enemy
- Story
At the meeting point, Kirill tries to trap Jefuty, Mendo and Lige with his mines, but Carl has already taken over the traps and detonates them, dealing a blow to Kirill's troops. Their objective is to let Kirill live and interrogate him about the location of the inhibitor. When Kirill calls in the mobile fortress, Jevon and Atena's explosive traps expedite the fight and Kirill flees. But Lige's "neural cloud" becomes unstable, she loses control over her body and has to be paralyzed with a blood bullet. Jefuty and Mendo leave Lige under Carl, Atena and Jevon's watch while they go after Kirill to the abandoned village of Zatra. Jefuty stops Mendo when he attempts to follow Kirill into the house he used as refuge, as she needs to confirm the location of the inhibitor. Jefuty knows Kirill and Crane are different persons, and she suspects Crane will come help Kirill. She plans to use the bell tower at the center of the town as a sniping spot to eliminate Kirill and Crane once Mendo confirms the inhibitor's location.
Mendo is dumbfounded when he sees that Crane, who has been an MID informant for years, is Colonel Beria, the same regional commander who has been coordinating the attacks against them. Mendo relates that Beria's track record is perfectly ordinary and his career has been in a rut due to his backwater assignment. Jefuty gathers that he might have some history with Shrikes, thinking that Jefuty is one like Lige, and wanted to fabricate opportunities to kill them himself without the Central Army's knowledge. Jefuty laments that she would have made different choices earlier if she knew about Beria's involvement. Mendo confirms that Beria has the inhibitor, but before Jefuty can fire, Sugar appears, kills Beria and Kirill and destroys the inhibitor. Mendo manages to placate Jefuty and avoid a fight, but they receive a call from Atena warning of incoming enemies.
- Units
- Playable
- Jefuty
- Mendo
- Carl
- Lige
- Jevon
- Atena
- Enemies
- Scouts
- Elite Scouts
- Elite Snipers
- Commandos
- Elite Commandos
- Medics
- Elite Medics
- Elite Machine Gunners
- Kirill
- Jarilo
- Diberg
- Map
- This level leads to All Consuming.
Same map as Chapter 3 Act 7, but with a reverse-boss sort of first phase where every enemy except Kirill must be killed. Jevon and Atena are only available during the second phase, arriving from the top of the screen. No opportunity to sneak your units ahead this time, but all tanks will start with less HP and the Jarilos will not be mobile this time. Lige will go berserk during this second phase, becoming immobilized for one turn before entering a berserk state, attacking any unit near her, starting the next turn.
The armored fortress will drop a stock weapon accessory, the bottom tank has a grip weapon accessory. Defeating this Jarilo without entering its retaliation range will be difficult unless you have the proper firing range upgrades for Jefuty.
- Secrets
-
 Location of Secret Document "Warszawa Incident Investigation Records".
 -
Location of Collectible "".

All-Consuming
Jevon obtains the weapon Meteor at the start of this level.
- Story
Jefuty and Mendo arrive after the URNC assault. While the TASA force survived, Lige has fallen to the Progenitor again and revives the URNC corpses. Jevon orders Sergei and the other regular TASA forces to fall back and secure an escape route, while they have no choice but to subdue Lige by force. Once she's pacified, Sugar and the Werewolves intervene, giving Lige's body the time to regenerate. On Sugar's order, Lige then kills the AU members, and Jefuty kills herself with a grenade.
- Units
- Playable
- Jefuty
- Mendo
- Carl
- Lige
- Jevon
- Atena
- Enemies
- β Shrike
- Scouts (Shrike)
- Elite Scouts (Shrike)
- Snipers (Shrike)
- Elite Snipers (Shrike)
- Commando (Shrike)
- Elite Commandos (Shrike)
- Scouts
- Commandos
- Map
- This level is a bad end. It will yield a Memory Point.
Same map as Chapter 3 Act 8, with more playable characters and a consequently much beefier boss. It will also be costly in blood bullets, you'll find some on the field but make sure you keep a few on hand to craft blood grenades if needed. The blood bullet upgrade negating the Shrikes' Blood Burst trait is very recommended.
Be careful with proximity mines and auto-targeting skills on this map: once under 50% HP, the boss will start using a new skill, Blood Burst Thorn, which will spawn 9 Blood Thorns on the field. Each of these structures can be targeted by the items and explode, causing uncontrolled Blood Bursts.
The bottom purple tile has a laser weapon accessory, and the top one a suppressor. The boss holds an elite upgrade kit. If all TASA forces leave alive, a Pill cheat item will be awarded.
- Secrets
-
 Location of Secret Document "Copy of Philip's Work Notes".
 -
Location of Collectible "".

Race Against Time
- Story
After they opened the bridge to cut off their pursuers, Jefuty and Mendo are faced with heavy resistance. Their choice is to manage to break through to the northeast towards the convoy, or steal a snowmobile in a nearby shed.
By managing to break through to the convoy, Jefuty and Mendo ride with the GRF and reach Squad Razor's safehouse on time. When they try to fall back to the second safehouse in the mine, they find it already under the URNC's control and must fight their way to the exit tunnel.
- Units
- Playable
- Mendo
- Jefuty
- Enemies
- Scouts
- Elite Scouts
- Snipers
- Commandos
- Elite Commandos
- Medic
- Machine Gunner
- Commander
- Map
- Exiting the map from the top leads to the level Preemptive Strike (only open before turn 6).
- Exiting the map from the bottom leads to the level Support in the Woods.
The enemy commander has a sight weapon part and the scout at the top some materials to craft EMP Mines.
- Secrets
-
Location of Secret Document "".
-
 Location of Collectible "White Mask".

Secret War
Training Simulation - Flanking will be unlocked at the start of this level.
- Story
Jefuty and Mendo approach the base from the south and use the heavy snow to remain concealed from the enemy patrolling through the forest. Jefuty notices that Mendo seems more reliable this time, but thinks that it might be because of how she perceives him. She theorizes that like memories, emotions could also get stacked and amplified. They find the base mostly empty, the main force having been deployed to ambush the safe houses, and enter the base's prison to find Carl.
- Units
- Playable
- Jefuty
- Mendo
- Enemies
- Scouts
- Elite Scouts
- Snipers
- Commandos
- Elite Commandos
- Commander
- Elite Sniper (if discovered)
- Elite Commander (if discovered)
- Map
- This level leads to The Rescue.
A stealth map. The purple tile at the bottom contains an advanced upgrade blueprint and the one at the top a grip weapon accessory (safe to access in stealth only after the truck has reached the end of the screen).
One of the ruins near the top road is unusual. If you step on it, it will reveal a secret passage to the bottom right of the forest, past the tight patrols of Commandos.
You will need to reach the tile at the back of the truck to get the collectible, which will also net you an achievement and end the level early as Jefuty and Mendo hitch a ride.
- Secrets
-
 Location of Secret Document "Inner Caucasus Theater Unit Deployment – Zone C".
 -
 Location of Collectible "Chocolate Biscuit Snack Toy".


The Rescue
- Story
After entering the prison ward of the base, Mendo's scouting drone locates where Carl is being interrogated. While Jefuty enters the security room and plants a chip to replace the surveillance images, Mendo enters the guard room and secures an access card.
- Normal end
After they leave the area for the secluded training grounds, Carl warns Jevon of the ambush, and he leaves the safe house after setting it to blow up. Carl still needs to carry out Kämpfe's orders to set up an attempt on William's life, which was the reason he let himself be captured to get into the base.
Jefuty shares more information about William and Lige, convincing Carl to include her rescue in his plan by revealing that she's also a fully-immune individual. She plans to create a diversion by making an appearance in the nearby quarantine zone, in order to make the Werewolves guarding Lige, and specifically Sugar, leave the base. After fighting off the Shrikes with the ability of her blood to dissolve Shrike cells, they'd use the underground river as a shortcut to return to the base, then break Lige free of the Progenitor's control and obtain William's location from her. With his location known and his Shrikes bodyguards away, William would be left open to an air strike. Carl calls Squad Razor as support for the battle in the quarantine zone, and agrees with Jefuty's request to look for Lige's neural inhibitor while he scouts the base to plant bombs and search for more intel about William. Mendo takes part in order to take revenge on William who caused the riot that killed in parents. To exploit the window of time after Lige's body has recovered and the moment the Progenitor fully takes over her mind, they set up the bait at 9PM and the capture at midnight.
In the quarantine zone, they find more URNC patrols than Jefuty expected. Mendo placates her, and claims he's confident in her plan due to his feeling of deja vu about the situations Jefuty talked about. At the appointed time, the combined AU forces launch their ambush.
- True End
Jefuty realizes that Beria, and the neural inhibitor, are in the base, and insists that Carl and Mendo help her recover it and Lige. Instead of leaving the area, they sneak to a warehouse on the north side of the base to speak away from the patrols.
- Units
- Playable
- Jefuty
- Mendo
- Carl
- Enemies
- Scouts
- Elite Scouts
- Commandos
- Medics
- Commanders
- Map
- Initially, this level only leads to Enticement (bad ending!).
- After unlocking the Divergence Point, choosing Beria leads to Negotiation.
A two-parts stealth map. The first part takes place in the bottom part of the map, and the characters are transported to the top part for phase 2. Keep in mind that enemies sedated within view of a watchtower will create an alert.
Secret Skip for phase 2: Step on the entrance of the building directly to the left of the starting point, which will make all enemies disappear from the map, leaving only the watchtowers. But if you're going for the top right objective, mind the enemy that will exit a building some turns later.
The purple tile to the left contains a stock weapon accessory (can be picked up on the way after Mendo cleared his first objective) and the one to the right contains a sight weapon accessory.
- Secrets
-
 Location of Secret Document "NSC-68".
 -
 Location of Collectible "".


No Escape
- Story
As Jefuty, Mendo and Carl are escaping from the base in high alert, they are caught by one of the Werewolves lieutenant, Tangieu. At the same time, Orr, one of the prisoners of the base, stage a jailbreak. The AU force cooperates with the soldiers to eliminate Tangieu and his elites, but they are still surrounded when Oleg arrives. Because they refuse to surrender, Carl and Mendo are shot, and Jefuty commits suicide with a grenade before she can be captured.
- Units
- Playable
- Jefuty
- Mendo
- Carl
- Enemies
- Scouts
- Elite Scouts
- Snipers
- Commandos
- Elite Commandos
- Medic
- Elite Medic
- Machine Gunner
- Elite Machine Gunner
- Commander
- Elite Commander
- Simargls
- Porevits
- Marzannas
- Special Forces - Skull
- Special Forces - Cyclone
- Elite Special Forces - Nightmare
- Elite Special Forces - Thunder
- Elite Special Forces - Nightmare boss, Tangieu
- Map
- This level is a bad end. It will yield a Memory Point.
The mission will shift to a boss fight as you near the first objective. You will receive the help of allies in this second phase, and releasing more will not only grant you allies, but also resources.
The Commander on the top right holds a laser weapon accessory, the boss holds a stock weapon accessory, and one of its henchmen an advanced upgrade blueprint.
- Secrets
-
Location of Secret Document "".
-
Location of Collectible "".
Enticement
Carl obtains the weapon Draco at the start of this level.
- Story
The AU troops cause a big ruckus during their battle in the contamination area. The URNC scouts report the presence of Jefuty, whom the Central Army wants captured. Sugar announces her arrival to the scene, unaware that Jefuty and the AU forces can easily escape the URNC's encirclement through the underground river and a Reverse-Collapsed boat, leaving holographic projectors behind to make the URNC believe they're still there. After using the acoustic generators to drown the Werewolves in ELIDs, Jefuty senses the Shrike consciousness trying to locate her, indicating that Lige is coming to her.
- Units
- Playable
- Jefuty
- Mendo
- Carl
- Atena
- Jevon
- Enemies
- Scouts
- Elite Scouts
- Snipers
- Elite Snipers
- Commandos
- Elite Commandos
- Medics
- Elite Medics
- Machine Gunners
- Elite Machiner Gunners
- Commander
- Elite Commander
- Special Forces - Skull
- Elite Special Forces - Nightmare
- Special Forces - Cyclone
- Boss: Elite Special Forces - Cyclone, Xion
- Simargl
- Devana
- AA-03s
- AA-03-B4Ms
- Map
- This level leads to Honeypot.
Straightforward extermination map with a healthy complement of ambushes and some fog of war at the middle point. Jevon and Atena will join the team for the boss fight.
The Commander holds a sight weapon accessory and the boss (who can prevent normal attacks with his skill and has a whopping 249 evade!) a sight weapon accessory.
- Secrets
-
 Location of Secret Document "Experimental Unit "Aurora" Mission Overview".
 -
Location of Collectible "".

Honeypot
The Anti-Stealth Visual Range of the entire team is increased from 2 to 3 and the Training Simulation - Infiltration is unlocked at the start of this mission.
- Story
The AU forces confront Lige and the Mitotic specimens in an ideal location near the base, far enough from the Werewolves and the air strike. During the battle, they witness fallen Shrike mitotic specimens being absorbed by live ones to increase their power. A strong blizzard picks up just as Lige and enemy reinforcements arrive, but the AU forces manage to bring Lige down before running away with her in tow.
After using the mountain terrain to lose their pursuers, Atena, Mendo, Carl and Jevon guard the sisters while Jefuty enters Lige's consciousness, to clear out the Progenitor's influence keeping her mind from the virtual cognition image and awaken her. To her surprise, she finds Mendo in Lige's mind.
- Units
- Playable
- Jefuty
- Mendo
- Carl
- Atena
- Jevon
- Enemies
- Shrike mitotic specimen
- Scouts
- Snipers
- Elite Snipers
- Commandos
- Elite Commandos
- Medics
- Elite Medics
- Commanders
- Machine Gunners
- Elite Machine Gunner
- AA-03s
- Simargls
- Porevit
- Marzannas
- Map
- This level leads to Nightmare.
A big fight against four Shrikes, then the boss Lige. You'll have a chance to replenish your power items before the boss, but a blizzard inflicting bonus damage to units unless they stand on certain tiles (except Jefuty) will also appear at the same time. The amount of turns will be tight, so save up your skills, too.
At the first opportunity, the boss will use its first skill, which lets it dash to the highest-priority target within enemy visual range the next turn, regardless of distance. The boss will always prioritize Jefuty, then other characters, then equipments. The Marzanna drones among enemy ranks will give them a big boost to their field of vision, and finding out exactly what the enemy can see will be difficult due to the snowstorm, but this will give you an opportunity to lure the boss into a trap.
The Commander arriving after defeating the first Shrike holds a scope weapon accessory.
- Secrets
-
Location of Secret Document "".
-
Location of Collectible "".
Nightmare
- Story
In Lige's virtual consciousness, which is represented as a manor garden, Mendo tries to attack the illusions of URNC soldiers representing Lige's fear to stop the encroaching influence of the Shrike Progenitor, but only Lige can attack the phantoms in her own mind. Subconsciously trying to help her sister, Lige turns nearby trees into automated turrets, which Jefuty and Mendo use to defeat the illusions.
The Shrike Consciousness mocks their attempt, proving it can manipulate the garden by twisting its flowers and hedges and changing the statue at the center into William's image. Lige summons items for Jefuty and Mendo to return the garden to its original shape: a new bouquet of flowers to replace the dead flowers, gardening tools to trim the wild hedges, a hammer and chisel to return the statue to its original form, and also a lab name tag with her test subject name on it. The process unlocks memories of Jefuty and Lige's conversation about Epiphyllum, Lige's refusal to join the Shrike Consciousness' cruel plans, and of Philip's rage at William while protecting Lige, who calls him her dad. The Shrike then summons a vision of the tank that destroyed Lige, and with Jefuty's encouragment Lige summons weapons to use against the new enemy.
Lige wakes up after the tank disappears, and the core Shrike Consciousness invading Lige's mind appears from the mansion. The core consciousness is much stronger than the clones she had sent out, and though Lige manages to open the gates of the garden so they can flee, but the core consciousness quickly erodes the entire garden and summons many clones to guard the gates.
If they manage to destroy the core consciousness, Lige properly meets Mendo and finds him a bit familiar before they leave the VCI. When Lige and Jefuty come to in the mountains, Jefuty notes that Lige was somehow comfortable around Mendo, and that he could also somehow enter her VCI. She concludes that the professors must have done something to him that they never revealed to her, but that investigating this topic will be difficult due to Philip's files having been mostly destroyed, and the rest filed away by the AU. The URNC base is destroyed by Carl's air strike, though William was never in it since he had only sent his assistant to repair Lige. With the ELIDs keeping the Werewolves occupied, the AU forces, now with a combat-capable Lige, make way to the evacuation point.
If they attempt to flee, the core consciousness triggers a virtual cognition image fragmentation to destroy them, but Lige manages to trap the the Shrike consciousness deep in the garden, temporarily restoring her VCI to its original state and leaving her exhausted. The AU forces leave the base before it is destroyed by missiles, but Carl found no trace of William's presence and Sugar's ability to track Lige enables the URNC to keep harassing the AU forces on their way to the evacuation point.
- Memory Fragments III and IV
In Lige's memories, the GAVIRUL Project lab is under attack by the URNC. Though she is hit by a bullet, Lige quickly heals and flees with Jefuty, who opens the jammed doors of the security room with her bare hands. They find that the guards have already been killed, but are now armed with weapons and their previous training, and mount up a counterattack. But Shrike mitotic specimens are among the attackers, and the soldiers signal the position of the two sisters, whom they designate as targets Fluorite and Aquamarine. Stunned by a grenade explosion, the sisters are captured by the soldiers, and brought together with Philip and Helena. William reveals himself as the one who ordered the attack, and mockingly thanks Philip for helping him find a new fully-immune individual and a way to control the Shrike. After shooting Philip, William invites Helena, whom he calls his daughter, to come back to him. After the faintest resistance from her, he claims to be sad to see her go but announces that he'll make Jefuty take her place as his daughter, and shoots Helena too.
William then scolds Jefuty for stealing his mitotic specimen and mocks her for giving Lige a name, calling her a "toy". He rips out Lige's neural inhibitor, allowing the murderous voices of the Shrike into her mind again, calling it "replacing her where she belong". He then intends to do the same with Jefuty by resuming experiments on her body, but Jefuty breaks her handcuffs and pulls out a hidden pistol. William claims that the weapon is useless against him, but Jefuty shoots herself in the head instead. In Lige's VCI, a voice coming from the mansion annouces that the world welcomes Jefuty's death for the 7922nd time, but that she moved a step closer in this attempt, and bids her to keep trying.
Lige suddenly awakens screaming in her room, and she shares her dream with Jefuty. Jefuty recognizes it as a memory and not a dream, but they are interrupted by Philip before they can discuss it further. Jefuty reports to Philip the results of their previous experiment on her body, including tearing sensations around the heart and lungs repeated every two hours, weakened limb control, halved muscle power, and pain strong enough to make her pass out three times, an overall rejection rate much lower than during Helena's self-experiment. Philip urges Jefuty not to talk about her own agony so calmly but Jefuty claims that what Helena can do, she must do better. Jefuty enquires about how Philip obtained such accurate drug data after direct trials stopped long ago, and starts scolding Philip for letting Helena run self-experiments again when Helena herself enters the room.
Helena gives Jefuty a Persian chrysantemum she had sent over, and her good health proves that Philip and her found another method of gathering drug data with a supercomputer calculation. According to these data, the serum extracted from Jefuty's blood hardens Shrike cells and their activty starts declining a mere 270 milliseconds after contact, leading to complete death after 135 seconds. Helena estimates that within four months, Jefuty's surgically implanted factor will solidify in her circulation and increase the concentration threefolds as she recovers, giving them a consistent serum sample for follow-up studies and eventually synthetsizing the final serum.
The four months might however not suffice due to escalating political tensions, though the professors refuse to give Jefuty any details. Having understood the conversation by accessing Jefuty's memories, Lige offers to use her own body to gather data from real Shrike cells, but the professors won't take the risk of destroying her completely if the permeability of the serum proves higher than expected. Lige insists that she's ready to take risks to help with he serum, but Jefuty explains that since she's no longer connected to the Progenitor, her mimicry abilities might not be sufficient to rebuild her body if she was reduced to a few cells.
Lige brings up her dream again, and Jefuty explains she had precognitive dreams before, giving her the memory of other versions of herself from the future, which she surmises is a genetic trail of GAVIRUL. Lige argues that they need to finish the serum before William's attack. Jefuty apologizes for having dull emotions and not knowing how to properly express her feelings, and offers Lige a deal that they should give everything they have to protect each other as proof of her sisterly devotion. Lige accepts immediately. Meanwhile, a conversation between Helena and Philip reveals that they used their son Mendo to gauge the success rate of Jefuty's surgery. Mendo's body proved even more adaptable than Jefuty's, with almost no rejection, yielding the extremely accurate data Jefuty found suspicious. Mendo was then immediately returned to Antarctica, and even Kämpfe wasn't informed of the experiment. The professors have planned an evacuation plan with the MID, to be implemented within six months, but Philip worries that the world's situation might backfire on them in the meantime, and Helena that William might make a move against them if he learns of their real progress on anti-Shrike experiments.
After Jefuty transmitted Lige's proposal and feelings to Philip, he agrees to conduct the experiment without informing Helena in a nearly-complete isolation lab, which carries the risk of killing him with Shrike Blood Mist. Cutting her arm with a knife, Jefuty pours a bit of blood on Lige's body, melting her skin and slowing down her usual regeneration speed. The observation proves the simulation right, but Jefuty is unsatisfied with the amount of osmotic damage, and decides to cut her arm deeper to pour more blood on Lige and scale up the test to find out the dose needed to reach toxicity threshold for the Shrike cell population. Lige agrees to continue even though her entire arm falls from her body, and the blood mist threatens to break confinement, forcing Philip to leave and enact strong confinement procedures while Jefuty and Lige continue their scaling experiment alone.
In another timeline, during William's attack, Jefuty continually cuts her body open to counter the Shrikes with her blood, but the density of Shrike mimic cell clusters is higher for Shrike soldiers and the scale of their previous experiment proves insufficient. In the present timeline, Lige points out that the attack had occurred a week earlier than before and insists to push the experiment to a point where they can find a method to use Jefuty's blood to efficiently kill the Shrikes. As the experiment goes on, Jefuty meets Lige in her VCI, which is plunged in darkness. Jefuty is weary that she's not talking to the real Lige at first, but Lige says that they are talking in a space that is "the boundary between life and death", where they can access the total sum of their shared memories. Though Lige asks Jefuty not to fear death as it is not the end for them, Jefuty is frustrated that it comes to her too quickly each time, and she wonders why Lige's presence seems to be the only cure to the loneliness death makes her feel. Lige cryptically answers that Jefuty herself is the best person to soothes her loneliness, and that "when the tide of memories has gathered into a river" and Jefuty's planned end comes, she will understand her words. Until then, they will need to play their roles as sacrifices again and again, until a chosen person comes along. Jefuty resigns to her destiny.
Outside the experiment room, Helena and a security team have deployed low temperature suppressor vaporisators to reduce the toxicity of the blood mist. Helena is furious at Philip and frightened that uncontrolled Shrike mutations might have consumed Jefuty, and rushes into the room with the security team despite the danger. They find that Jefuty has dissolved Lige's body until only her head and a faint consciousness remains. While Helena is horrified that Jefuty could do this to her sister, Jefuty reports that 12 mL of blood can dissolve 4500 grams of Shrike cells, 50 mL will disrupt mimic maintenance in Shrike cell population, and a mitotic specimen will collapse on itself if the blood-serum erodes the connection points of the Shrike's neural network, or failing that stop the specimen from regenerating for about 300 seconds, concluding that 50 mL of blood contained in a bullet will be effective to kill adul-sized Shrikes. Jefuty warns Helena and the staff to leave the room because the mist will reactivate as Lige's body is starting to regenerate, but even Jefuty's fully-immune body itself is at its limit from Blood Mist exposure. The staff drags Helena out of the room while Jefuty dies in the experiment cell. When she awakens at the same time as Lige in the previous loop, Jefuty gives Philip the parameters of the anti-Shrike serum and urges him to prepare the lab for evacuation back to Antarctica.
- Units
- Playable
- Jefuty
- Mendo
- Lige
- Enemies
- Shrike Consciousness
- Scouts (illusion)
- AA-03s (illusion)
- Svarog (Illusion)
- Map
- Exiting the garden leads to Eviction Notice.
- Defeating the Strong Shrike Consciousness leads to Forward Pressure.
Similar level to Blood Horror. A puzzle map fought with unique skills and items. In the third phase, you'll gain a name tag item without any apparent use. In the fourth phase, you can use it on the Shrike to make it vulnerable without having to confront the tank (you could also use it on the Shrike Consciousness during the third phase, but it would be much less useful). If you choose to kill the boss in the last phase, it will come down to the wire. Remember to use the characters' skills, position Lige and other units smartly to use the terrain and prevent the Shrike from instakilling Lige, and exploit Mendo's HP pool.
As in Blood Horror, the Memory Shards will combine into two Memory Fragments key items (not shown on-screen), which are necessary to see the whole post-level story.
- Secrets
-
Location of Secret Document "".
-
 Location of Collectible "Blue Butterfly".

Eviction Notice
Training Simulation - Breakout is unlocked at the start of this level.
- Story
In trying to shake off their Werewolves pursuers, the AU forces make way to Zeuk Town. While they are resting, an attack on Lige's mind annouces the arrival of a big URNC force. Despite Jefuty's encouragements, tyhe Shrike consciousness takes over Lige's mind and she turns into a β Shrike, who revives the corpses of the previous fight to "punish" her sister. Meanwhile, Oleg's forces also arrive in the area, and Carl orders Mendo to flee with Jefuty. Oleg notices their escape and sends Sugar after them. Sugar is delighted that her plan worked.
Mendo and Jefuty pass through the abandoned Damania Town on their way to Squad Razor. Jefuty says that surviving serves no purpose, and that the situation is her fault for not making the right choices and fialing to destroy the Shrikes in Lige's virtual cognition image. She tries to shoot herself, but Mendo stops her, reminding her that the Antarctic Union can still send troops to save Lige as long as this version of Jefuty can survive to help them. Jefuty embraces Mendo to gather her courage, and praises his undying optimism and willmpower. Their rest is interrupted by the arrival or URNC forces led by Sugar.
- Units
- Playable
- Jefuty
- Mendo
- Carl
- Atena
- Jevon
- Lige
- Enemies
- Scouts
- Elite Snipers
- Commandos
- Elite Commandos
- Medics
- Machine Gunners
- Elite Machine Gunner
- Special Forces - Skull
- Elite Special Forces - Nightmare
- Special Forces - Cyclone
- Elite Special Forces - Thunder
- AA-03s
- AA-03-B4M
- Svarogs
- Simargls
- Porevits
- Marzannas
- Filins
- β Shrike
- Oleg
- Map
- This level leads to Dead End.
The same map as Forward Pressure, but with a different (and arguably more difficult) final objective. Save your skills for the second phase, where you'll have very little time to get to the objective before reinforcements and the boss' ability to resurrect dead soldiers make things get out of hands.
The first purple tile on the way contains a sight weapon accessory and the second a compensator.
- Secrets
-
Location of Secret Document "".
-
 Location of Collectible "Cloud Wind Chime".

Dead End
- Story
Jefuty and Mendo are bunkered in the town and cause noticeable damage to the infantry forces assaulting them, until the enemy forces receive the help of Captain Thian, the "Bloody Angel" and her elite medical team. Waves of enemies continue to pour in as dawn breaks. The Antarctican gunship Mustang 6 finally arrives to lay fire support, and Jefuty and Mendo take refuge into Shana Chapel.
Sugar and Lige are waiting for them inside. Sugar had been waiting for the troops to push Mendo and Jefuty inside from the start, finding the dilapidated interior a fitting decor for their deaths. She announces that Oleg killed Carl, Jevon and Atena, and that she fed their bodies to the "rejects" mitotic specimens. Mendo's attempts to neutralize Lige with blood bullets fail and Sugar neutralizes Jefuty, realizing that she managed to finish Philip's research on an anti-Shrike serum. Jefuty realizes that William is the mastermind behind Sugar's actions, and she orders Mendo to have Mustang 6 kill them. Mendo radioes Mustang 6 to bomb the chapel before Lige can kill him, and all present are engulfed in flames.
- Units
- Playable
- Jefuty
- Mendo
- Enemies
- Scouts
- Elite Scouts
- Snipers
- Commandos
- Elite Commandos
- Medics
- Machine Gunners
- Elite Machine Gunners
- Commanders
- Special Forces - Skull
- Special Forces - Cyclone
- Marzanna
- Simargls
- AA-03s
- Elite Medic boss - Thian
- Map
- This level is a bad end. It will yield a Memory Point.
Notice that Thian's team has a Marzanna with them, so laying traps to intercept them on turn one won't work. This boss holds a compensator weapon accessory. A Commander arriving later will hold a pulser weapon accessory (this group also has many medics, making traps much less effective to intercept them).
You'll want to return to this mission after clearing The Final Battle I: the brown house on the bottom left corner of this map will hide a one-time stash of 12 cruise missiles once this item has been unlocked.
- Secrets
-
 Location of Secret Document "Speculation in the Decline of Religions".
 -
 Location of Collectible "Golden Toaster" (craft a Healing Orb while standing on this tile).


Forward Pressure
The Training Simulation - Hold is unlocked at the start of this level.
- Story
In trying to shake off their Werewolves pursuers, the AU forces make way to Zeuk Town. While they are resting, an attack on Lige's mind annouces the arrival of a big URNC forces and they are encircled by Oleg's men. With Jefuty's encouragements, Lige repels the Shrike's attack and the AU forces launch a counter-attack on Oleg. They manage to inflinct a punishing amount of damage to him, but the emergency medical sysstem in his suit grants him inhuman durability, and the AU forces decide to flee into the Tuka Mountains without managing to finish him. Sugar, who was the one who previously attempted to invade Lige's consciousness, arrives shortly after, and Oleg orders her to give chase while he tends to his wounds.
Lige senses Sugar's presence and warns the AU forces of the ambush waiting for them on the way to the evacuation point. Thinking about Sugar's ability to control mitotic specimens and to track Lige's mind, Jefuty concludes that she's actually a special type of Shrike. Carl orders Mendo to find another route, but Sugar has been hearing their conversation and mocks that Jefuty doesn't have enough blood to even harm her. A URNC Battle Fortress then arrives with Kirill onboard He claims that Sugar killed Beria, and that he will kill both Antarcticans, Shrikes and Werewolves. The AU forces' hopes to use the chaos to sneak away are dashed when Kirill starts bombarding the area.
- Units
- Playable
- Jefuty
- Mendo
- Carl
- Jevon
- Atena
- Lige
- Enemies
- Scouts
- Elite Scouts
- Snipers
- Elite Snipers
- Commandos
- Elite Commandos
- Medics
- Elite Medics
- Machine Gunners
- Elite Machine Gunner
- Special Forces - Skull
- Elite Special Forces - Nightmare
- Special Forces - Cyclone
- Elite Special Forces - Thunder
- AA-03s
- AA-03-B4Ms
- Svarogs
- Marzannas
- Filins
- Simargls
- Porevits
- Oleg
- Map
- This level leads to Mutual Destruction.
The same map as Eviction Notice, but with a different final objective. You'll have a chance to replenish power weapons before fighting the boss. Note that the tanks on the corners of the map during boss phase will remain static, but beware of overreaching, as enemy reinforcements will also arrive from the south. The boss is immune to stats alterations and takes reduced damage from AoE attacks, so you'll have to make do with his high evade.
The first Svarog has a stock weapon accessory and the Elite Special Force - Nightmare a pulser weapon accessory. The boss holds an advanced upgrade blueprint.
- Secrets
-
 Location of Secret Document "The Establishment and History of the Rescue Foundation".
 -
Location of Collectible "".

Mutual Destruction
Mendo unlocks the weapon Viper at the start of this level.
- Story
The AU forces ar caught in the crossfire of the URNC's internal fighting in the Tuca Mountains, and Kirill's bombardement has cracked the ground and separated them. They use the many tunnels in the mountain to regroup and manage to take down Sugar and her lieutenants, while the loyal URNC forces eventually take down Kirill's Diberg mobile fortress. Atena is overjoyed to have taken revenge on Sugar, and Jefuty injects her blood into Sugar's neck to ensure she stays down befor the AU forces leave the scene.
However, they don't manage to go far before a heavy Blood Mist appears. Jefuty tranquilizes Lige, thinking she's the source of the mist, but Sugar appears, stronger than ever, revealing that Jefuty's blood has the inverse expected effect on her. Sugar converts Atena, Carl and Jevon in Shrike puppets, takes control over Lige and captures Mendo, who can resists the Blood Mist, into a blood cocoon. Sugar then talks to Jefuty with William's tone, bidding her to come home to him. Jefuty realizes Sugar is a β Shrike, which William has been using to watch her, and commits suicide with a grenade.
- Units
- Playable
- Jefuty
- Mendo
- Carl
- Jevon
- Atena
- Lige
- Enemies
- Scouts
- Elite Scouts
- Snipers
- Elite Snipers
- Commandos
- Elite Commandos
- Machine Gunners
- Elite Machine Gunners
- Devana
- Svarog
- Khors
- Energy Chargers
- Defense Installations
- Medics
- Elite Medic
- Special Forces - Skull
- Special Forces - Cyclone
- Simargls
- Porevits
- Marzannas
- AA-03s
- AA-03-B4Ms
- Diberg
- Elite Special Force - Nightmare boss, Eugene
- Elite Special Force - Thunder boss, Break
- Sugar
- Kirill
- Map
- This level is a bad end. It will yield a Memory Point.
Take a good look at the caves' entrances to know which entrances are connected. The statue at the top of the map hides the collectible, you'll need to turn the symbols so they all point away from the statue, then step on the statue. To access the secret document, you'll need to take the entrance directly under it, then the entrance which looks similar to the one leading right to it.
On turn 2, the mountain itself will gain a life gauge you'll need to keep from reaching 0 by destroying the armored units at the bottom of the map. The more damages it takes, the more walkable tiles will disappear from its edges. The Reverse-Collapse Devices will extend the range of every items to this area, but you can let the third faction deal the killing blow once you've tenderzied the targets enough. The Diberg fortress alone will deal 2000 HP of damage every two turns (and every turn after a certain point), and because it stands out of your range, you'll have to let the other faction take him down (a fully upgraded Melt Bomb to lower the fortress' resistance will do wonders). As it approaches death, the fortress will become immune to damage for one turn.
You won't have a new phase to replenish your power weapons when it comes time to battle Sugar (though the level has many bonus rocket launchers on orange tiles). After Sugar starts moving, she'll summon red and blue holograms each turn. Blue holograms shield her from damage as long as they exist and may hide themselves in the fog. Sugar herself is smart enough to use buildings to regain health and finish her turn out of the range of your unit. Keep your units unaligned so her skill can't hit several of them at a time.
The boss Break holds a sight weapon accessory and Eugene a pulser weapon accessory. Sugar holds an elite upgrade kit.
- Secrets
-
 Location of Secret Document ""Carpenter" Working Group Record 3".
 -
 Location of Collectible "The Hero's Art of War".


Rapid Advance
Lige unlocks the skill Blood Burst Thorn and the trait Extraordinary Antibodies at the start of this level.
- Story
After causing much damage to the URNC forces in the difficult terrain of the abandoned munitions factory, the AU forces travel to Mount Kushtau to join the town of Larne, a safe evacuation point indicated by Beria. They are contacted on Crane's frequency by Kirill, who reports that Beria died so he could escape from the massacre during the fight with Sugar. Following Beria's dying wish, Kirill is also en route to Larne to cover the AU forces' evacuation with his battle fortress.
In Larne, Squad Razor report that the URNC is jamming transmissions and they are unsure if HQ received their message about the change of evacuation point. The battle fortress also arrived, but Kirill is dying from his wounds and asks to see Carl to give him the control key to the battle fortress before he breathes his last. Carl orders to give Kirill a burial, but Lige warns that there are Shrike cells on him and that his body must be burned. This also means that Sugar will be able to track down their position. Since their position is already compromised, Carl orders to increase the transmitter's power so he can speak with Kämpfe, while the rest of the soldiers prepare to fight Sugar and the Werewolves.
- Units
- Playable
- Jefuty
- Mendo
- Carl
- Atena
- Jevon
- Lige
- Enemies
- Scouts
- Elite Scouts
- Snipers
- Elite Snipers
- Commandos
- Elite Commandos
- Medics
- Elite Medics
- Elite Machine Gunners
- Special Forces - Skull
- Elite Special Forces - Nightmare
- Special Forces - Cyclone
- Simargls
- Porevits
- Devana
- AA-03s
- Elite Special Forces - Thunder boss, Aengus
- Map
- This level leads to The Final Battle I.
A character stepping on a control panel near transport tracks can send the transport to any of the track's terminals at the end of the player's turn by spending 6 AP. The transporter will cause 200 flat damage and throw units out of the tracks, so make sure to soften your targets consequently and to keep your own units clear of the tracks, as you can't cancel the travel once you've committed your APs. A single unit can board and exit a transport by spending 2 AP. Each transport has 600 HP, this is important because enemy reinforcements will eventually arrive from the bottom and target the transports.
At the bottom of the map is a lone control panel not connected to any track, when stepping on it, the AAX-05P Constructor mech suit will become available and the corresponding achievement will be unlocked. The suit must be controlled by a playable unit, who will no longer be able to use items or its skills, and will cost 6 AP to enter but 0 AP to leave (the pilot will need to leave the mech to clear the main objective). It has 2000 HP with 60 armor points, an attack of 217, 215 armor piercing and an accuracy of 415, but cannot crit. Its skill will cause 500% of its base damage attack for a measly 3 SP and 1 turn cooldown. It can however only remain active for 10 turns.
It's not a bad idea to keep some skills and power weapons in stock until the last moment, as a boss with 5000 HP and many support units will appear right in front of the objective for the last stretch. The Elite Commando at the bottom right holds a sight weapon accessory, and the boss a laser weapon accessory.
- Secrets
-
 Location of Secret Document ""Thorn Collar" Test Data".
 -
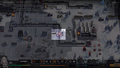 Location of Collectible "Giant Wrench".


Treacherous Road
- Story
As the AU force is progressing through the mountain, they run into difficulties when their equipment fails due to the URNC's new jamming equipment. They push through nevertheless, forcing the URNC to deploy a new AA-03 variant rumored to be unbeatable specially transferred from the Asian Theater to attempt to stop them.
The AU forces travel to Mount Kushtau to join the town of Larne, a safe evacuation point indicated by Beria. They are contacted on Crane's frequency by Kirill, who reports that Beria died so he could escape from the massacre during the fight with Sugar. Following Beria's dying wish, Kirill is also en route to Larne to cover the AU forces' evacuation with his battle fortress.
In Larne, Squad Razor report that the URNC is jamming transmissions and they are unsure if HQ received their message about the change of evacuation point. The battle fortress also arrived, but Kirill is dying from his wounds and asks to see Carl to give him the control key to the battle fortress before he breathes his last. Carl orders to give Kirill a burial, but Lige warns that there are Shrike cells on him and that his body must be burned. This also means that Sugar will be able to track down their position. Since their position is already compromised, Carl orders to increase the transmitter's power so he can speak with Kämpfe, while the rest of the soldiers prepare to fight Sugar and the Werewolves.
- Units
- Playable
- Jefuty
- Mendo
- Carl
- Atena
- Jevon
- Lige
- Enemies
- Scouts
- Elite Scouts
- Snipers
- Elite Snipers
- Commandos
- Elite Commandos
- Medics
- Machine Gunners
- Commander
- Elite Commander
- Special Forces - Skull
- Elite Special Forces - Nightmare
- Special Forces - Cyclone
- Simargls
- Porevits
- Marzannas
- Devanas
- AA-03s
- AA-03-B4W
- Svarogs
- Map
- This level leads to The Final Battle I.
The jammer structures on the way will increase item use cost by 1 AP within 15 tiles, and prevent your equipment from functioning beyond their deployment turn. You should still be deploying and then recalling scanners to better see the many enemies waiting in the fog. Beware as the snow rolls on the map not only hurt all units, but also set off traps.
The elite mech on the bottom left holds an elite upgrade kit and the Commander at the top a sight weapon accessory. The purple tile contains a sight weapon accessory.
- Secrets
-
 Location of Secret Document "Dolls Rights Related Manuscript".
 -
Location of Collectible "".

The Final Battle I
Lige will unlock the skill Boundless Ambush at the start of this level.
- Story
The battle fortress is not yet ready because of a power supply issue when Oleg arrives in an Assault Artillery mech provided by William, the AAX-05S. Even after the metal monster is activated, the enemy reinforcements are too numerous and the AU forces retreat to the town center through the subway. They activate Devana radium concentrators just as Sugar and a contingent of Werewolves pour out of the subway, but Mustang 6 arrives soon enough and bombards the area. With the mobile fortress' self-destruct system primed and 85% of the town subject to follow-up explosions, the enemy forces are utterly wiped out and the TASA forces have suffered no casualties, thanks to the medical functions of the TASA combat suits.
The question remains whether of not this level of damage was enough to take down Sugar. Lige suspects that based on her strong consciousness invasion and tracking abilities, Sugar is not actually a β Shrike, but a Shrike Progenitor, the highest form composed by original Shrike cells. Concentrating the energy of all mitotic specimens, a Progenitor is nigh-invincible and immortal, save for an injection of Jefuty's blood into its core. If a Progenitor is on the field, Jefuty is convinced William must be nearby, even if he concealed himself perfectly up until then.
Carl contacts Colonel Kämpfe, who had not received their new extraction coordinates. Moreover, the URNC has been on maximum alert since 12 hours ago, a massive concentration of their ground forces are approaching the Eastern European theater, and over five fighter jet squadrons are preventing the AU's mothership from keeping air superiority, delaying the evacuation by an hour. Jefuty has a grudge against Kämpfe for not including Lige in his mission orders, but he readily adds her as an evacuation objective when he learns that Lige is also a fully-immune individual. He asks Jefuty for William's location in exchange, but she doesn't know it. Kämpfe surmises that he is in hiding after foreseeing the situation leading to his death, and Carl tasks Mendo with Jefuty and Lige's protection.
Jefuty and Lige feel Sugar's presence again and the AU forces prepare for another fight. Lige tells Jefuty that they are close to "the appointed time" where they can save everyone. Jefuty has no memory of being in Larne in previous timelines, and Lige confirms it is the first time they made it this far. A blood mist is hanging over the ruins of the city as Sugar is gathering all Shrike cells at her disposal. Mendo shares that he has a sense of deja-vu about the scene, and reveals he had a lot of dreams about Jefuty's untimely demises, but also dreams of taking Jefuty back to Antarctica and of a tulip garden. Lige is surprised that Mendo holds this last set of memories, and telepathically informs Jefuty that Mendo is much more special than the version Lige knew. She bids Jefuty to make sure Mendo returns to Antarctica alive, reversing their roles.
- Units
- Playable
- Jefuty
- Mendo
- Carl
- Atena
- Jevon
- Lige
- Jarilos
- Diberg
- Enemies
- Scouts
- Elite Scouts
- Snipers
- Elite Snipers
- Commandos
- Elite Commandos
- Medics
- Elite Medics
- Machine Gunners
- Elite Machine Gunners
- Commanders
- Special Forces - Skull
- Elite Special Forces - Nightmare
- Special Forces - Cyclone
- Elite Special Forces - Thunder
- Simargls
- Porevits
- Marzannas
- Filins
- AA-03s
- AA-03-B4Ms
- Svarogs
- AAX-05S
- Sugar
- Map
- This level leads to The Final Battle II.
The goal of this level is to survive until the start of turn 16. The metro stations can be used to move quickly around the map. Beware of enemies hidden in the fog at the egdes of the map at the start. The Svarog tanks will start moving on turn 2, and the enemy will make a general charge on turn 4.
The boss this time is a monster of a mecha with 12,000 HP, 100 armor, 200 armor-piercing, 190 evade, 160 attack, a range of 5, 20% chance to deal 3× damage and its normal attacks hit twice for all units adjacent to its target. Its skill deals a flat 100 damage on a 3-tiles area up to 6 tiles away with 2 turns cooldown. Fortunately, the Jarilos and Diberg heavy units are on your side, but the Diberg won't be active for 5 turns, and Atena also won't be available during that time. The biggest threats against these allies are other mech units (especially the boss whose skill is effective against the Diberg's force field) and Machine Gunners, they cannot be repaired and expend their APs fast.
On turn 8, many enemy reinforcements will arrive and you will be prompted to retreat to the lower part of the map through the tunnels. More grenades and rocket launchers are waiting for you there, and three allied Devanas. Don't loiter next to the left and right metro exits as many Werewolves and Sugar will pour out a turn later, but you'll also get five cruise missiles, the most powerful item in the game. Use barriers and the Jarilo's incendiary missiles to hold out the last few turns.
The purple tile next to Mendo's starting position is a material to craft a heavy turret, and the one next to Jefuty a cheat item. The right Svarog tank holds a suppressor weapon accessory, and a Filins hidden in the fog at the left border of the level holds an elite upgrade kit. A Svarog reinforcement will also hold a stock weapon accessory, you'll have a chance to take it down with the Diberg.
- Secrets
-
 Location of Secret Document "Razor Surveillance Report: Subject Information".
 -
Location of Collectible "".

The Final Battle II
Mendo unlocks the skill Harmonic Resonance and the trait Soul Resonance, and Jevon's Raging Flame skill becomes a special skill at the start of this level.
The Secret File "Codename "Operation Bakery" Operation Report" is unlocked at the end of this mission.
- Story
As the AU troops are about to plant traps in the city, Sugar appears from under the ground in a new form. Giant hands made of blood sprout from the ground, and the area is locked by a blood wall. After surviving the Shrike onslaught for some time, Sergei and the rest of the TASA team arrive with a special flamethrower and burn down the Shrike wall. Jefuty and Lige try to run away with Mendo, but he insists on staying behind to fight back the Shrikes.
Jefuty and Lige reach the extraction point, but are trapped by the infected Carl, Jevon and Atena. Mendo arrives to help them, but Sugar also arrives to attempts to recapture Lige, her "child". Mendo interposes and is ran through by Sugar's arm, but Sugar is weakened by his blood. Mendo tells Jefuty not to give up when she's finally at the end of her journey, and jumps with Sugar down the nearby cliff. Jefuty and Lige are evacuated by the AU transport, but Jefuty cannot accept that all of her allies had to sacrifice themselves in the end. Lige also confirms that they have "reached the agreed-upon moment", but not their destiny yet, because carrying out their agreement without Mendo alive would make the future meaningless. Lige bids Jefuty to try to save everyone again, and when she does she 0will tell Jefuty "the whole truth".
- Units
- Playable
- Jefuty
- Mendo
- Carl
- Atena
- Jevon
- Lige
- Enemies
- Scouts (Shrike)
- Elite Scouts (Shrike)
- Snipers (Shrike)
- Elite Snipers (Shrike)
- Commandos (Shrike)
- Elite Commandos (Shrike)
- Machine Gunner (Shrike)
- Special Forces - Skull (Shrike)
- Special Forces - Cyclone (Shrike)
- Blood Palm
- Blood Fruit
- Sugar Σ
- Map
- At long last, the true end of Chapter 4. After clearing this level, 2092R mode will be accessible, but you will need to find all the Secret Documents to access Chapter 5 (3 in Chapter 1, 4 in Chapter 2, 6 in Chapter 3 and 24 in Chapter 4).
You might need to go back in the timeline and clear unfinished missions to gather the items and enhancements needed. Don't forget to equip Mendo and Jefuty's special skills during the preparation phase. The priority is to destroy some Blood Palms to reduce the amount of enemies spawning in and to prevent them from turning into Shrike mitotic specimens. This can be done with weapons ignoring armor like rocket launchers or cruise missiles (see Dead End), preferably at maximum tech level. Move as fast as possible towards the bottom right, where the final mission objective is.
In this level, Carl, Jevon and Atena are at risk of being turned into enemy units if they reach 0 HP while under the Blood Erosion effect, which is caused by the following:
- Boss' normal attacks
- Hit by blood thorns generated by the boss' second skill
- Contact with a tile with Blood Mist. Blood Mist will be generated on a certain amount of tiles by the following:
- Death of any enemy, including Blood Cocoons, unless they were hit by a Blood Bullet
- Location where the boss used its first skill
- Breaking all four shields on the boss
Blood Mist and its effects can be countered by Mendo's hidden skill, and Jefuty's second hidden skill generates Blood Bullets and damages Shrike units. Both skills cost 50% of their HP.
The boss has 41,000 HP plus four shields each absorbing one attack and all restored at the end of the turn (creating a 2-tiles radius Blood Mist when all removed), 516 accuracy and 178 evade. It can only attack adjacent tiles with normal attacks, but attacks twice each time while also applying Blood Erosion. The boss will become mobile on turn 2. Its mobility is enhanced by its first skill, which lets it move up to 8 tiles away, and deal increasing amounts of damage for each shield still active in a three-tiles radius while also creating Blood Mist. The second skill is the familiar x-pattern attack creating blood thorns (as before, beware of explosion chains).
A trait will also cause a random player unit to be enclosed in a blood cocoon at the end of the player's turn, the cocoon must be defeated to free the unit (as mentioned, using a Blood Bullet is best). Another trait will increase player units attack while reducing their accuracy and evasion at the end of each turn, and a third one causes 4 Blood Fruits to hatch each turn (not necessarily around the same Blood Palm).
Finally, the Isomeric Lifeform trait prevents the boss' HP from dropping below 20%.
When ally units are turned into Shrikes, they inherit the same properties as in Chapter 3 Act 8 and will create crimson blisters and blue blisters on death (but you don't want that to happen to get S-rank). These Shrike versions have the following properties:
- When Atena is turned, she says that's she's finally free and will meet her sister Eleanor again. She retains her OSK and Electromagnetic Shield Bash skill.
- When Carl is turned, he says he at least died on the battlefield but laments that he couldn't drink wine at the end. He retains his AT-77U and Special Guidance skill.
- When Jevon is turned, he laments that he fell before the mission was over. He retains his Orca and Grenade Feast skill.
The purple tile on the left contains a hilt weapon accessory, the one near the top an oiil weapon accessory, the one in the center an elite upgrade kit.
- Secrets
-
 Location of Secret Document "Photo of William and the Philip Couple".
 -
Location of Collectible "".

Midnight Stratagem
Jefuty will obtain the hidden skill Burning Blood at the start of this level.
- Story
Mendo has set traps around Lake Belo to neutralize the mitotic specimens and Lige as they approach. Using resonant icebreakers to silently break the ice on the lake, the AU forces control the movements of the Shrikes by forcing them to make detours. However, the trap's dosage is too low and does not completely knock Lige out. Jefuty shoots her in the leg, revealing her position but finally putting the neurla inhibitor on her Lige's head. Jefuty, Carl and Mendo, carrying the wounded Lige, run away from the URNC troops and mitotic specimens trying to destroy the neural inhibitor.
In the AU transport, Jefuty explains the situation to Lige. The two sisters can feel the β Shrike is still after them and will try to stop them from leaving, but the AU forces plan to use an abandoned URNC munitions factory to trap their pursuers.
- Units
- Playable
- Jefuty
- Mendo
- Carl
- Enemies
- Scouts
- Snipers
- Elite Snipers
- Commandos
- Elite Commandos
- Special Forces - Skull
- Elite Special Forces - Nightmare
- Special Forces - Cyclone
- AA-03s
- AA-03-B4Ms
- Shirke mitotic specimen
- Map
- This level leads to Rapid Advance
First phase is a stealth map where you must lead enemies into preset traps, can also be played as a battle map (or should, given the atrocious stealth gimmick). There are no special mechanics at play here: the traps are one-use only, other enemies than your targets can fall into your traps, and your targets can be awakened by other enemies like normal units. There are underground passages to teleport around the map, but also a lot of enemies hiding in concealed tiles.
Second phase is a 2-turns defense phase, with an opportunity to replenish items. Plugging the holes in the walls of the defense area with barriers and breaking the ice on the nearby water to interdict passage will be enough to slow down the impending enemies, no need to spend more resources.
The purple tile at the bottom left is a stock weapon accessory, the one at bottom center an advanced upgrade blueprint, and the one on the lake a sight weapon accessory.
- Secrets
-
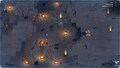 Location of Secret Document "Cp57 Experiment Records".
 -
 Location of Collectible "Ship in a Bottle".


Negotiation
Dialog-only mission. Successfully completing the negotiation ("inhibitor", then "tried to use it to kill", then "victim", then "not a Shrike cell", then "Blood Bullets", then "Sugar") leads to Midnight Strategem (good ending), otherwise go to No Escape (bad ending).
The Secret File "Warszawa Incident Photographic Records" will be obtained at the end of this level.
- Story
Mendo, Jefuty and Carl have reached the warehouse to discuss without being found. After they warn the TASA team about the danger to their mine safehouse, they discuss how to rescue Lige. Jefuty asks Carl to have MID review their files on Beria and Kirill, and arrange a negotiation with Beria on the base, hoping to negotiate for the neural inhibitor. MID learns that Beria is Crane's real identity, and that him and Kirill were involved in the Warszawa Incident, where the city of Warszawa "burned for three days and nights". Carl explains that the incident was due to a Shrike cells leak, leading the URNC to bomb the city before suppressing the truth about what happened.
Carl and Jefuty assume that Beria and Kirill have a deep hatred for Shrikes, and seized the neural inhibitor as part of a plot against Lige. Jefuty also surmises that Beria might assume she's a Shrike too, and used his identity as Crane to ensure he'd personally enact revenge without the rest of the URNC military interfering. Jefuty suggests reveal to Beria the existence of a common enemy: Sugar, who is a β Shrike able to manipulate mitotic specimens, and is under William's orders. She asks Carl to hack into the base's security data to gather a specific piece of footage from the lab proving Sugar's nature.
Using Crane's contact, Jefuty arranges an encounter with Beria, with Mendo ensuring from the base's surveillance room that they meeting remains private. Jefuty asks for the neural inhibitor, but Beria plays dumb, saying that he could have made good money by capturing Jefuty, as both the URNC and the AU have a prize on her head. Jefuty knows that Beria's only goal was to kill her and Lige due to his hatred of Shrikes after his parents, wife and two children died at Warszawa. While Beria's file contains no hint about this, Kirill's does, as it mentions that he survived Warszawa and saved another man named Lukasz Sadr, who later disappeared. Beria caves in and admits his real identity when Carl attempts to show him a photo of his late family. Carl then proves that Jefuty is not a Shrike by pointing out that the Operation Bakery would be much too underprepared to handle Jefuty if she was one, and Jefuty adds that William wouldn't be trying to capture her alive if he could capture her brutally like he did with Lige. Beria claims that Jefuty is still one of William's tools to "destroy the world", to which Jefuty responds that her capture by William is what will destroy the world because she is "the Shrikes' natural biological nemesis".
Jefuty offers to exchange the neural inhibitor against the means to fight William and the Shrikes: her blood bullets. Beria is skeptical, claiming that incendiary weapons are sufficient, but Jefuty explains that such methods only work against mitotic specimens who are just walking corpses. She reveals that the Warszawa Incident was caused by β Shrikes whose replication power is much greater than normal Shrike cells. Because β Shrikes are the backbone of the Shrike system, destroying one would remotely damage the Shrike progenitor controlling the entire concsiousness command system from William's main lab. Jefuty then reveals that Sugar is the local β Shrike, using the footage as proof. In the film, Sugar cuts off one of her arms and integrates it into Lige to repair her. Carl argues that Jefuty and Lige must never fall into William's hands to stop William's secret plans. Beria finally agrees to the deal and gives the Antarcticans the location of the inhibitor, as well as the promise not to interfere in their escape from the base.
Jefuty is impressed by Beria's apparent lack of fear of β Shrikes, and he explains that his vengeance trumps any other feeling. She also notices that like her, he went to extreme measures for the sake of his family. She warns him that Lige must be separated from Sugar if they want a chance to destroy her. To do this, they need to lure Sugar to the contamination zone and lock her in a fight against ELIDs before midnight, which is when Lige's repairs will be finished. They would then draw Lige away separately in order to put the neural inhibitor on her head. The Epiphyllum field is a perfect area to trap Sugar, as the strong Collapse radiation will silicify her cells and greatly slow her regeneration, giving Beria the opportunity to kill her with the blood bullets. Beria agrees to take part in the plan.
Carl offers Beria to join the AU after the operation is over to continue his quest to destroy the Shrikes, but Beria rejects the proposal, not trusting the Antarctic's ability to survive if they harbor inhuman monsters like Jefuty. Later that night, just before midnight, the AU forces wait near Lake Belo for Beria's distraction to take place. Mendo is worried about relying on the colonel, but Carl assures him that he's been working with Beria long enough to know he won't betray tham at this point. A dying Beria calls them to signal that he's successfully trapped Sugar with the ELIDs.
- Bad End
If the AU force fails to convince Beria, he starts to leave and draws a gun on Jefuty when she tries to subdue him. Beria sounds the alarm and the AU team must run away without Lige or the neural inhibitor.
Confrontation
Dialog-only mission. Successfully completing the negotiation ("inhibitor", then "tried to use it to kill", then "victim", then "not a Shrike cell", then "Blood Bullets", then "Sugar") leads to Lone Infiltrator (good ending), otherwise go to Caged Bird (bad ending).
- Story
After Carl, Jefuty and Mendo have reached the warehouse, and with Atena listening on the raido from the surveillance room, Jefuty explains she is now certain Beria is in possession of the neural inhibitor based on what MID found about his relation to Shrike. She also reveals his identity as Crane, MID's informant, despite being the commander-in-chief of the Inner Caucasus Military District. From this position, he both helped the AU forces escape capture, but also arranged the ambush on Squad Fox, as part of his plan to kill Lige and Jefuty himself. MID found that Beria is connected to the Warszawa Incident, a highly classified event that has been hushed by the URNC. Carl reveals Warszawa suffered a Shrike cells leak, which led to the URNC levelling the city to contain it.
To convince Beria to cooperate, Jefuty asks Atena to steal a piece of security footage from the base's lab revealing Sugar's true nature as a β Shrike, capable of controlling mitotic specimens and answering directly to William. Atena finds footage of Sugar repairing a mitotic specimen by merging her arm into her body, surprising Atena who had no idea about Sugar's true nature. Jefuty calls "Crane" and exposes his identity, convincing Beria to meet them in the warehouse. Jefuty confronts Beria about his possession of the neural inhibitor, his hate of Shrikes, and his plans to kill Jefuty and Lige. Beria feigns ignorance, so Carl and Jefuty expose how he lost his family in the Warszawa Incident. Carl praises Beria's job in burying his trace, but MID found his real identity through his adjutant Kirill, a known Warszawa survivor. Kirill saved a man named Lukasz Sadr during the incident, who disappeared after this, and Beria admits his true identity when Carl attempts to show him a photo of his dead family.
Jefuty explains the purpose of the neural inhibitor and that only Lige is a Shrike. Carl confirms it by pointing out that Operation Bakery would be sorely underquipped to handle Jefuty if she was a Shrike. Beria still calls Jefuty one of William's tools for "destroying the world", but Jefuty counters that her capture is how the world would be destroyed since only her body can counter Shrike cells. Jefuty offers Beria to exchange the neural inhibitor against the weapon to fight William and the Shrikes: her Blood Bullets. She offers the state of the mitotic specimens in the lab as proof of her blood's efficacy. Beria argues that incendiary weapons are already enough to destroy Shrikes, but Jefuty reveals that they are not sufficient against β Shrikes, the core nodes of the Shrike's consciousness command system, able to divide infinitely and the reasons for the Warszawa Incident.
Carl then show Beria the footage found by Atena to prove that Sugar is a β Shrike, angering Beria who thought the URNC had learned their lesson to not use Shrikes as weapons after Warszawa. Beria accepts the deal, promises not to stop the AU force as they leave the base with Lige and points them towards a safer extraction point. He also warns that the URNC army has put the region in high alert and that a large force is approaching. He rejects Jefuty's offer to help in the fight against Sugar, and mocks the Antarctic Union for accepting to shelter Jefuty, who he believes is simply another kind of monster like the Shrike. Some time after 5AM, Mendo and Jefuty approach the base's lab while Carl recovers the neural inhibitor.
- Bad End
If the AU force fails to convince Beria, he starts to leave and draws a gun on Jefuty when she tries to subdue him. Beria sounds the alarm, but Jefuty inists to enter the lab and take Lige.
| Previous Chapter: Chapter 3 | Next Chapter: Chapter 5 |
|---|