Polarized Light/Chapter 1: Difference between revisions
Jump to navigation
Jump to search

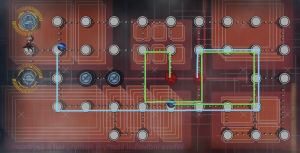
File:Polarized Light E1-1 Overview.jpgMap Overview
File:Polarized Light E1 EX2 Overview.jpgMap Overview
Added Chapter banner on the right |
Added E1-EX2 and some more info |
||
| Line 16: | Line 16: | ||
|- | |- | ||
|} | |} | ||
{{WIP}} | |||
{{clr}} | {{clr}} | ||
== E1-1 "<map name missing>" == | == E1-1 "<map name missing>" == | ||
| Line 34: | Line 35: | ||
This map also introduces the new stationary enemy [[Insert Enemy Name Here]]. | This map also introduces the new stationary enemy [[Insert Enemy Name Here]]. | ||
}} | |||
== E1-EX1 "<map name missing>" == | |||
[[File:Polarized_Light_E1_EX1_Hint.jpg|400px]] | |||
== E1-EX2 "<map name missing>" == | |||
{{EventMapGuide | |||
|event={{ROOTPAGENAMEE}} | |||
|mapid=E1-EX2 | |||
|cerecommended=1000 | |||
|overviewimage=Polarized_Light_E1_EX2_Overview.jpg | |||
|mapobjectives=* Objective 1: ''EMP 1'' has to be placed on the east (right) radar. | |||
* Objective 2: ''EMP 2'' has to be placed on the west (left) radar. | |||
* (Can someone translate the real objectives for me?) | |||
|srankobjectives=* Defeat one enemy and fulfil the objectives within four turns. | |||
|clearrewards={{Icon|fcc}} x2 | |||
|droptype=[[T-Doll Index|T-Dolls]] | |||
|limiteddrops={{doll name|Desert Eagle|HG|5}}, {{doll name|Kord|MG|5}}, {{doll name|INSAS|AR|3}}, {{doll name|Zas M76|RF|3}} | |||
|guide=* There is only one enemy at the beginning which needs to be killed. It has roughly the same strength as the enemies in E1-EX1. | |||
* The second echelon may be a [[Dummy echelon|dummy echelon]]. | |||
* The difficult part is to switch both EMP's position which is only possible in the south-east (bottom-right) corner. | |||
The general plan is as follows:<br/> | |||
[[File:Polarized_Light_E1_EX2_General_Plan.jpg|300px]] | |||
To achieve this, the bombs need to be "switched" in the south-east (bottom-right) corner. You have to leave enough room to go around the bombs.<br/> | |||
[[File:Polarized_Light_E1_EX2_Emp_Switch.jpg|300px]] | |||
}} | }} | ||
Revision as of 04:23, 18 January 2020

Chapter 1 handles the introduction to the event's main story.
Below is the node information for this chapter
| Node Count | 18 |
|---|---|
| Battle Nodes | 8 (2 EX) |
| Story Nodes | 10 |
E1-1 "<map name missing>"
| Battle Type | Day Battle |
|---|---|
| Recommended CE | 1000 |
| Map Objectives | Base objectives:
S-Rank objectives:
|
| Clear Rewards | |
| Drop Types | T-Dolls |
| Limited Drops | None |
| Buffed T-dolls |
- Spawn an echelon on each dropzone.
- Move both echelons one node south (down) and one to the east (right). End the first turn.
- Move and defeat the enemy according to the enemy movement.
This map also introduces the new stationary enemy Insert Enemy Name Here.
E1-EX1 "<map name missing>"
E1-EX2 "<map name missing>"
| Battle Type | Day Battle |
|---|---|
| Recommended CE | 1000 |
| Map Objectives | Base objectives:
S-Rank objectives:
|
| Clear Rewards | |
| Drop Types | T-Dolls |
| Limited Drops | HG Desert EagleDesert EagleDesert Eagle, MG KordKordKord, AR INSASINSASINSAS, RF Zas M76Zas M76Zas M76 |
| Buffed T-dolls |
- There is only one enemy at the beginning which needs to be killed. It has roughly the same strength as the enemies in E1-EX1.
- The second echelon may be a dummy echelon.
- The difficult part is to switch both EMP's position which is only possible in the south-east (bottom-right) corner.
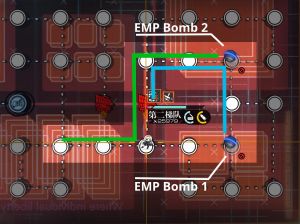
The general plan is as follows:

To achieve this, the bombs need to be "switched" in the south-east (bottom-right) corner. You have to leave enough room to go around the bombs.


